
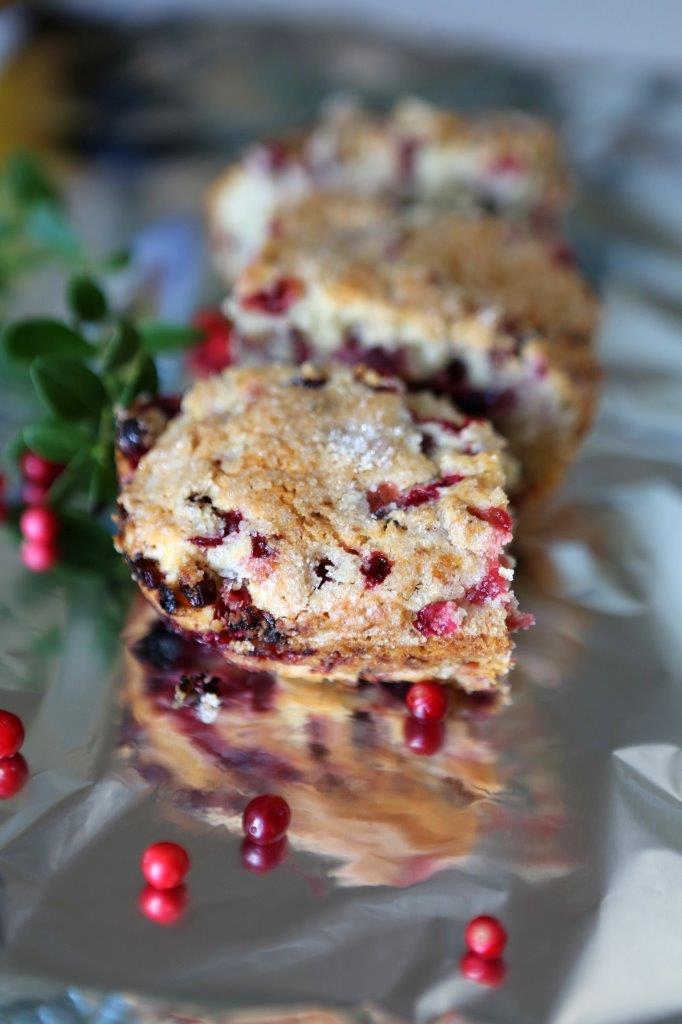
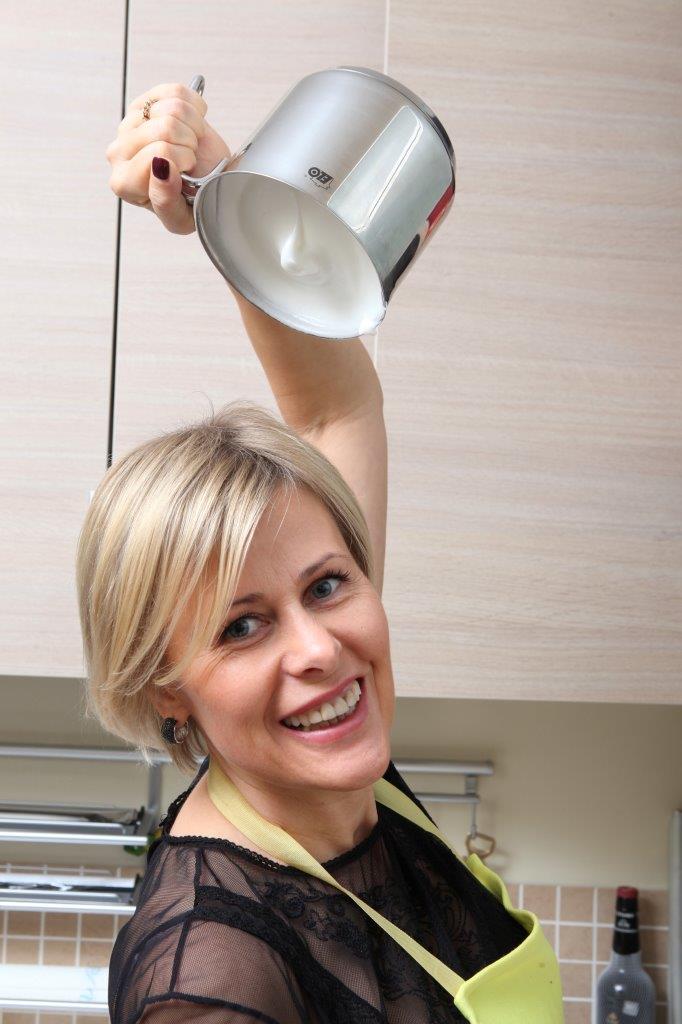
Cranberry upside down cake
This is a very perfect cake for the fall season- sweet and sour at the same time. It is very juicy and with the wholegrain flour and buttermilk added can be nice and filling.
For the base
70 g butter
120 g light brown sugar
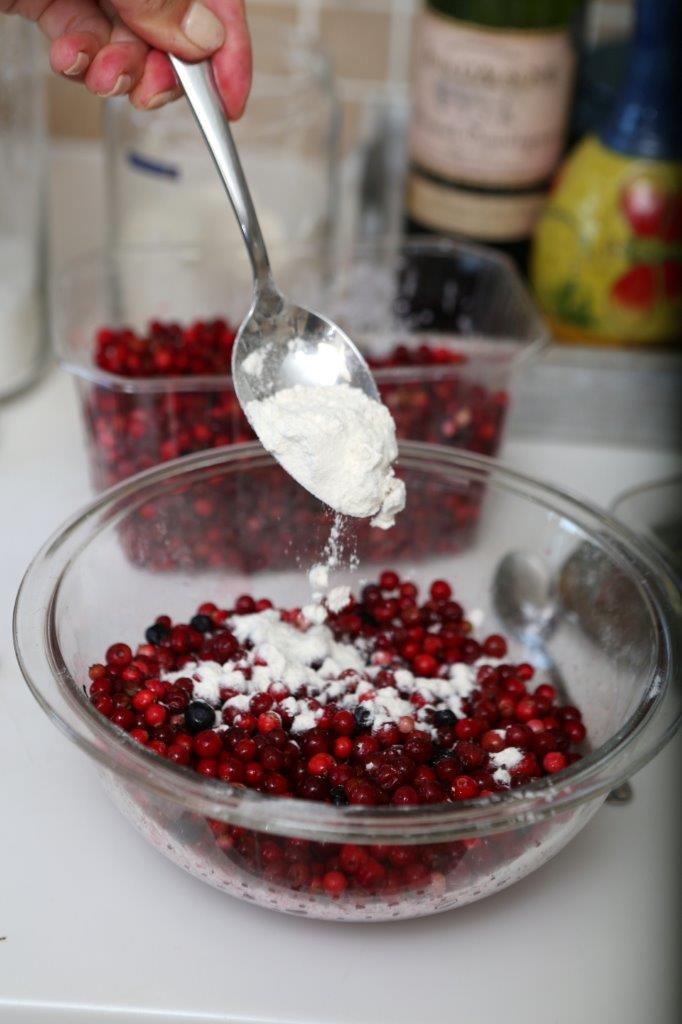
200 g cranberries
For the batter
120 g butter, room temp
150 g sugar
2 eggs, room temp
150 ml buttermilk or kefir
1 tsp vanilla paste or vanilla sugar
200 g all purpose flour, 1/3 can be substituted with wholegrain
2 tsp baking powder
Pinch of salt
1. Preheat the oven to 180 degrees (celsius).
Make the base.
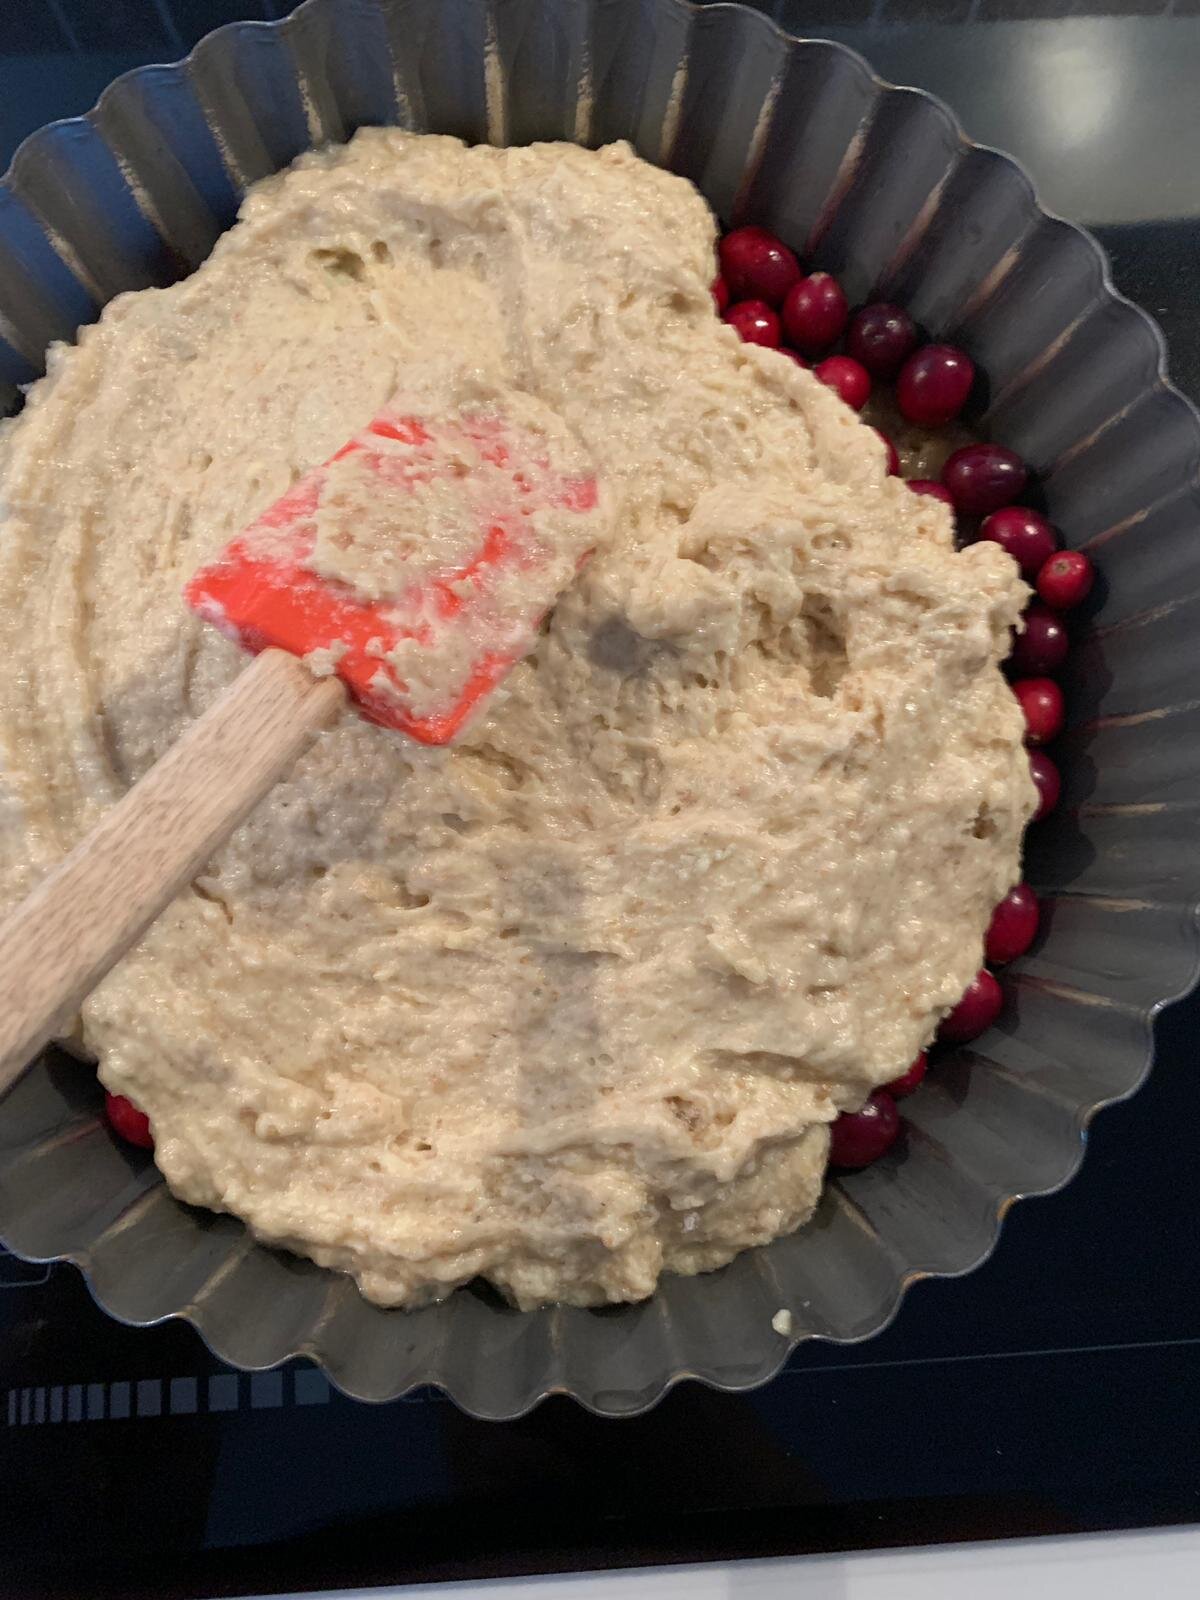
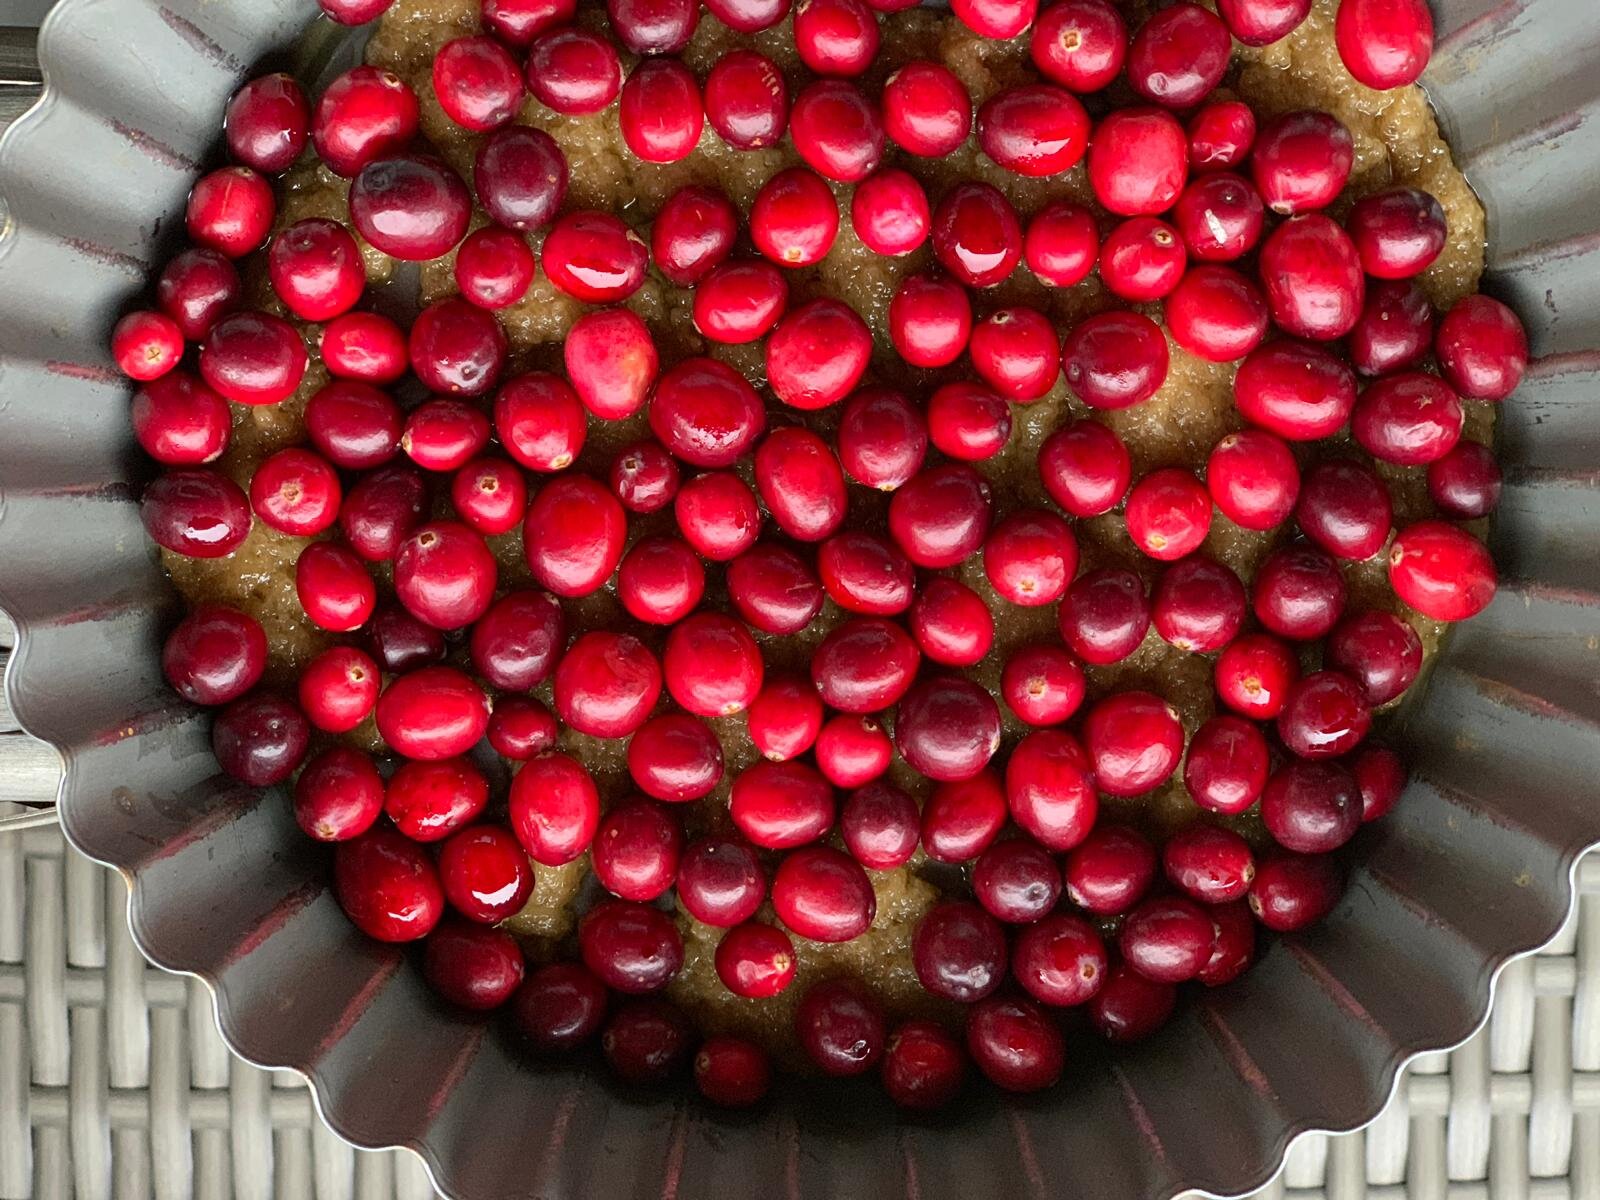
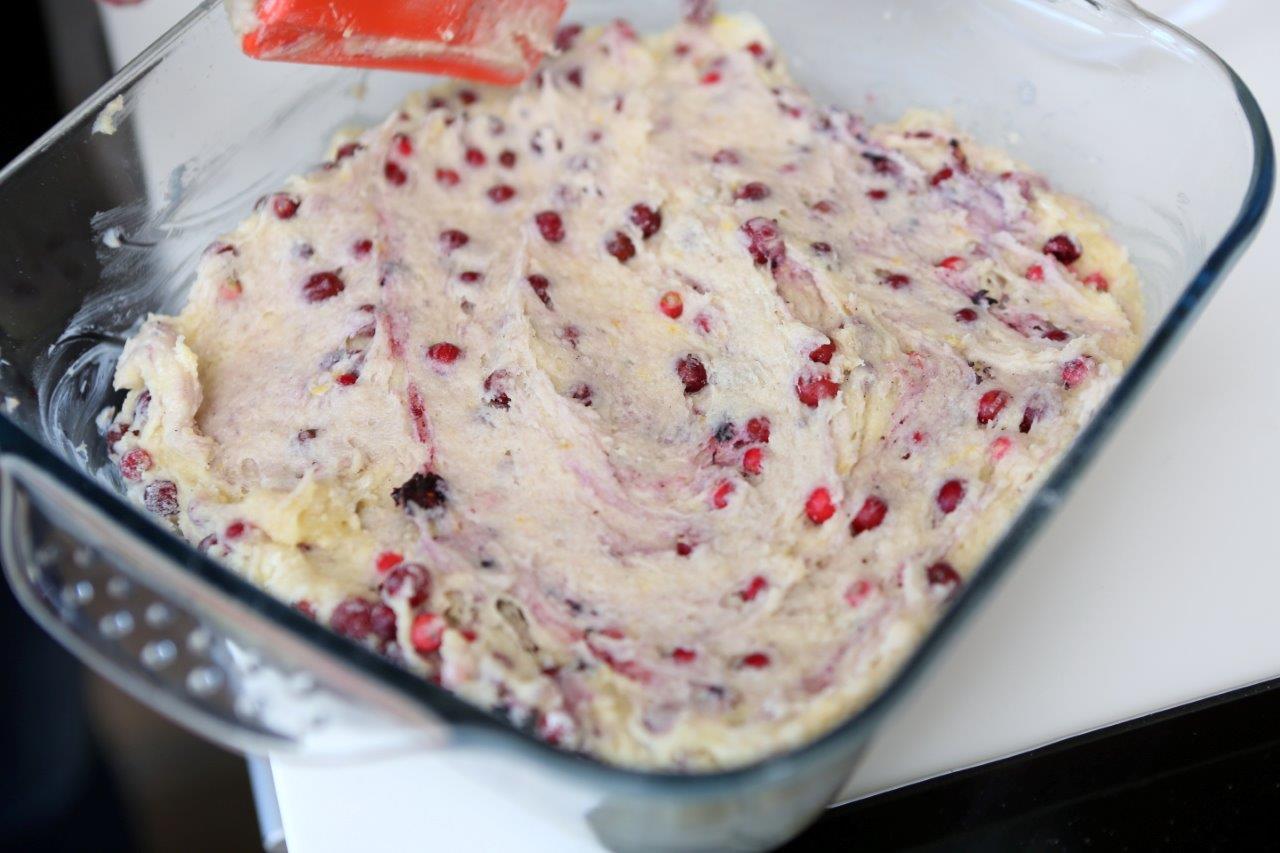
2. Melt the sugar and butter for the base in a small pot. When it has melted, stir and leave for a few minutes on the heat for the sugar to start to caramelize. Then pour in the bottom of ta greased cake pan (22-24 cm).
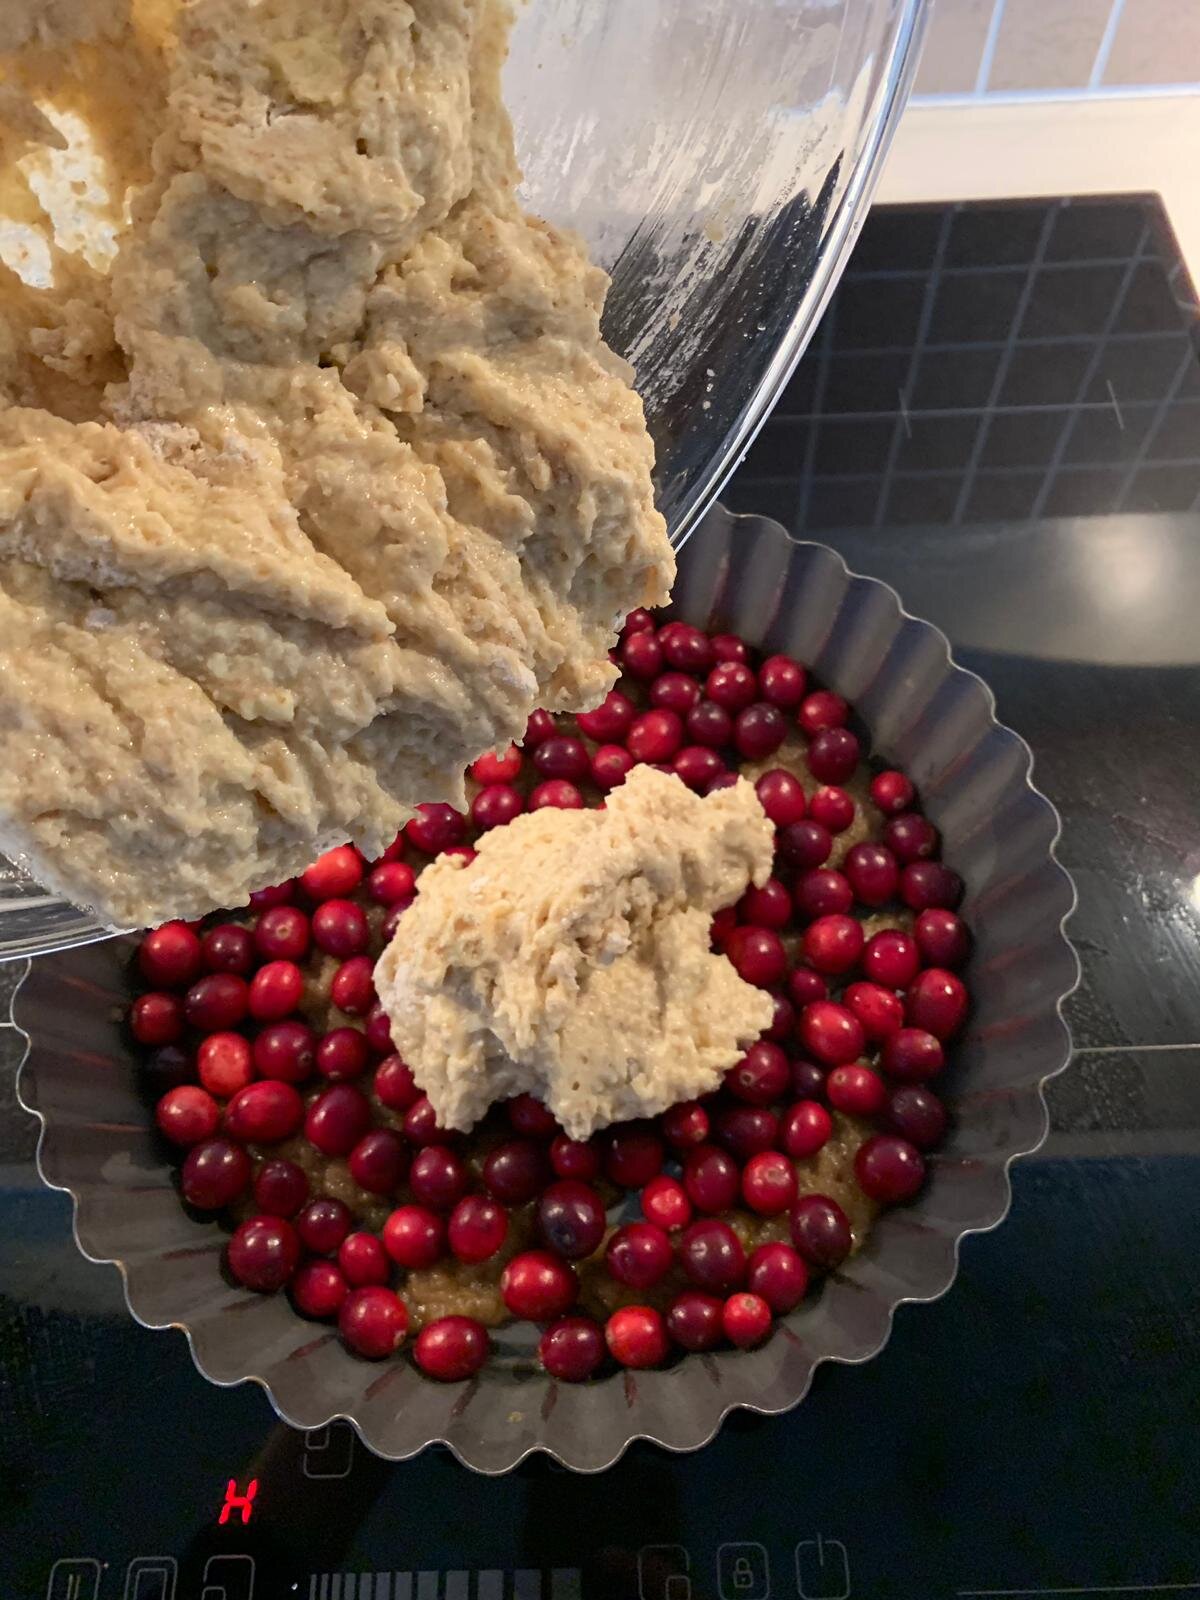
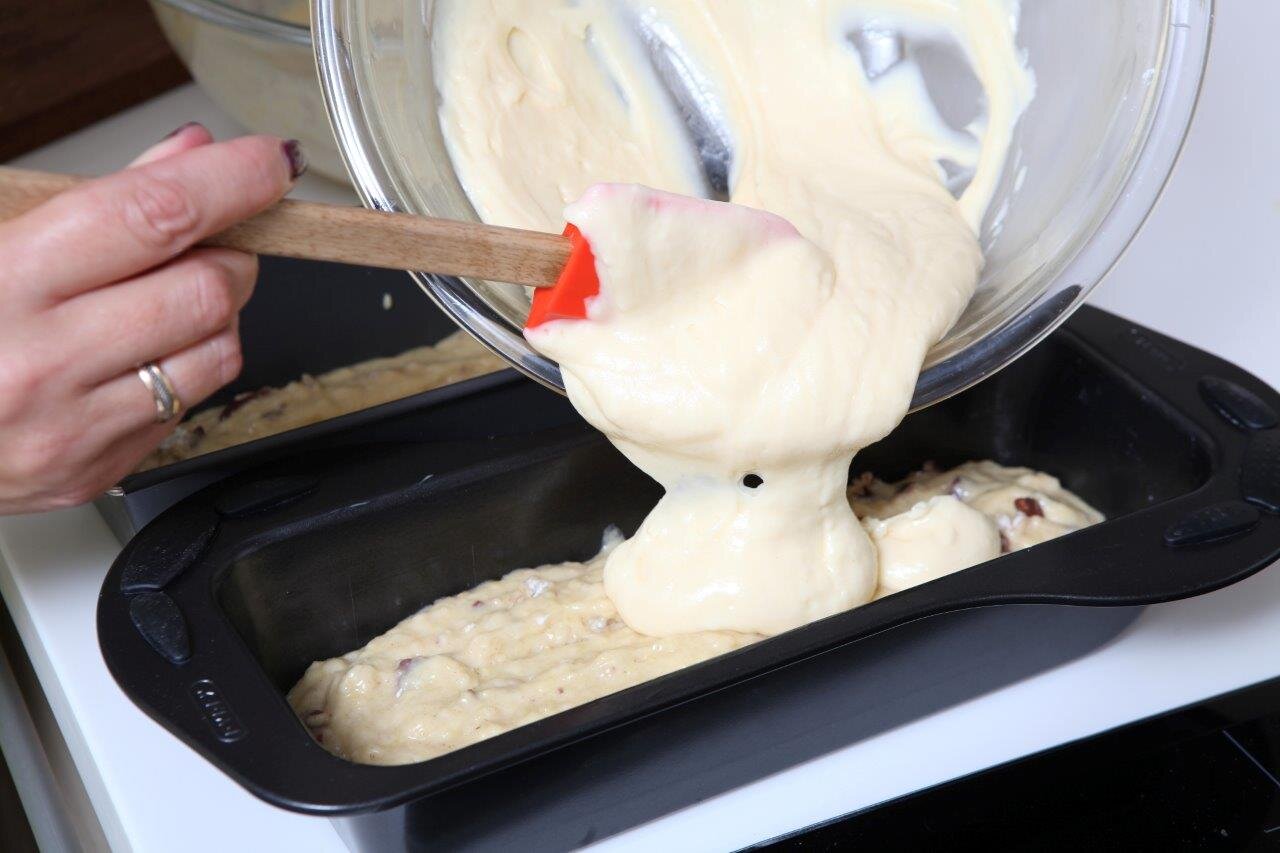
3. Sprinkle in the washed and dried off cranberries, press them down a little.
Make the batter.
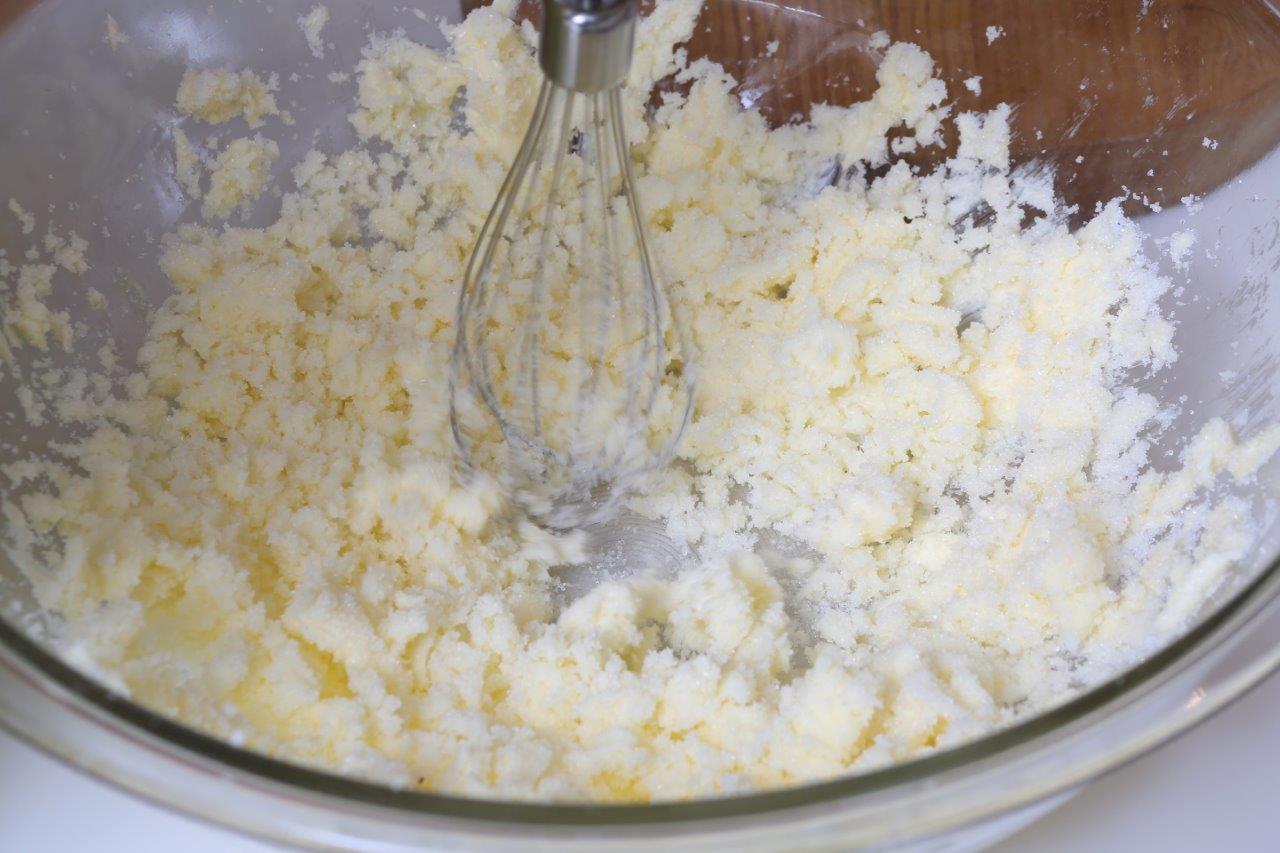
4. In a medium bowl beat the eggs with half of the sugar until light and larger in volume. Mix in the vanilla.
5. In another bowl beat the soft butter with the rest of the sugar until fluffy.
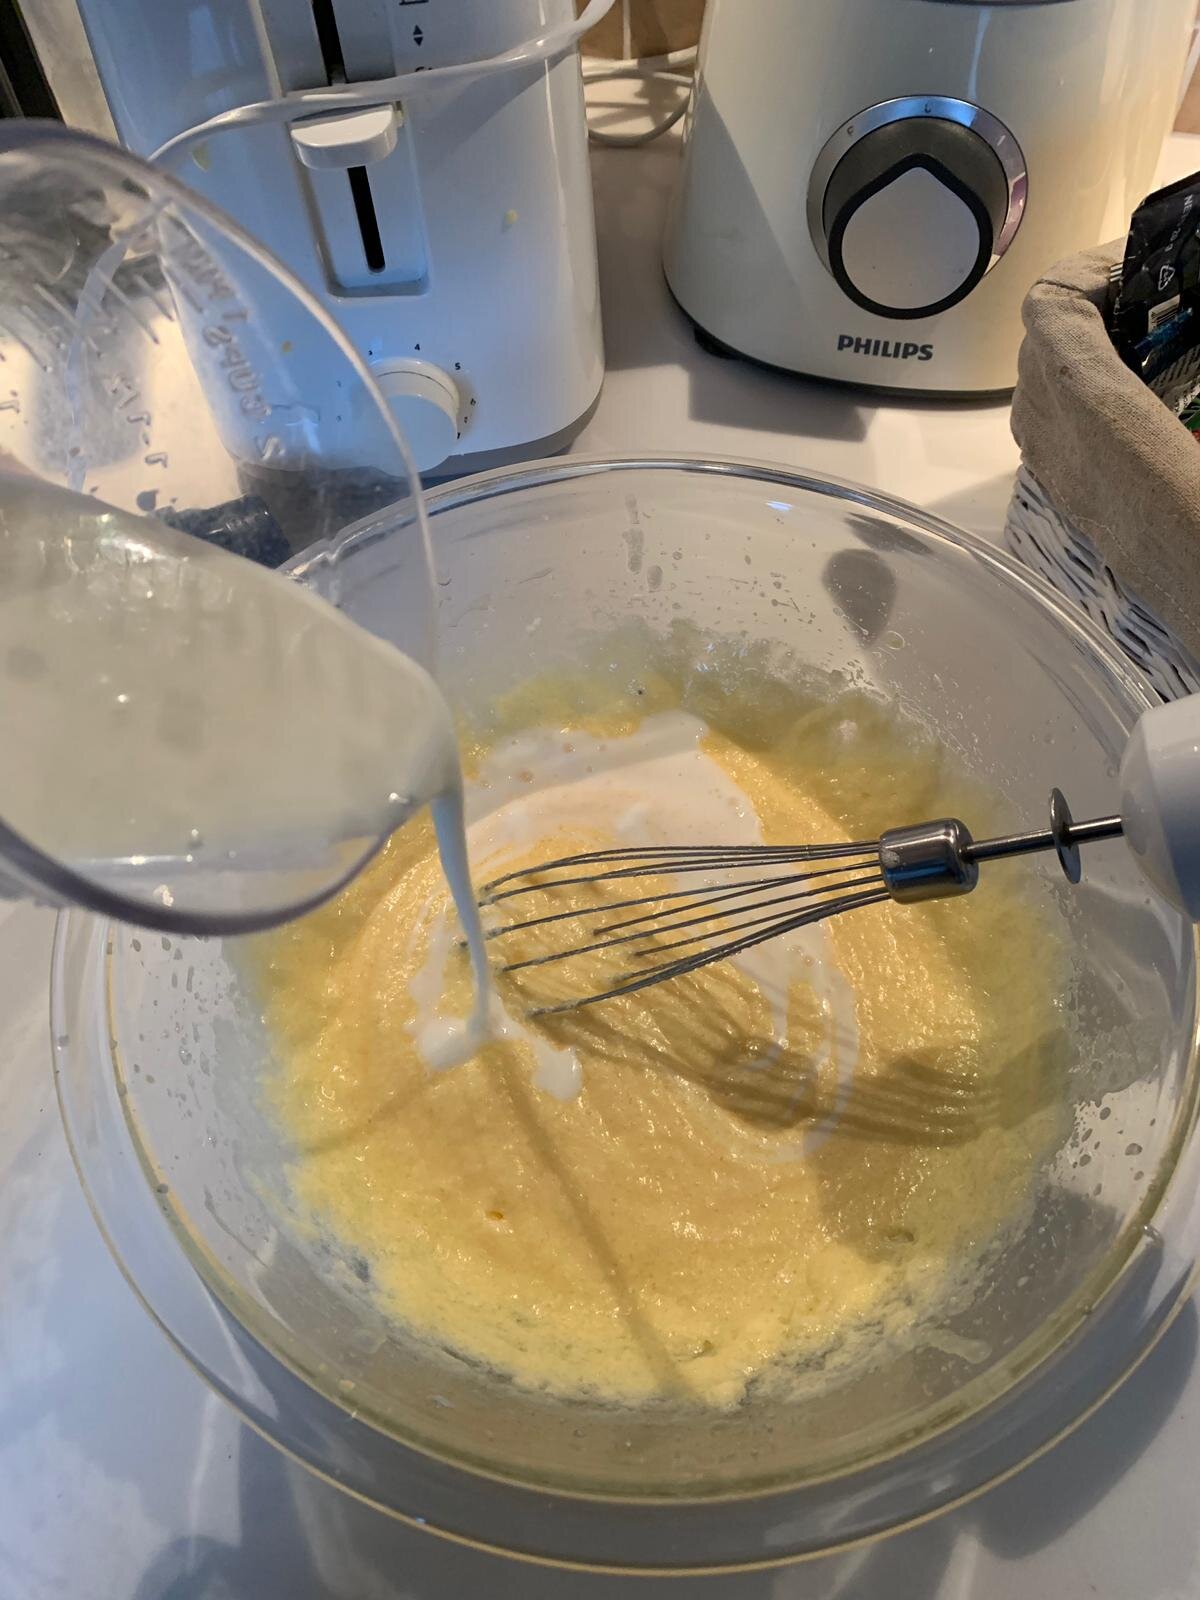
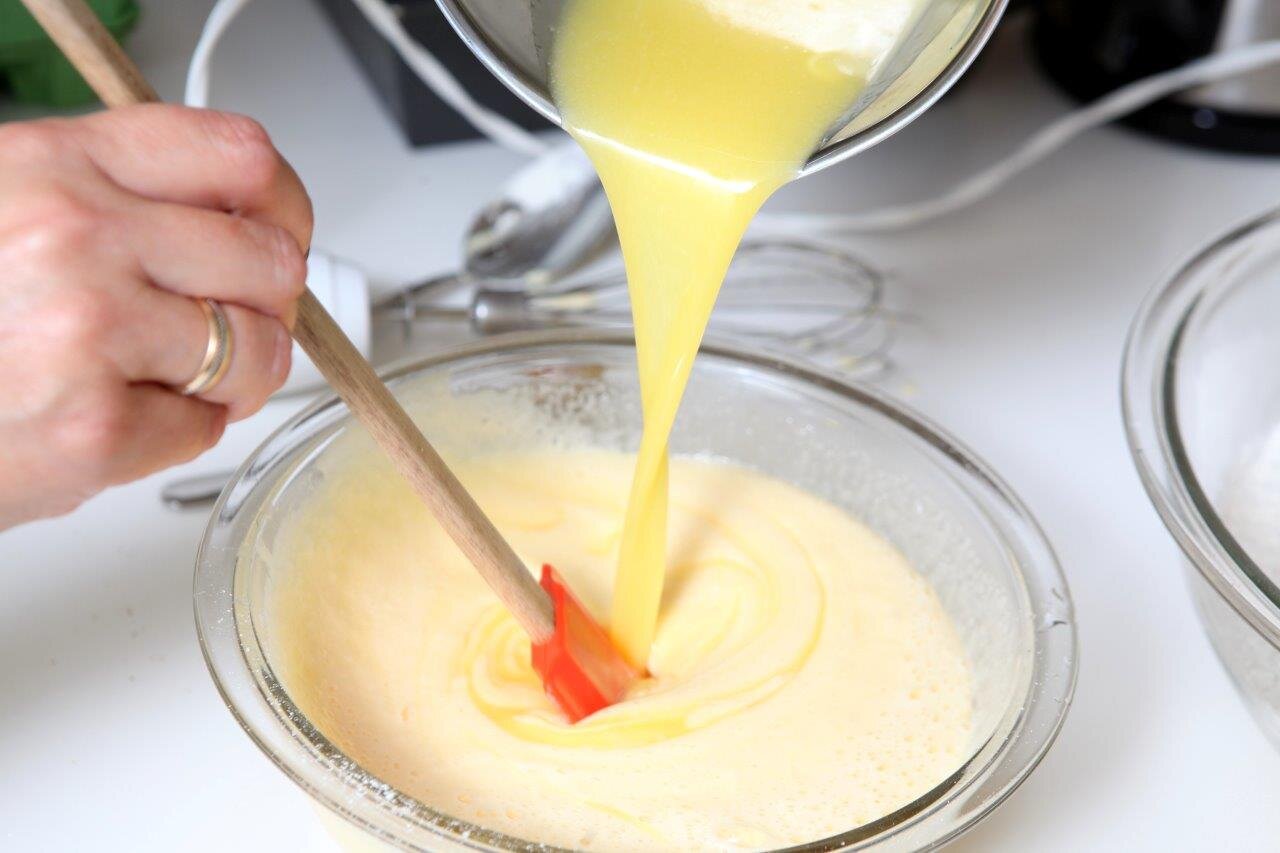
6. Add the egg mixture to the butter mixture gradually, beating with a mixer the whole time. Stir in the buttermilk.
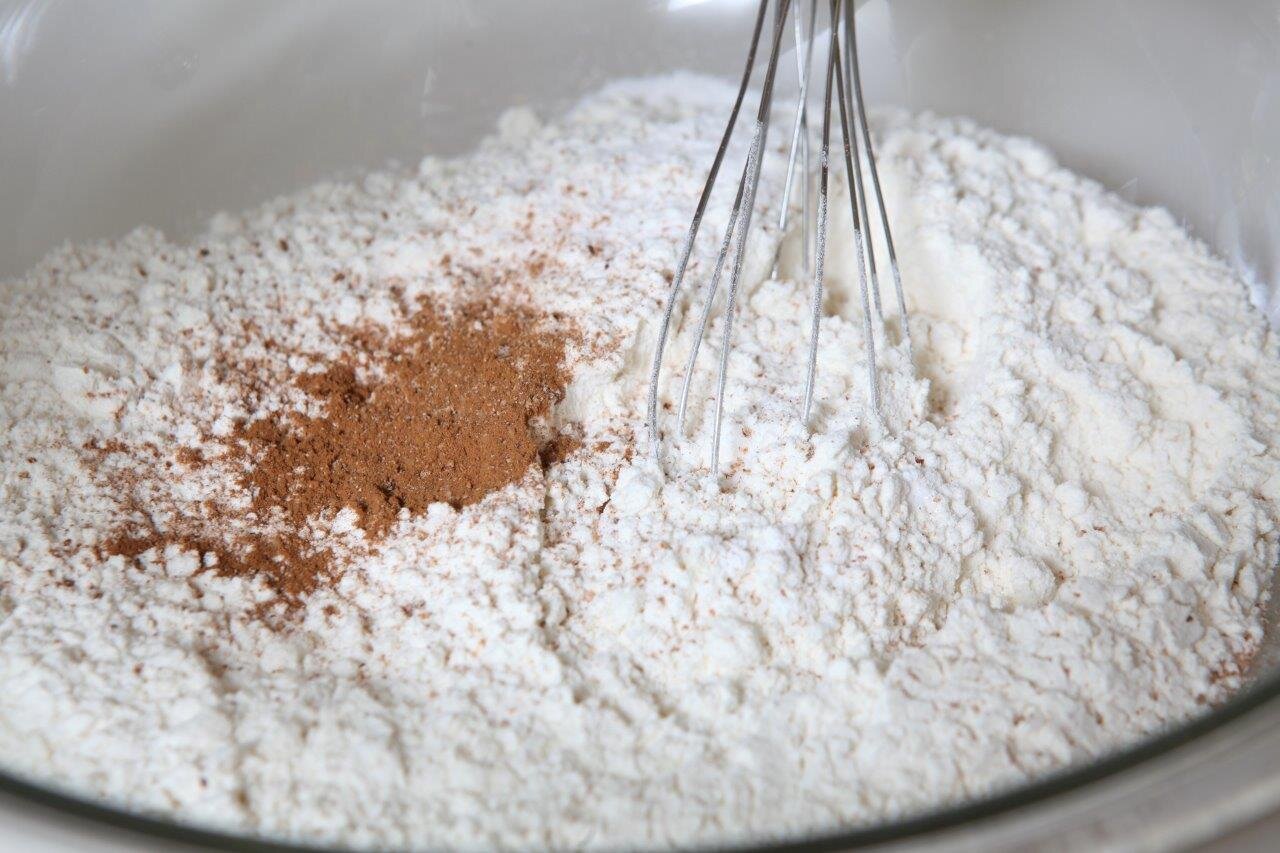
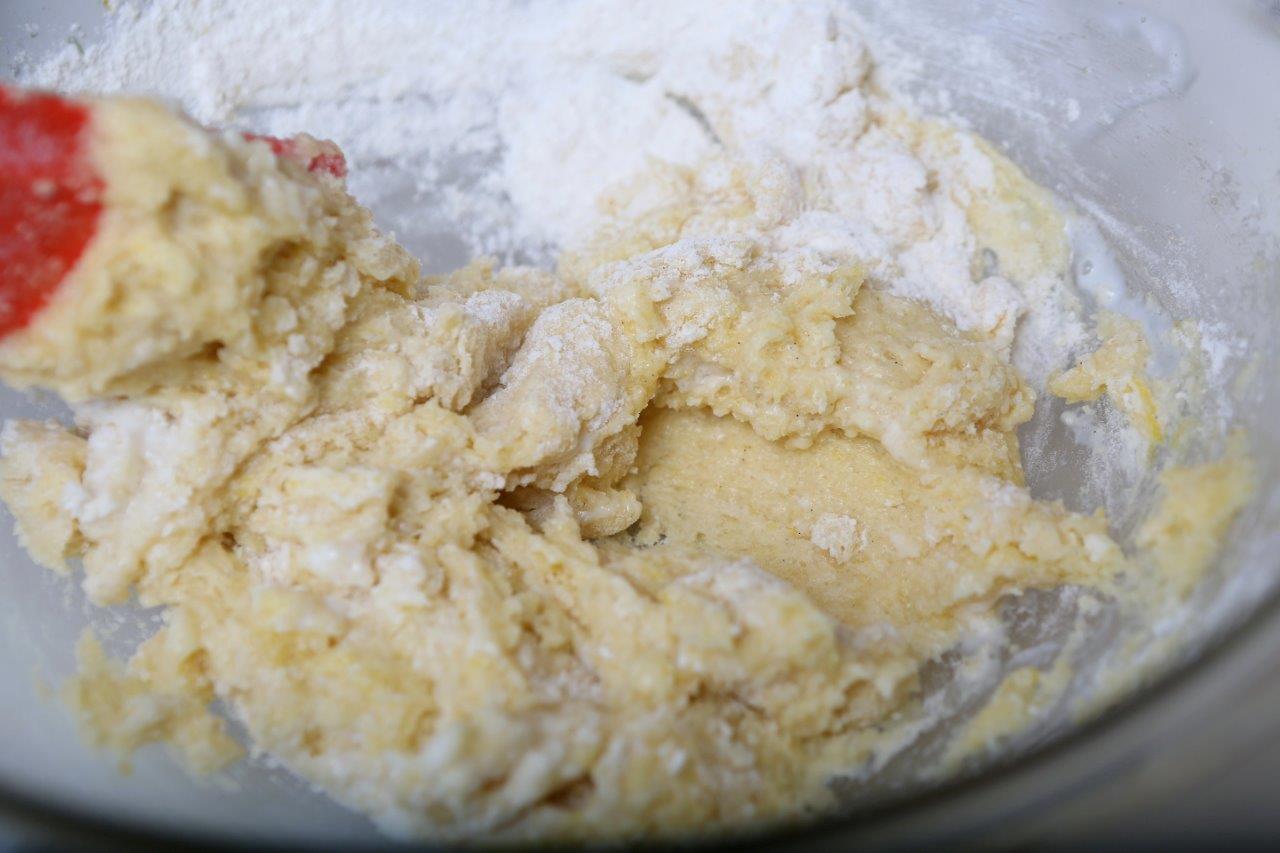
7. Whisk together the flour, baking powder and salt in a small bowl.
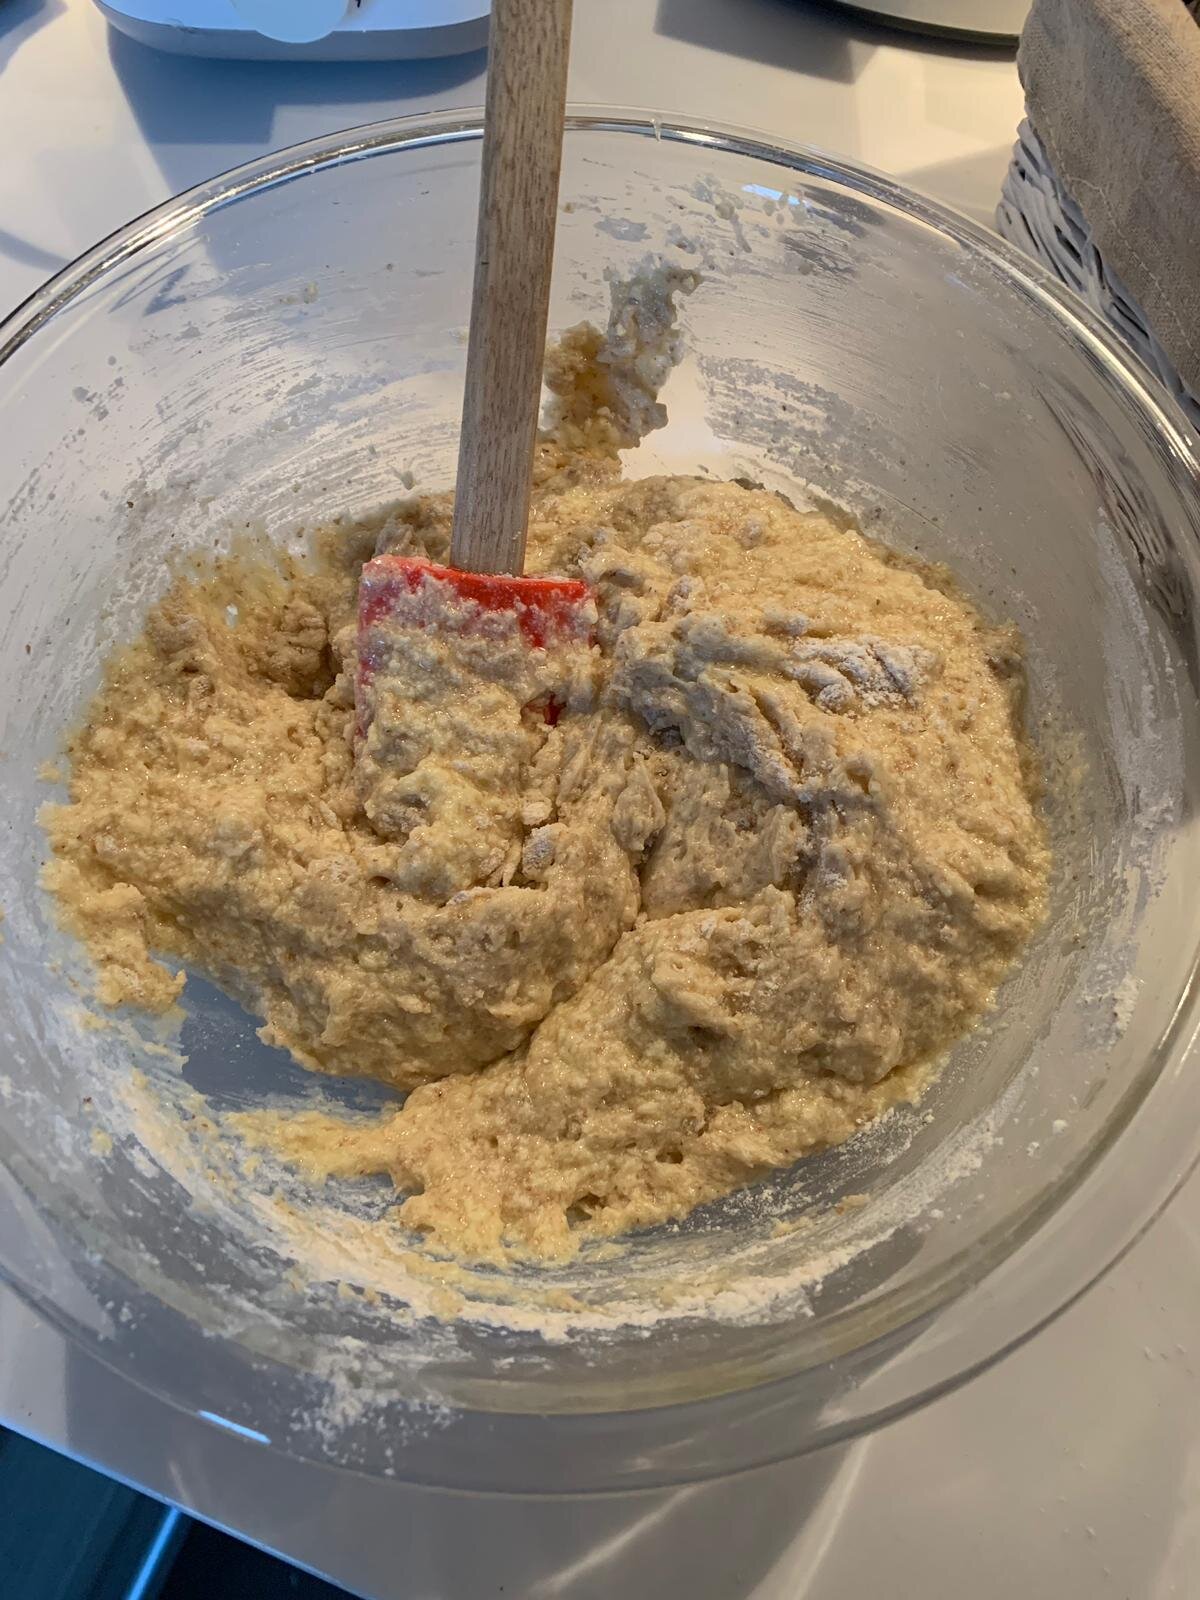
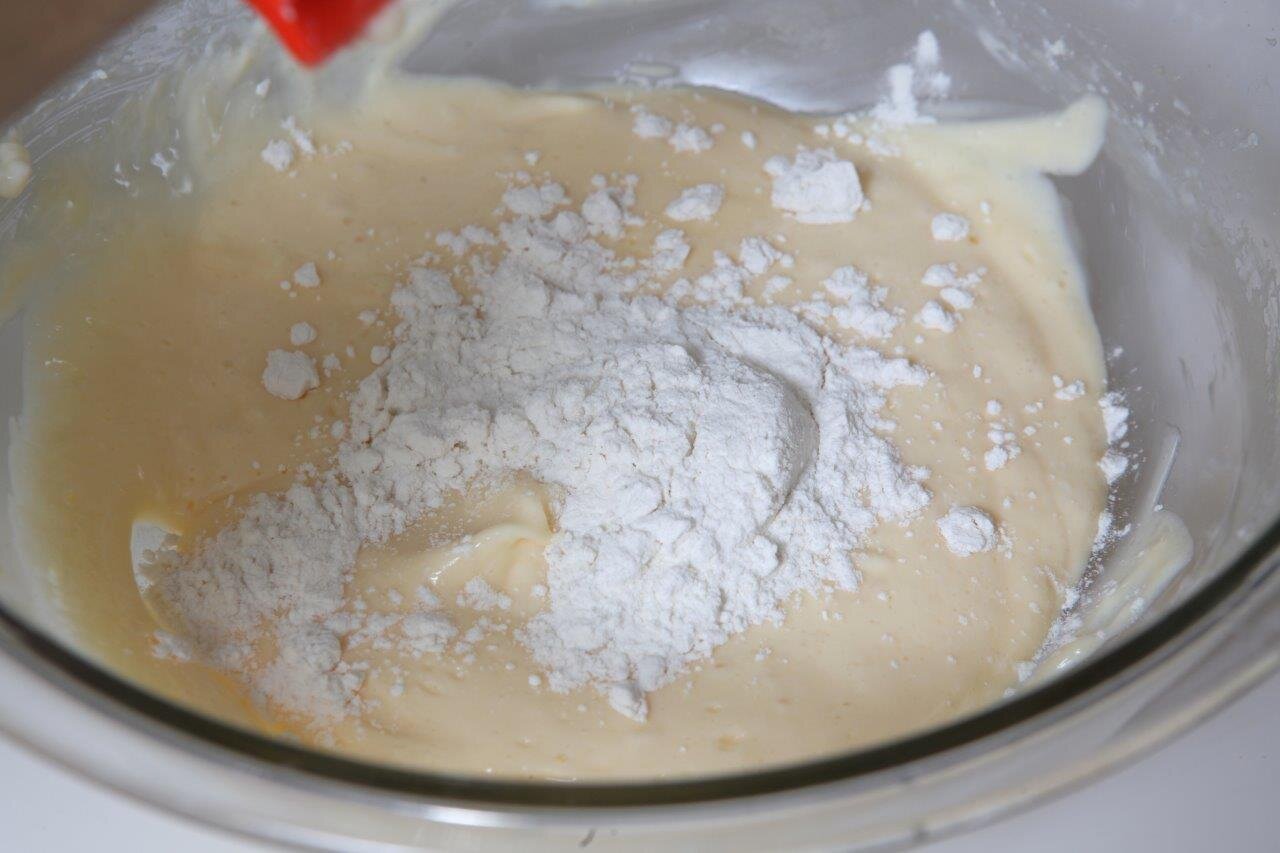
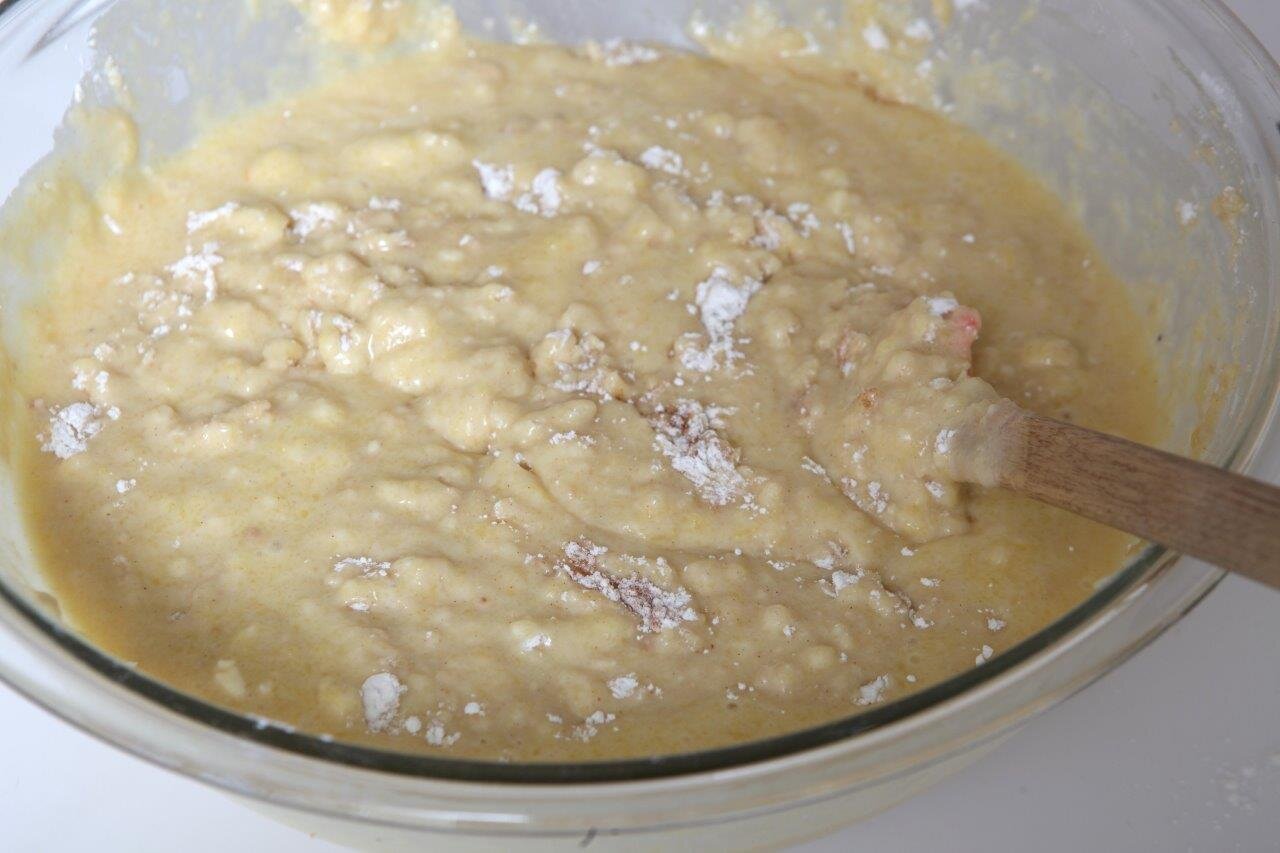
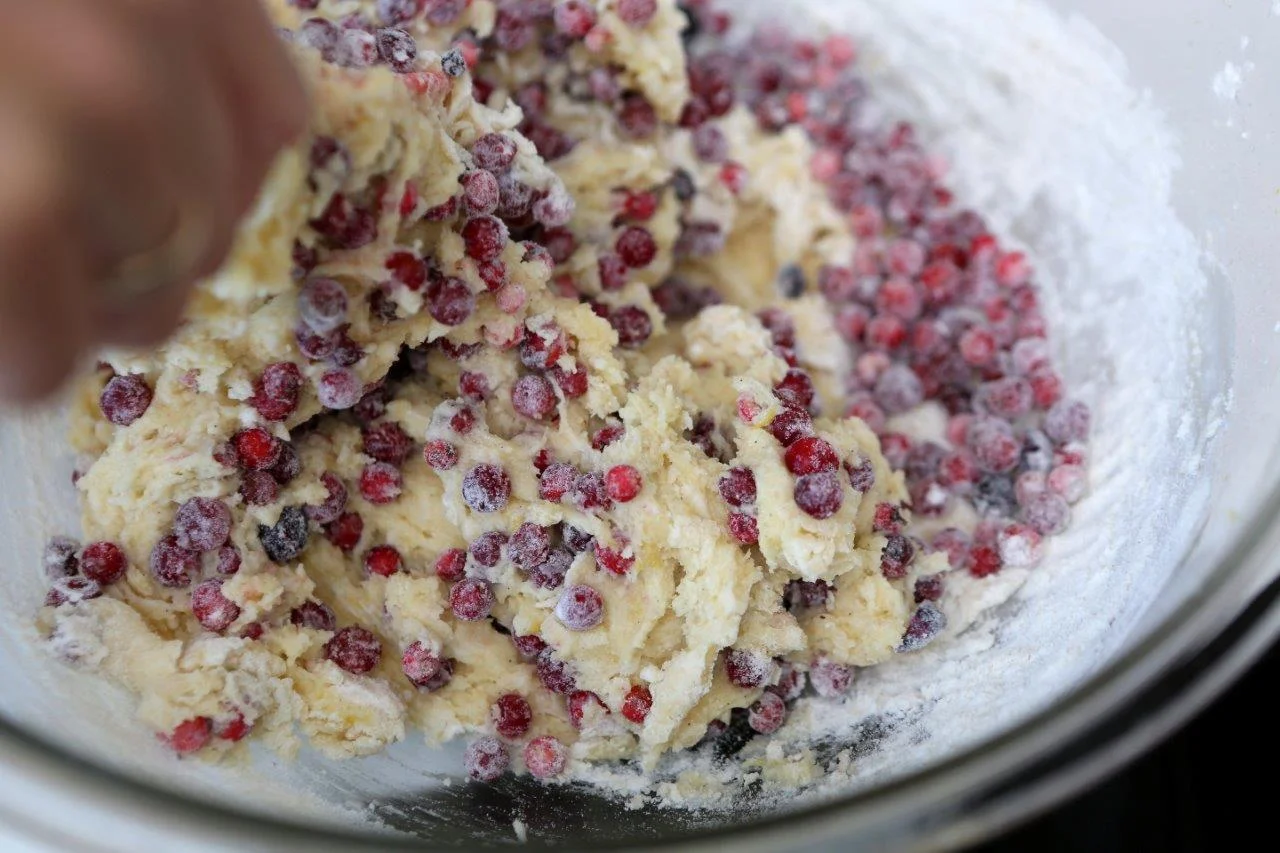
8. Stir in the dry ingredients to the wet ingredients and be careful not to overmix. The cake can turn out dense and not as fluffy.
8. Pour the batter over the cranberries in the pan.
9. Bake in the oven for approximately 35 min, check the readiness with a toothpick.
10. Cool for 10-15 min and remove from pan. Best served warm.
Recipe: Ārija Avota
Photo: Ārija Avota

Pumpkin bread with cream cheese
450 g pumpkin puree
450 g all purpose flour
400 g sugar
4 eggs
225 g butter, melted
120 ml water
100 g walnuts or pecans
1 tsp baking powder
1 tsp baking soda
1 ½ tsp cinnamon
¼ tsp nutmeg
2 tsp vanilla paste or vanilla sugar
¾ tsp salt
For the filling
225 g cream cheese, room temp
100 g sugar
2 eggs
1 ½ tbsp all purpose flour
2 tbsp butter for the pan
1. Butter two bread pans (approx 28x10x6 cm), preheat oven to 180 degrees (celsius).
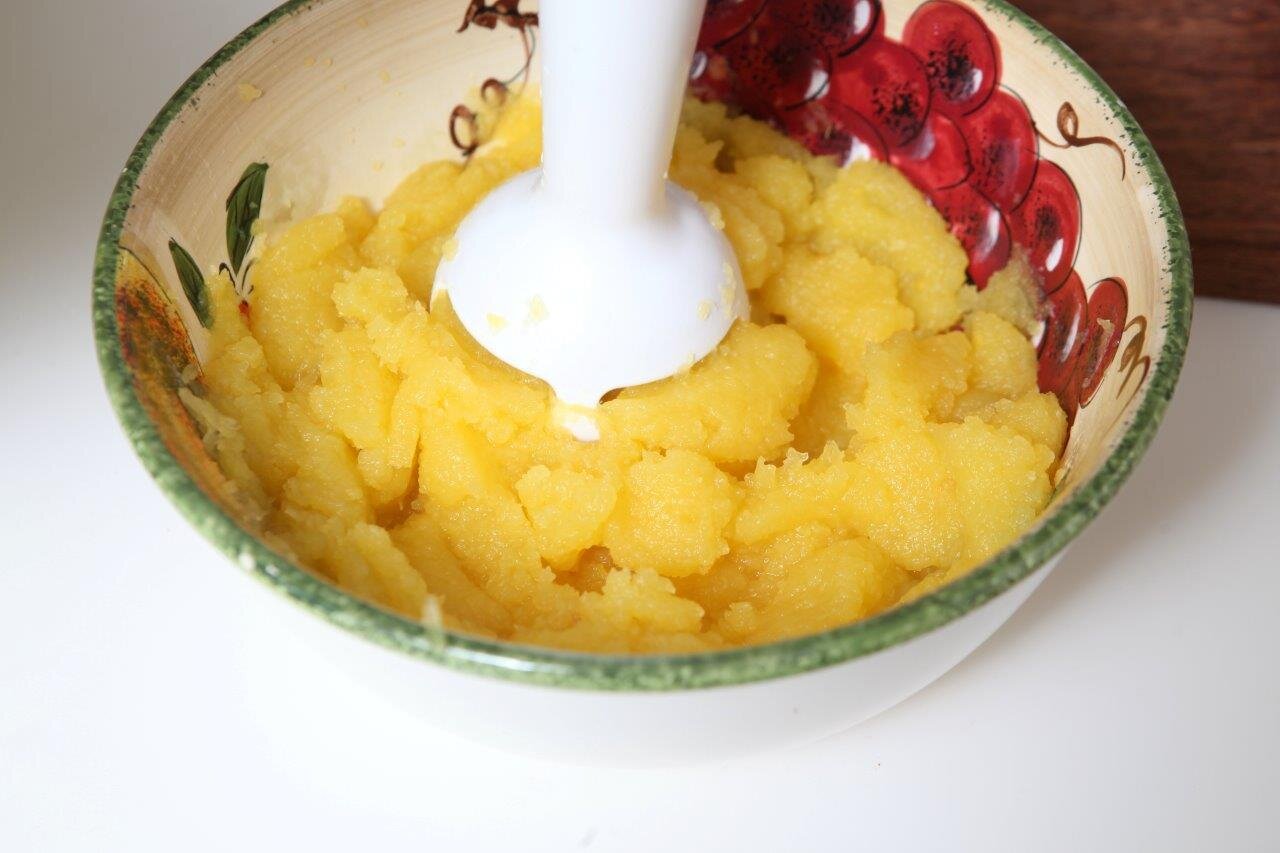
2. Place pumpkin slices in the oven to bake for about 45-60 min, depending on the size of the slices. When the pumpkin is soft (test by cutting it with a knife) remove from oven, let it cool and use a spoon to scrape off the flesh from the skin. Then blend in a puree consistency.
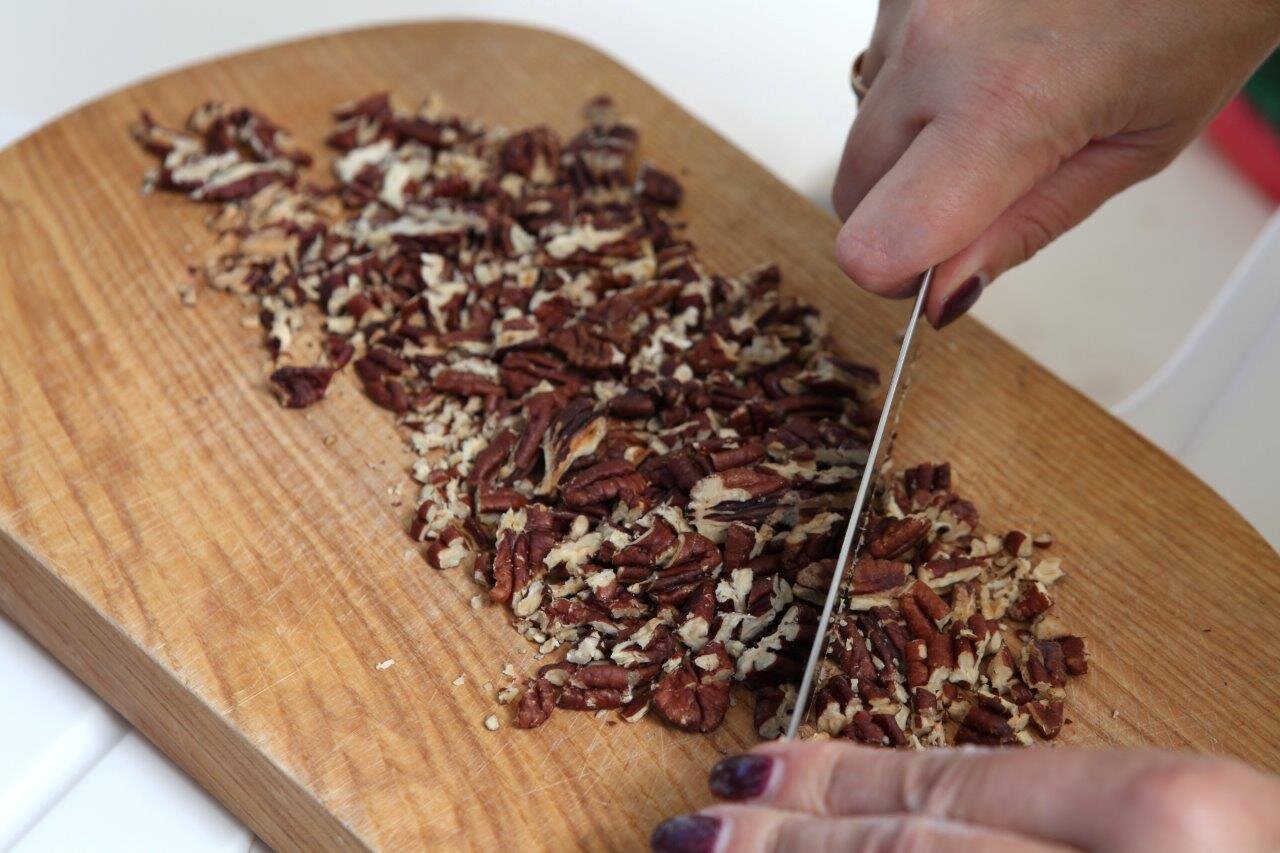
3. Place the nuts on a baking sheet and bake in the oven until fragrant, about 8-10 minutes. Let cool and chop up roughly.
Make the filling
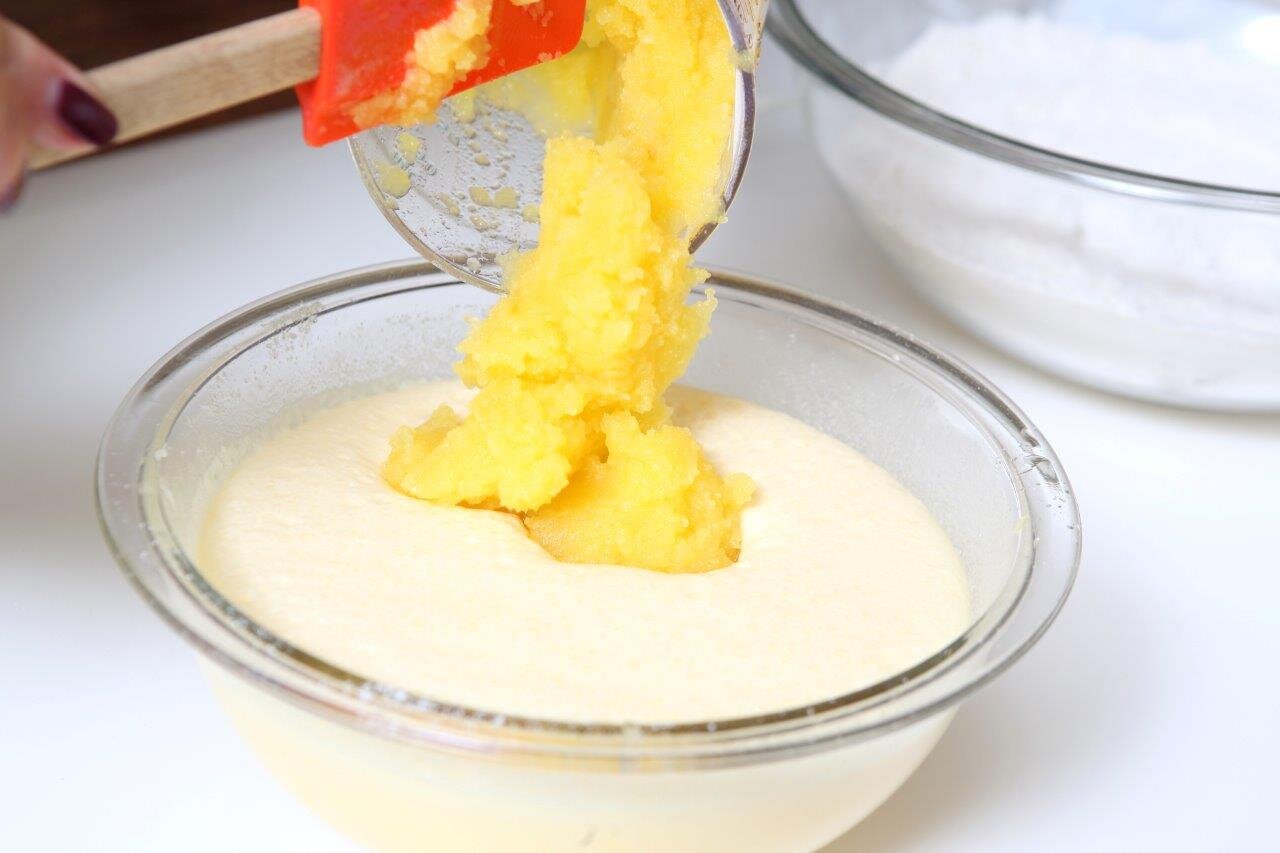
4. Use a mixer or whisk to beat the cream cheese until soft and then add the sugar. When creamy, beat in the eggs one by one. Stir in the flour, set aside.


Make the batter
5. In a medium bowl, whisk together the sifted flour, baking powder, baking soda, salt, cinnamon, nutmeg. Set aside.
6. In a large bowl beat the eggs lightly, then add sugar and cooled melted butter. Stir in the pumpkin puree, water, vanilla and chopped nuts.
7. Lightly stir the flour mixture in the pumpkin mixture, be careful not to overmix, that will make the bread tough and not as light. It’s ok if the batter has a few chunks of flour in it.
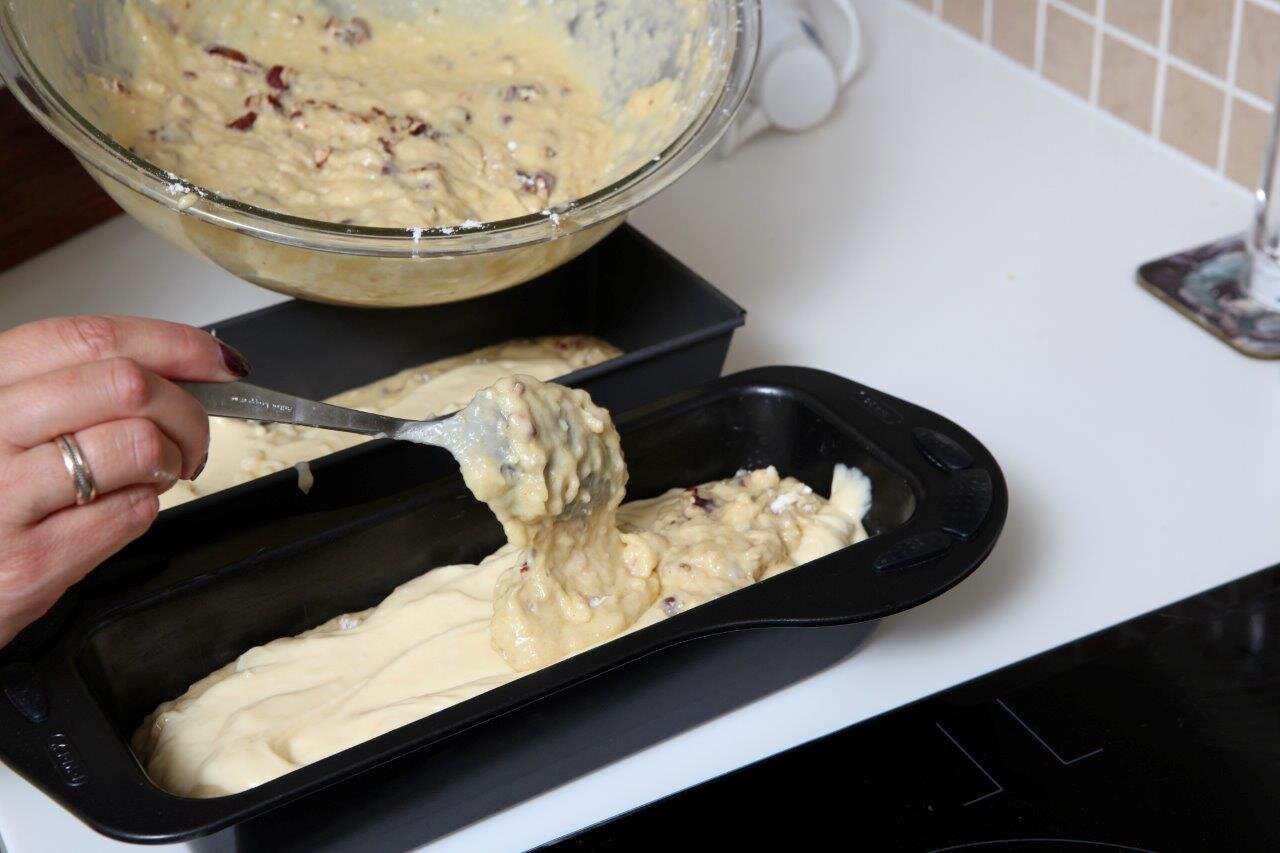
8. Pour a quarter of the batter at the bottom of both pans. Now pour half of the filling in each pan in the middle. Top it off with the rest of the batter and even it out with a spatula.
9. Place both pans in the center of the oven and bake for 55-65 min until a toothpick inserted comes out clean.
10. Remove from the oven and place on a wire rack to let cool for at least 10 min. Then you can turn over the pans to remove the breads and slice them to serve. Can be served both hot and cold either with some butter or Nutella.
Recipe: Ārija Avota
Photo: Ieva Andersone (IG: @photoievaandersone)


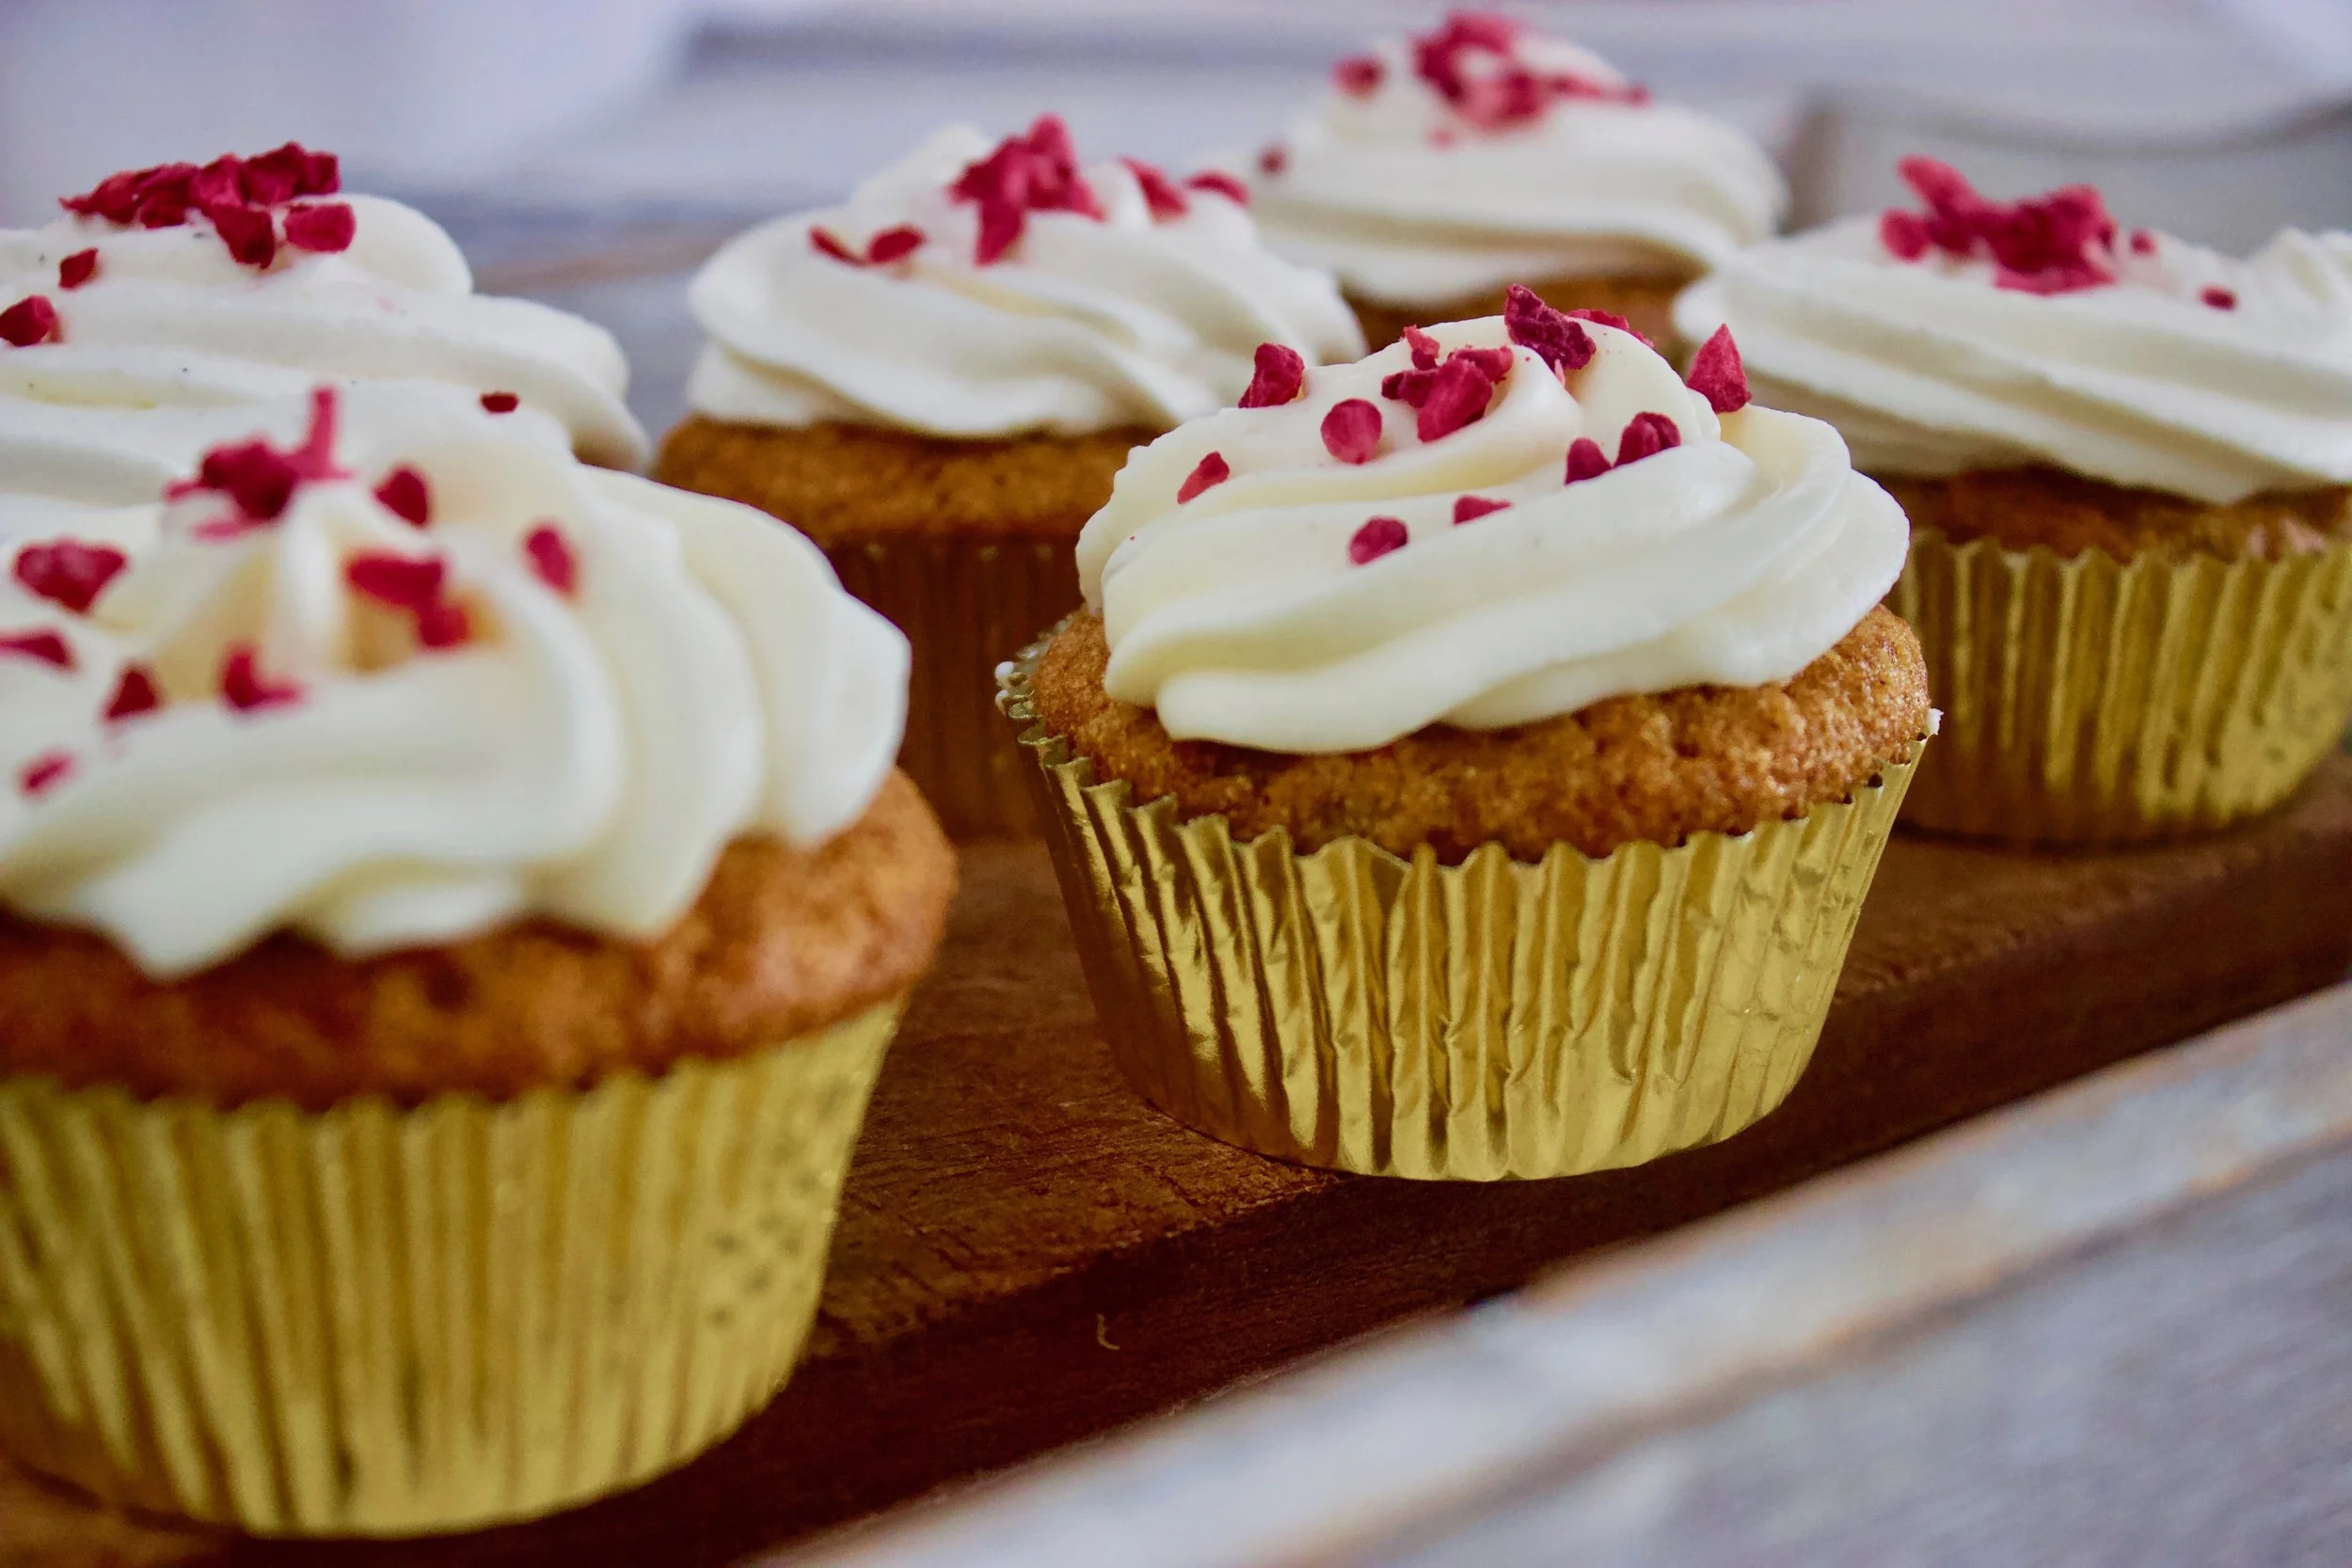
Carrot cupcakes
Carrot cake has a very nice and interesting taste that really complements fall- the play of the used spices creates an amazing smell that fills your home and always has everyone asking: what are you making?!
If you have never tried carrot cake, I highly recommend to try it and no be afraid of the fact there is a vegetable in cake :) And also do not be discouraged of the long list of ingredients because everything can easily be made in two bowls and doesn’t take long.
This is actually a very versatile recipe because you can use the same batter for cupcakes or cake (pour it in a 20 cm pan and bake for 30 min checking the readiness with a toothpick).
For the cupcakes
300 g carrots, peeled and grated
2 eggs, room temp
100 g sugar, can use brown sugar too
160 ml (160 g) rapeseed oil (or any other oil without a distinct smell- sunflower, vegetable, etc.)
160 ml (120 g) unsweetened applesauce
1 tsp vanilla sugar or vanilla paste
100 g walnuts or pecans, chopped
175 g all purpose flour, 1/3 can be replaced with whole grain
1 tsp baking soda
1 tsp cinamon
Pinch of salt
For the icing
100 g cream cheese
30 g heavy cream
50 g powdered sugar
Makes 12 cupcakes
Make the cupcakes
1. Chop the walnuts or pecans. Wash, peel and finely grate the carrots in a large bowl (can use a food processor if you have one)
2. In that large bowl with the carrots add eggs, sugar, oil, applesauce and vanilla and beat together using a wire whisk. Mix until sugar is dissolved.
3. Heat the oven to 180 degrees (celsius) and line a muffin tin with paper liners.
4. In a small bowl whisk together the dry ingredients- flour, baking soda, cinnamon, salt and chopped walnuts. Then stir in with the wet ingredients but just until incorporated, do not overmix. It’s ok if there are some lumps left as they will continue to mix when putting batter in the muffin tin.
5. Fill the muffin tin evenly with the batter- do not be afraid to fill the tin to the top, because this batter doesn’t raise too much over the top.
6. Place the tin in the middle of the oven and bake for 17-22 min. I suggest checking the readiness with a toothpick after 17 min and bake some more only if necessary. Since ovens differ greatly, it could be you need to bake a little longer, but not longer than 25 min since you don’t want to overbake and have dry cupcakes. Remove from oven and let cool for at least 20 min.
Make the icing
7. While the cupcakes are cooling you can make the icing. Use a deep, narrow container or bowl and soften the cream cheese with a spatula.
8. Cream cheeses sometimes differ in consistency- some are thicker and others are more liquid, so look at that to determine how much to soften the cream cheese before using a mixer to beat it. Start beating it until fluffy and then add the powdered sugar and beat until nice and smooth.
9. Slowly and gradually add the cold heavy cream while beating constantly. This is also where you check the consistency because a thicker cream cheese may need more heavy cream and vice versa. In the end the icing should be a nice stiff but creamy consistency.
10. Place the icing in the fridge to cool a bit more while still waiting for the cupcakes to cool too (you can’t put icing on a warm cake).
11. Take a piping bag and place the decorating tip you want on the end of it (for the cupcakes in the photo I used the standard “star”) and fill the bag with the icing. Decorate each cupcake with a swirl, starting from the outer edge to center and up. The icing doesn’t have to be perfect, the flavor combo is delicious either way! So even if you do not have the tools necessary for decorating- you can use a spatula to spread the icing on more freely.
12. Serve immediately or save for the next day in the fridge.
Recipe: Anna Inne-Smilga
Photo: Oto Avots

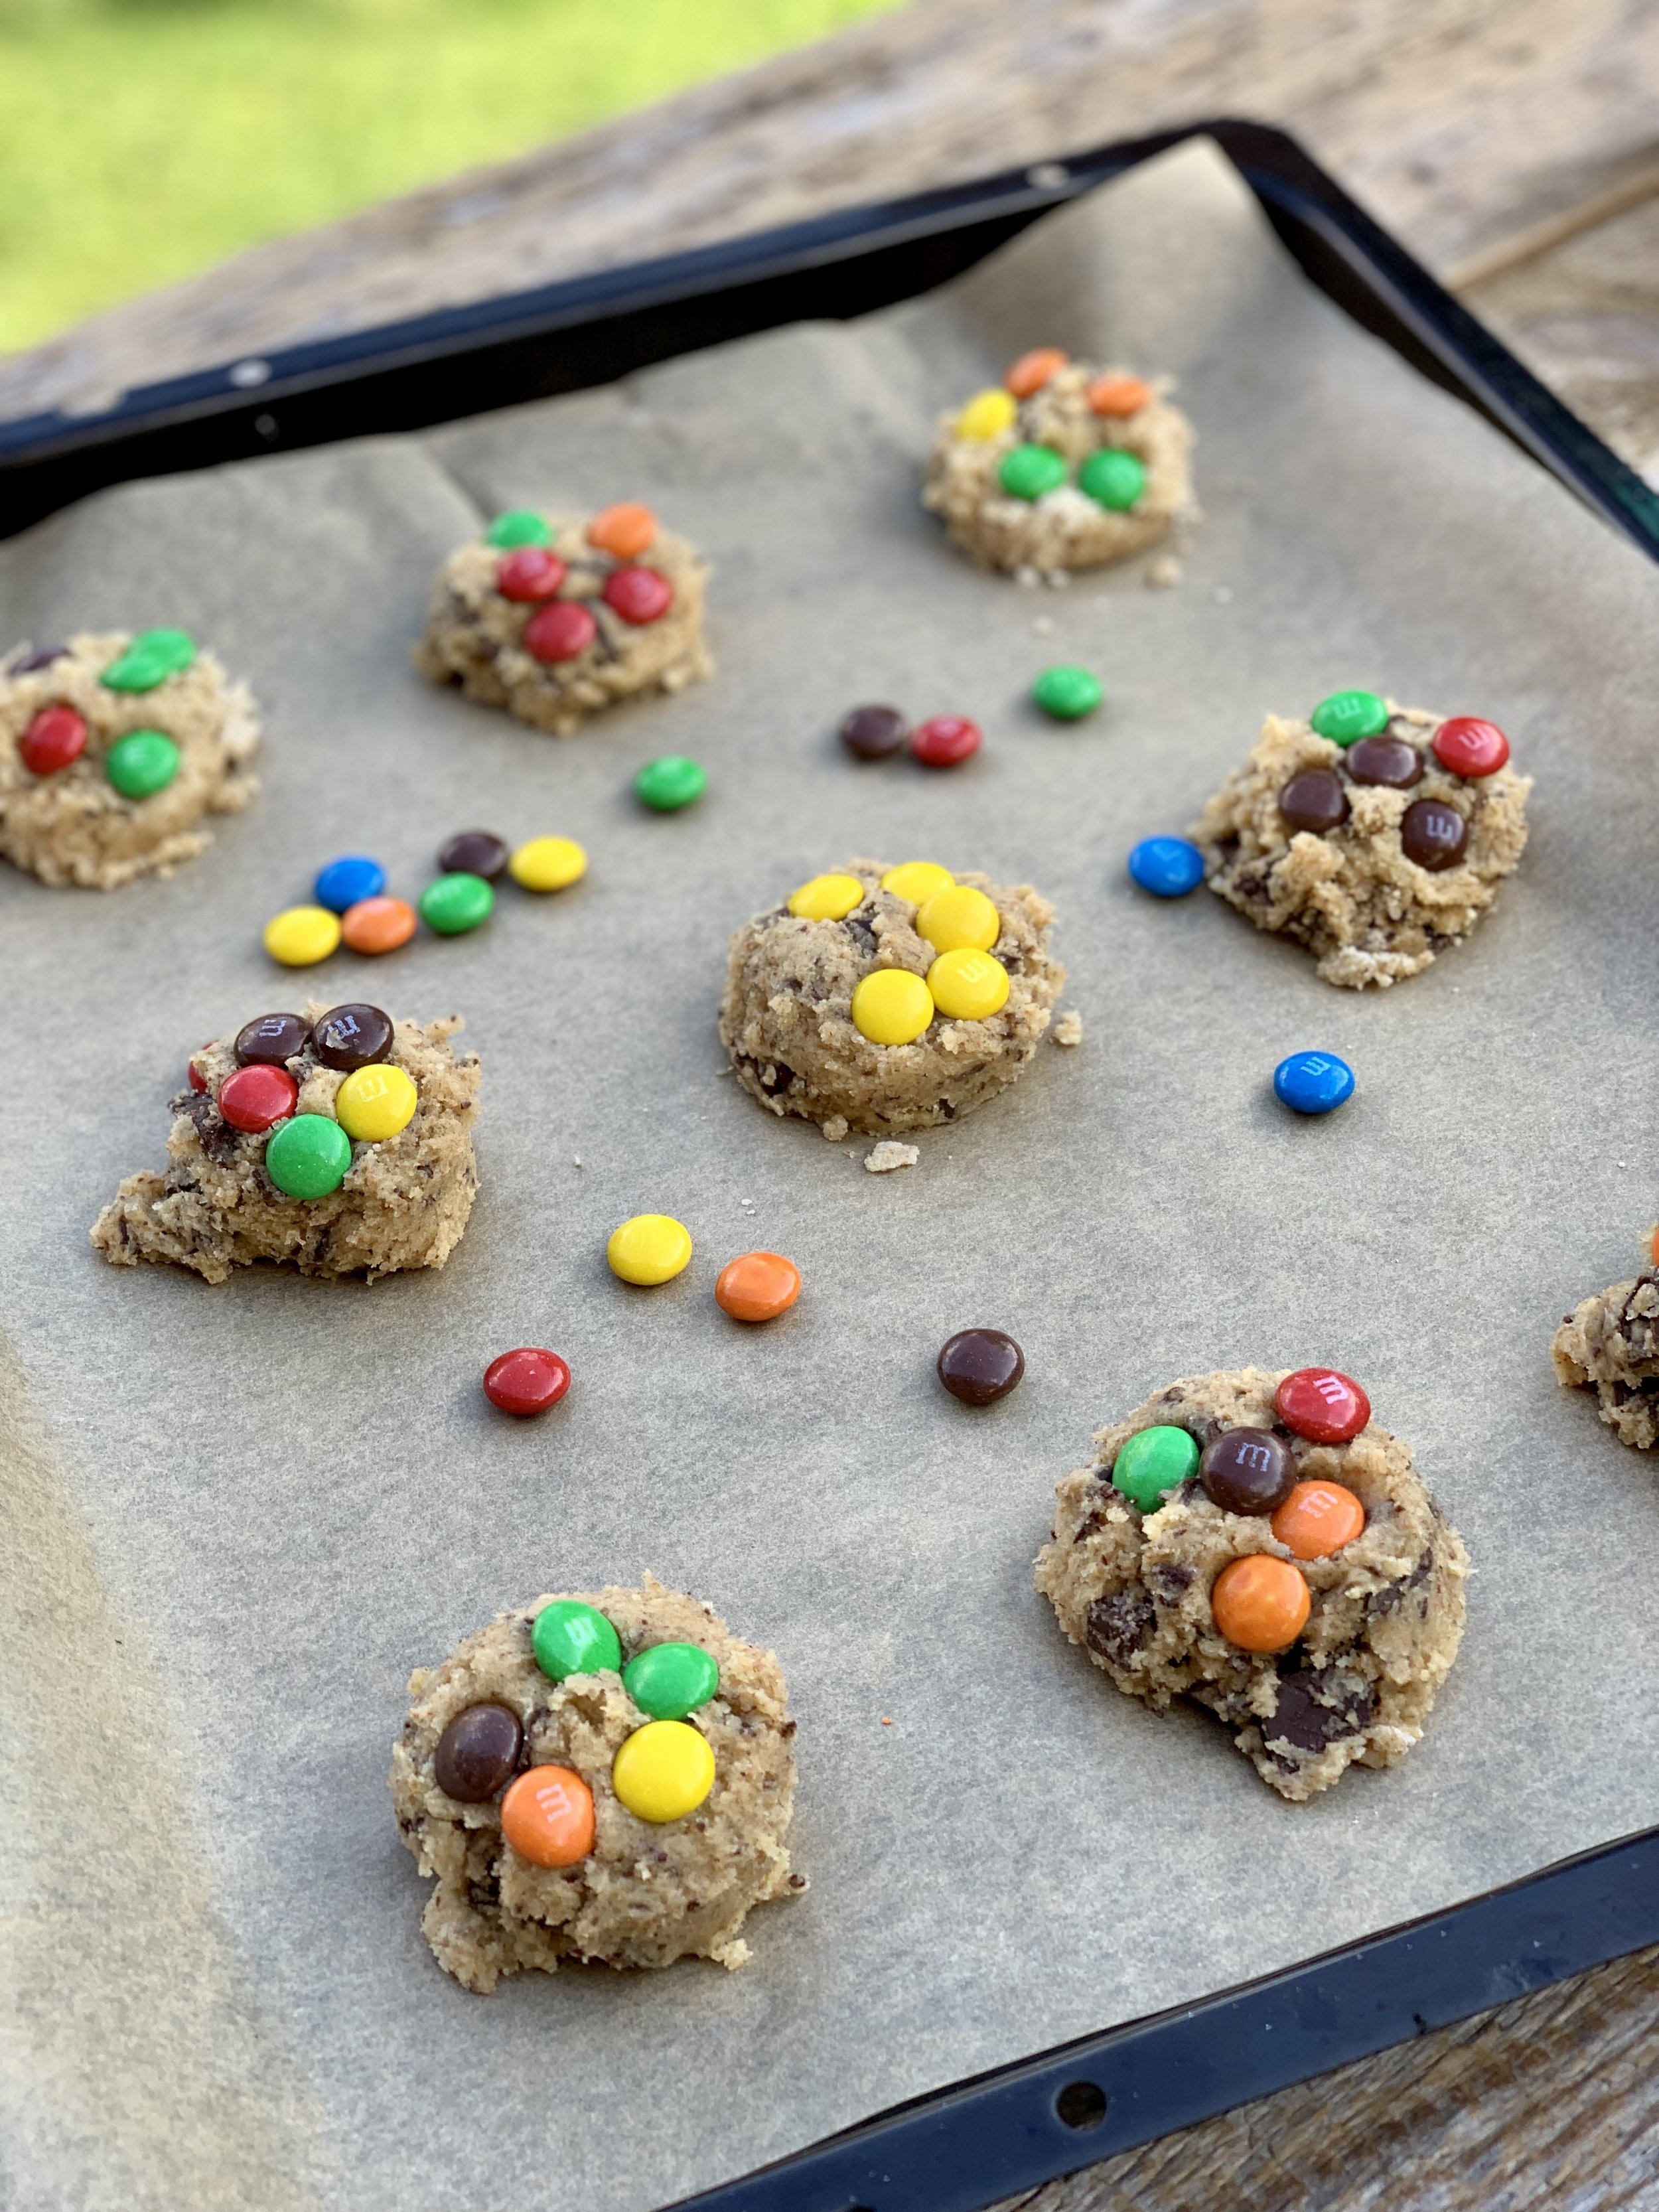
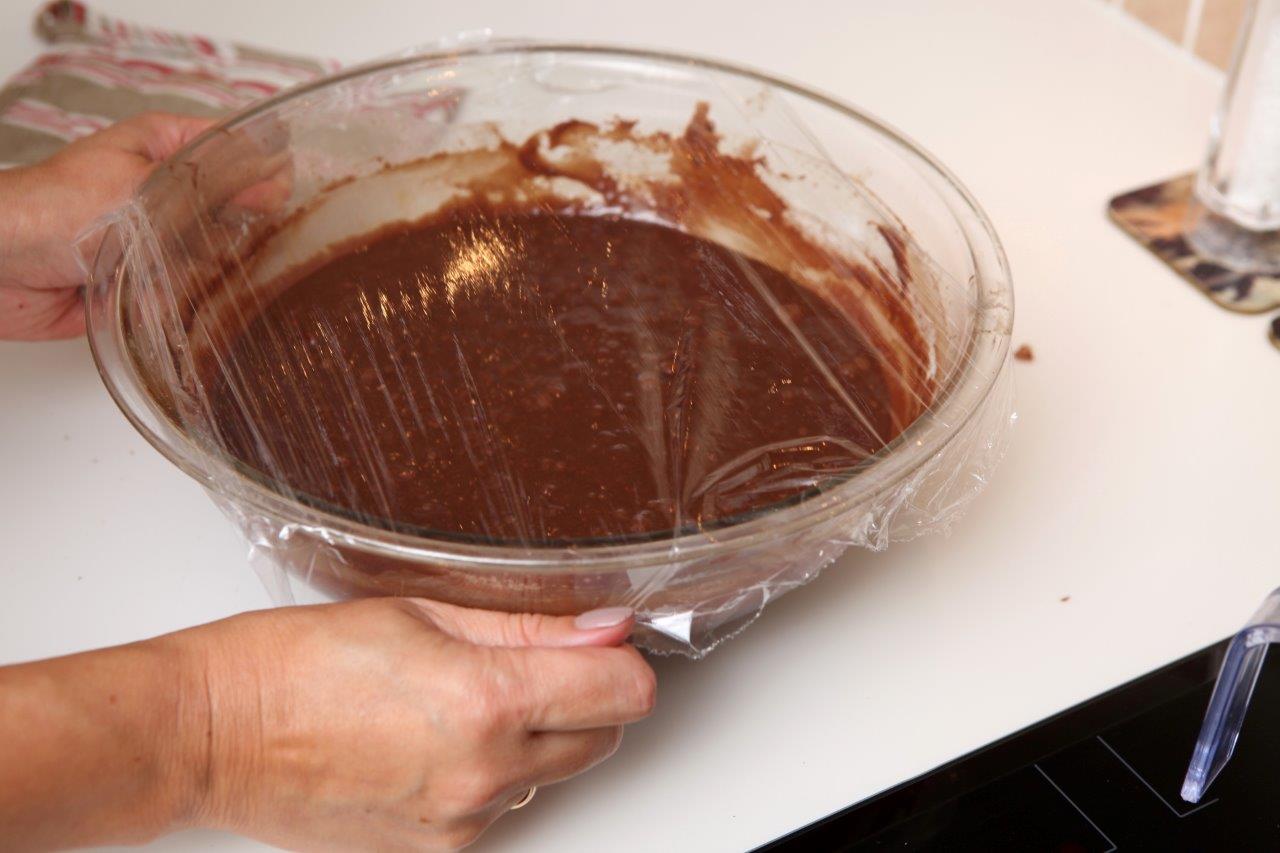
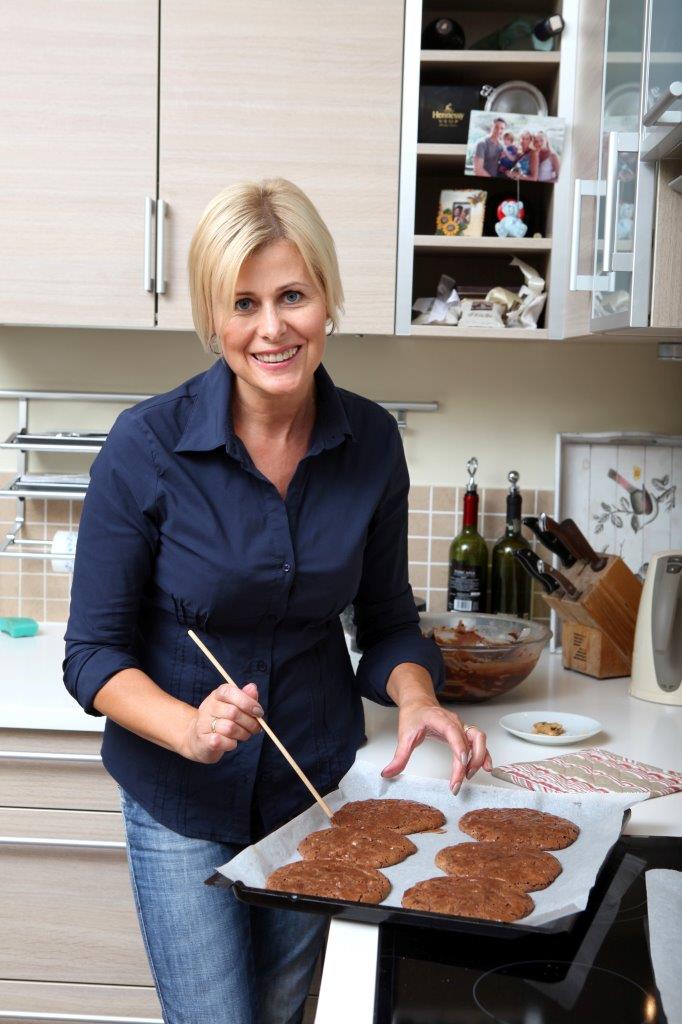
Chocolate chip cookies with M&M's
This is a spin on the classic chocolate chip cookie- the M&M’s actually make them even more appealing (if that is even possible). This recipe is simple and makes the perfect chewy cookie- just be sure to find the right timing for your oven, because if you bake for a minute too long the cookies will turn out crunchy (not a bad thing either way).
260 g all purpose flour, 1/3 can be replaced with whole grain
1 tsp baking soda
¼ tsp salt
170 g unsalted butter, room temp
120 g sugar
120 g ligth brown sugar
1 large egg
1 large egg yolk
1 tsp vanilla paste or vanilla sugar
200 g chocolate chips (can chop a chocolate bar into chunks)
2 handfuls of M&M’s
Makes 18 large cookies
1. Preheat the oven to 180 degrees (celsius). Line two baking trays with parchment paper.
2. In a medium bowl, whisk together the flour, baking soda, salt and set aside.
3. Chop the chocolate into chunks and set aside too.
4. In a large bowl beat the soft butter and both sugars using a mixer until light and fluffy (2-3 min). Add the egg and egg yolk along with the vanilla and beat until incorporated and smooth.
5. Use a spatula to gently stir in the dry ingredients to the butter mixture. Then stir in the chocolate chips or chunks. Do not overmix and do not use a mixer!
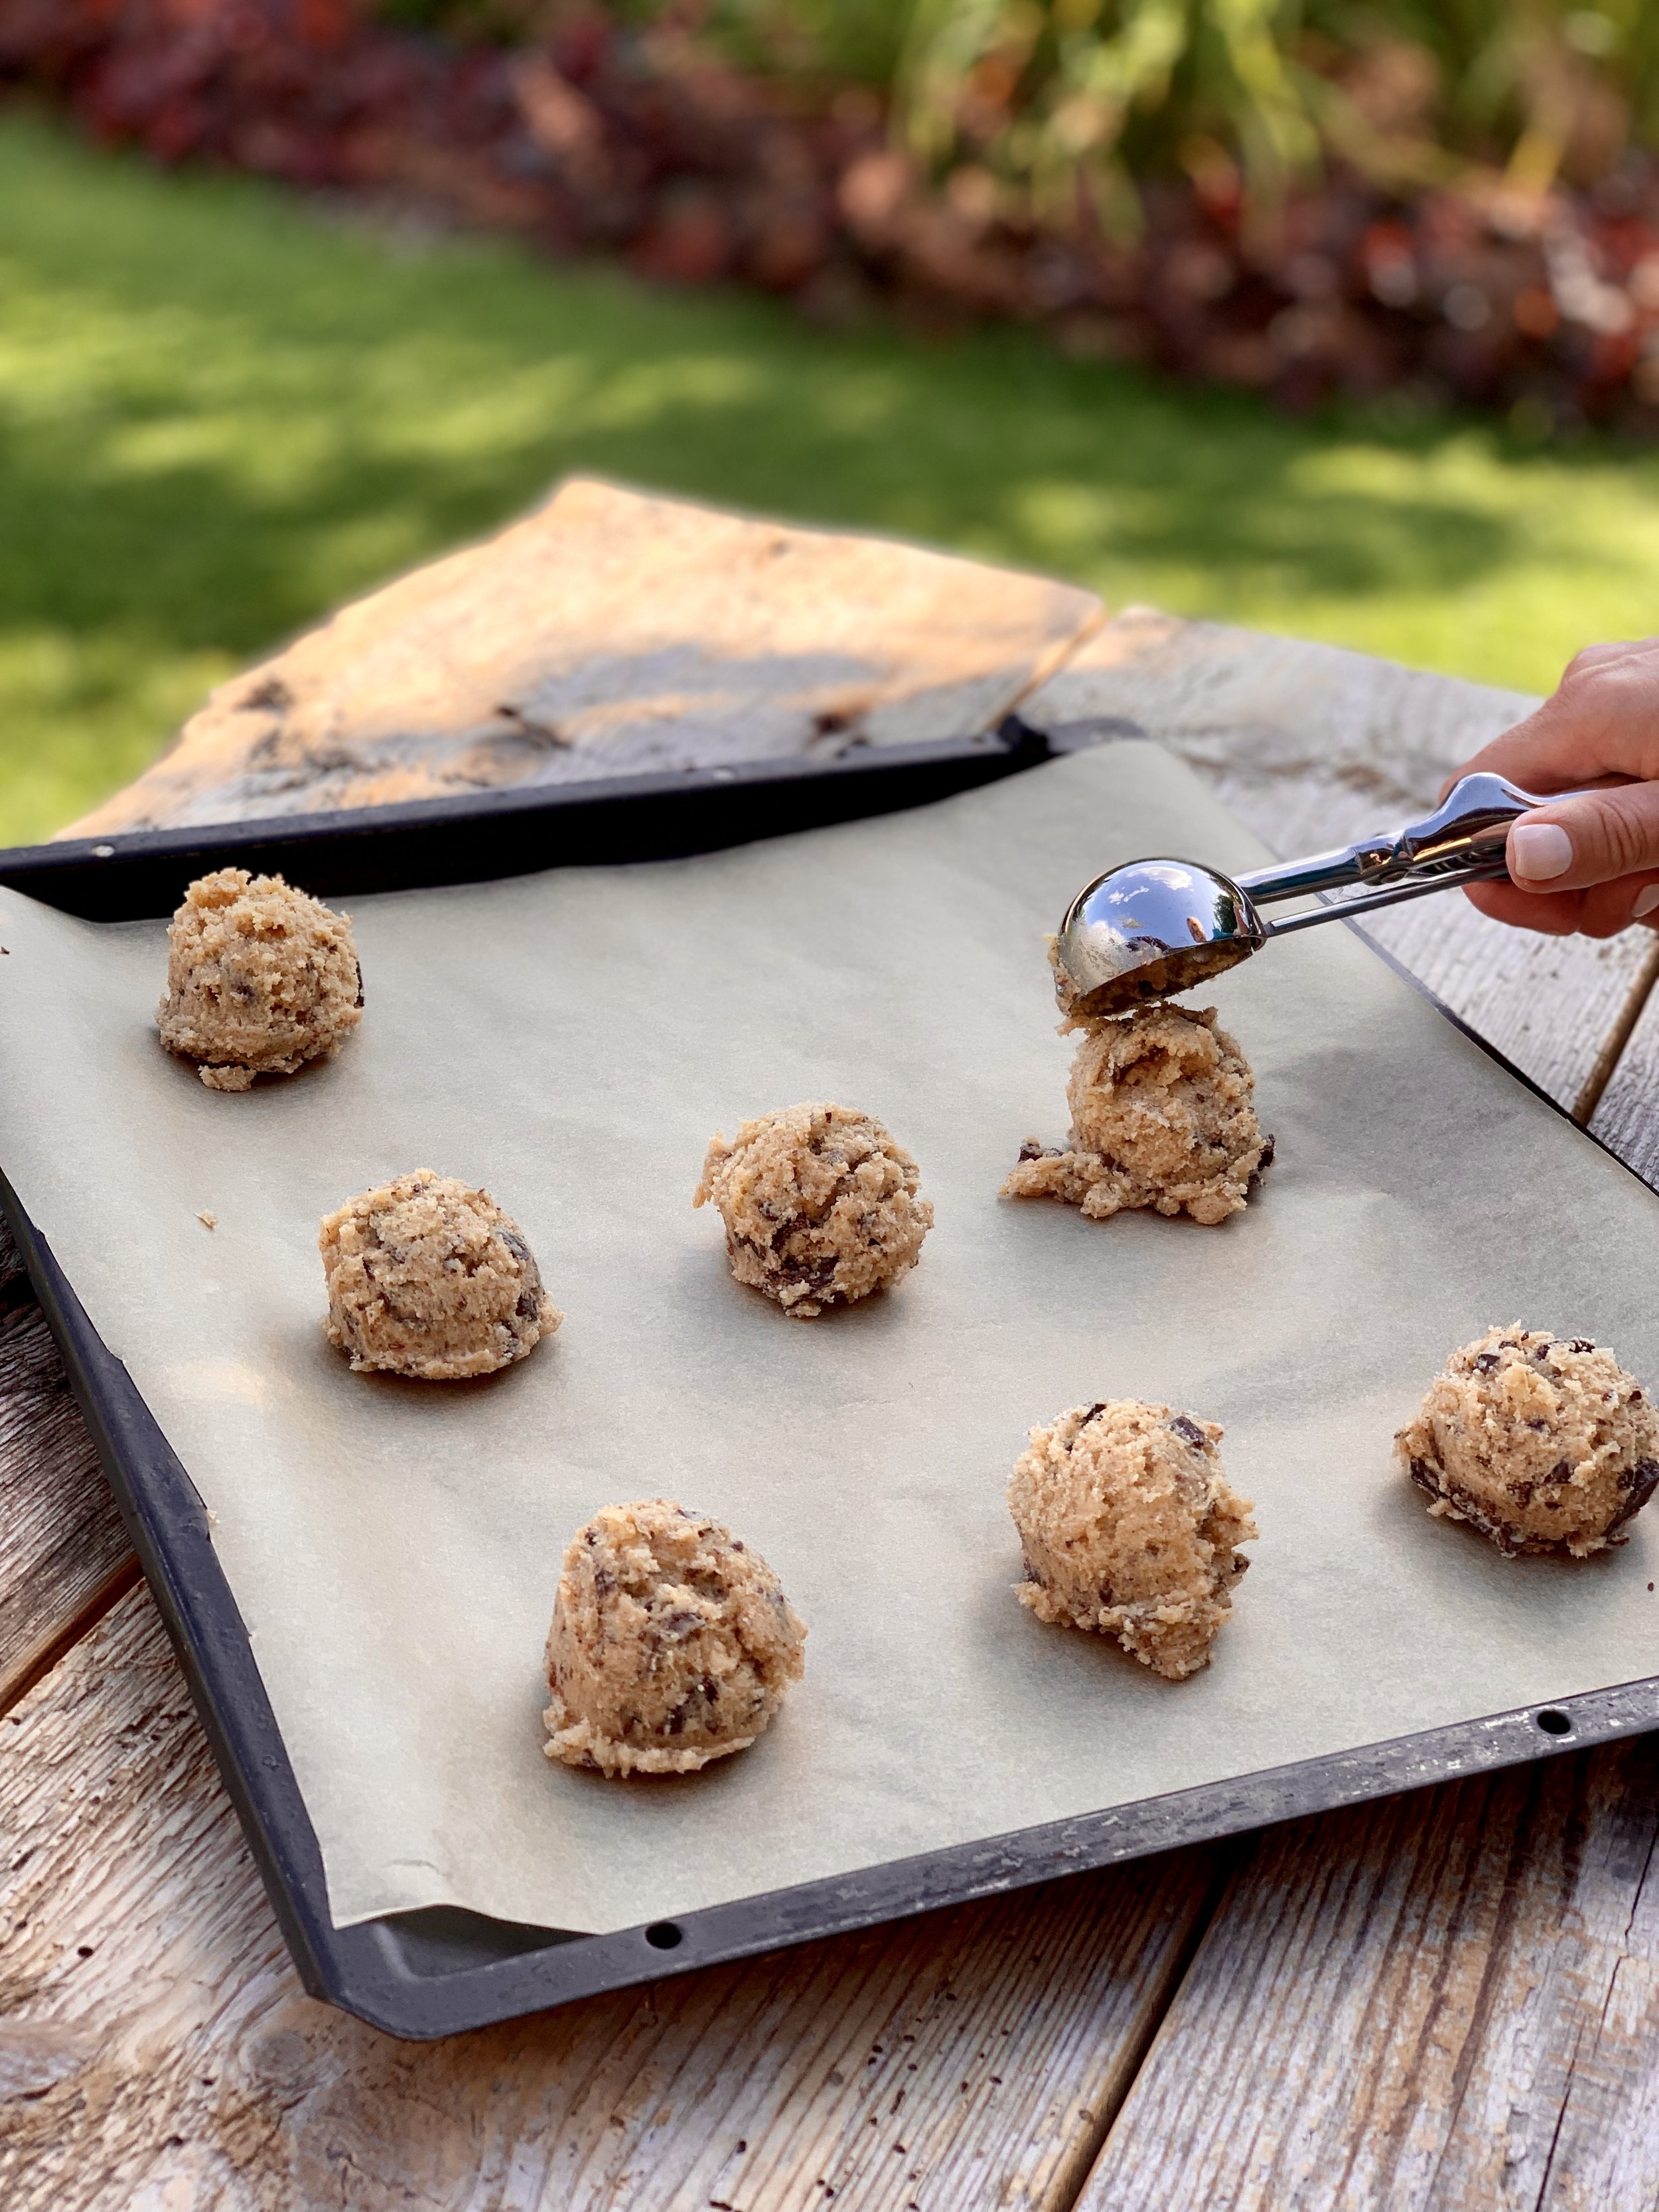
6. Use an ice cream scoop or a regular spoon to create balls of dough and place 9 on each baking tray. Flatten the balls a little bit.
7. Place the M&M’s on top of each cookie and press it in the dough (3-4 candies for each cookie).
8. Bake the cookies one tray at a time for approximately 12 min. When they are done the edges will be golden, but the center still soft. They will set as they cool and still be chewy. Leave them to cool before removing from the tray.
9. If you prefer crunchier cookies- bake for a minute or two longer.
Recipe: Ārija Avota
Photo: Oto Avots

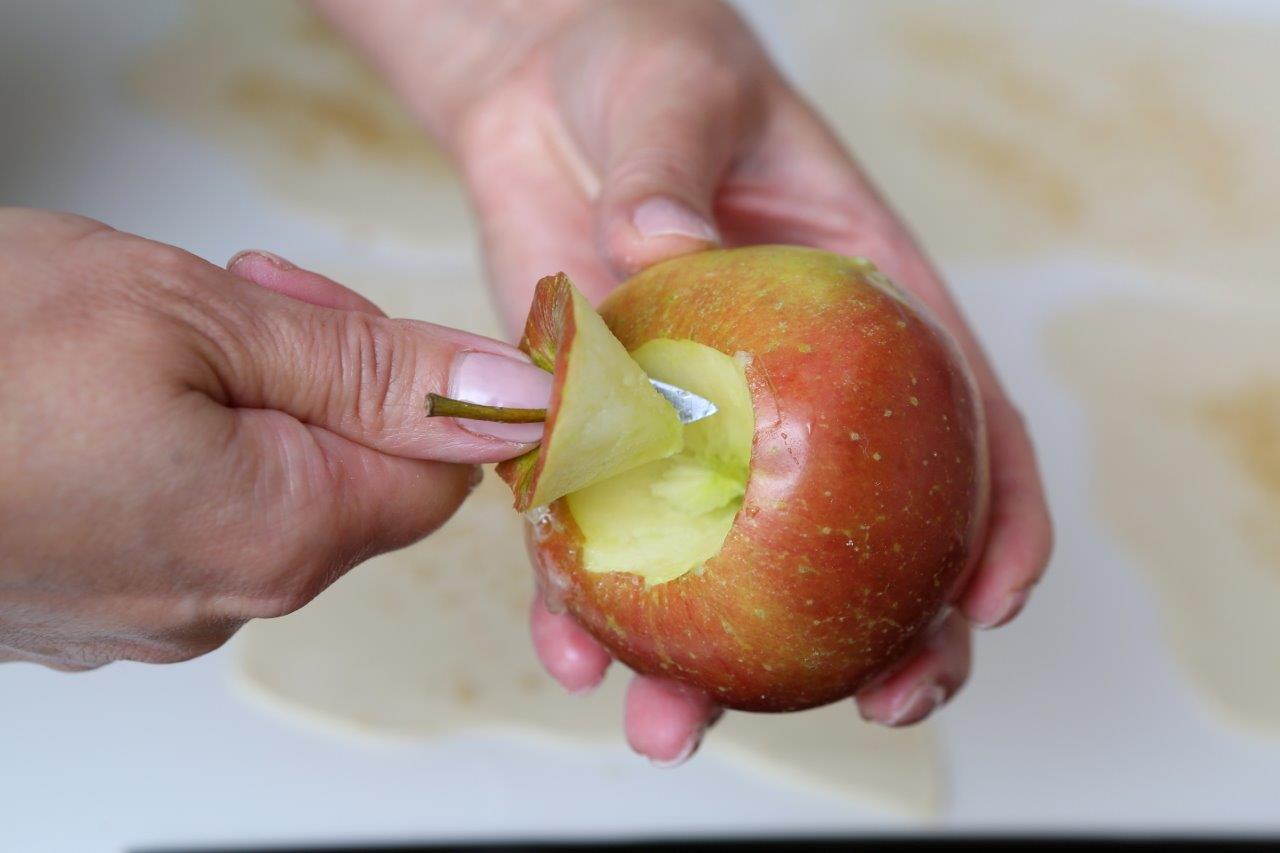
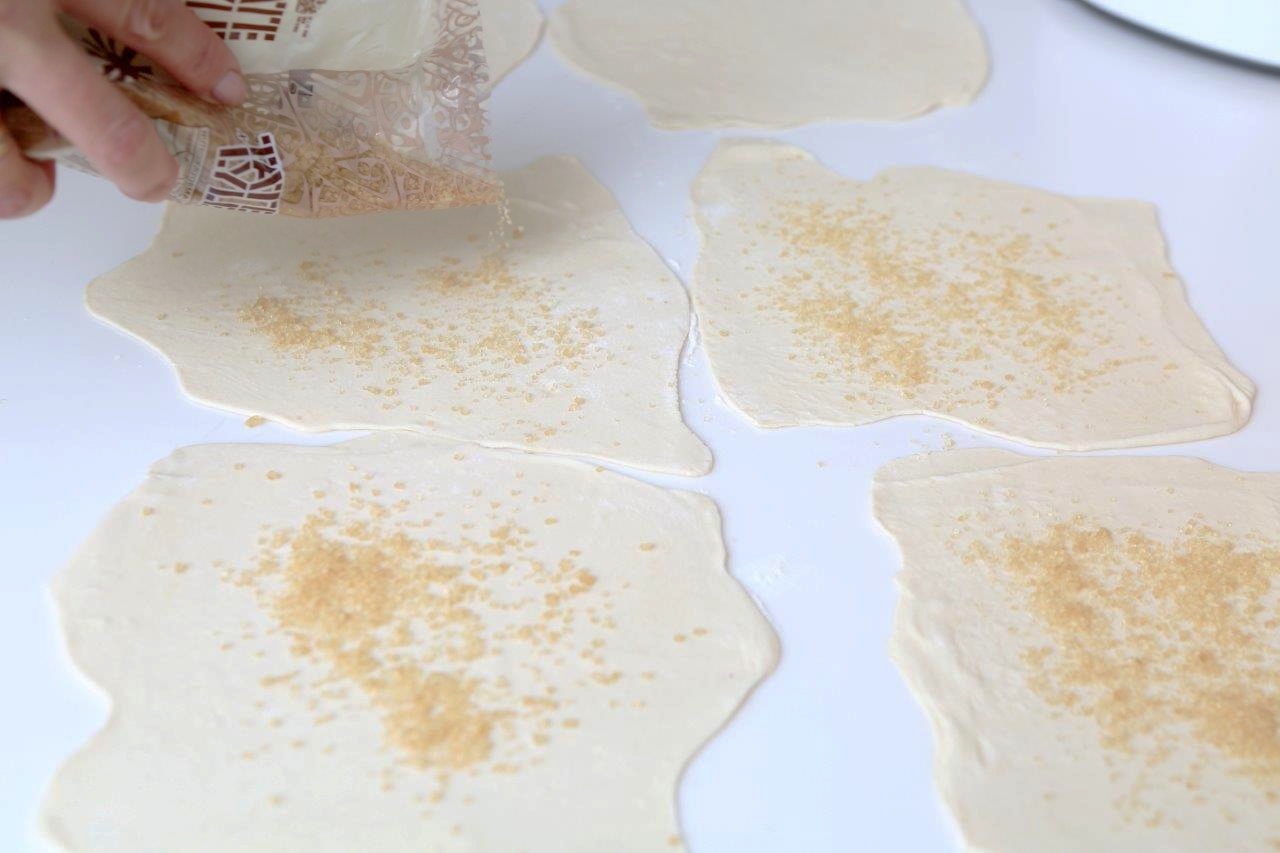
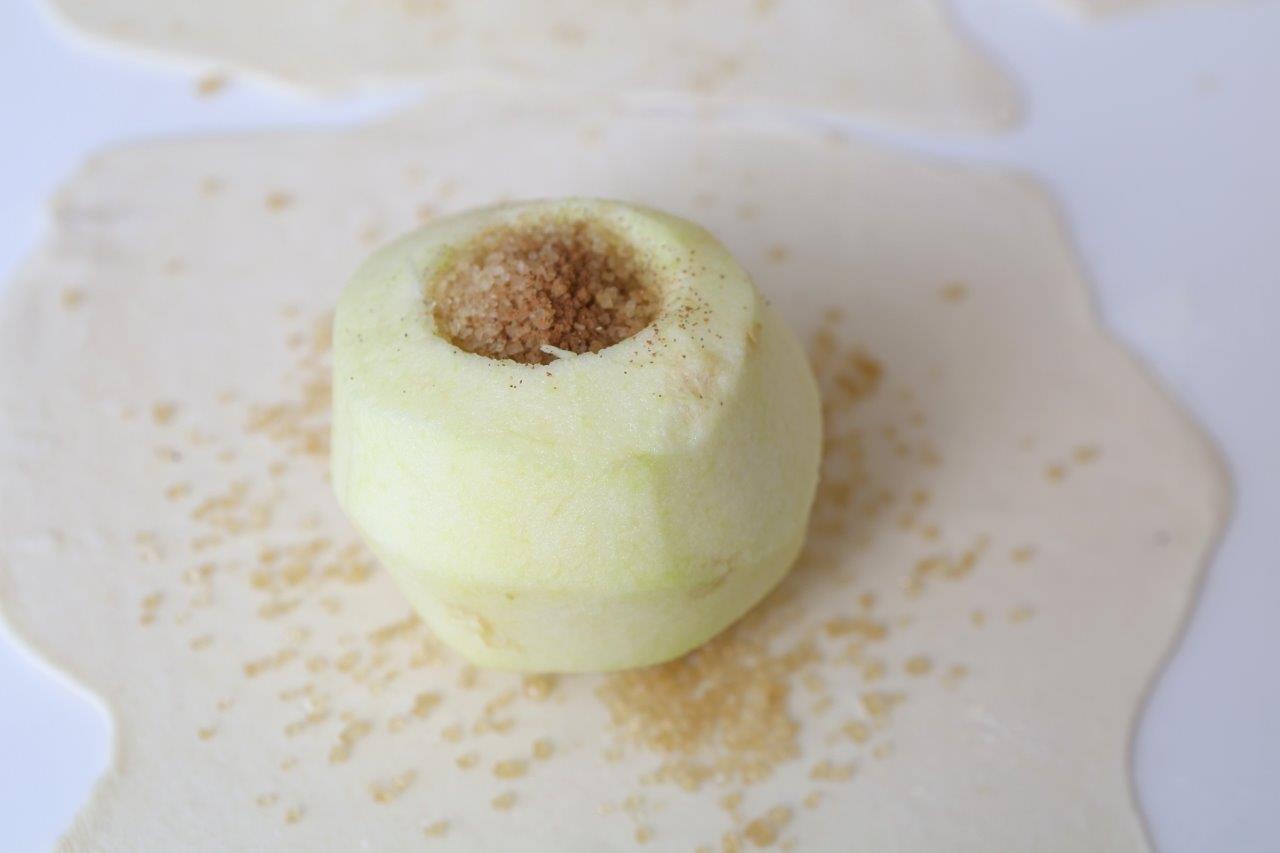
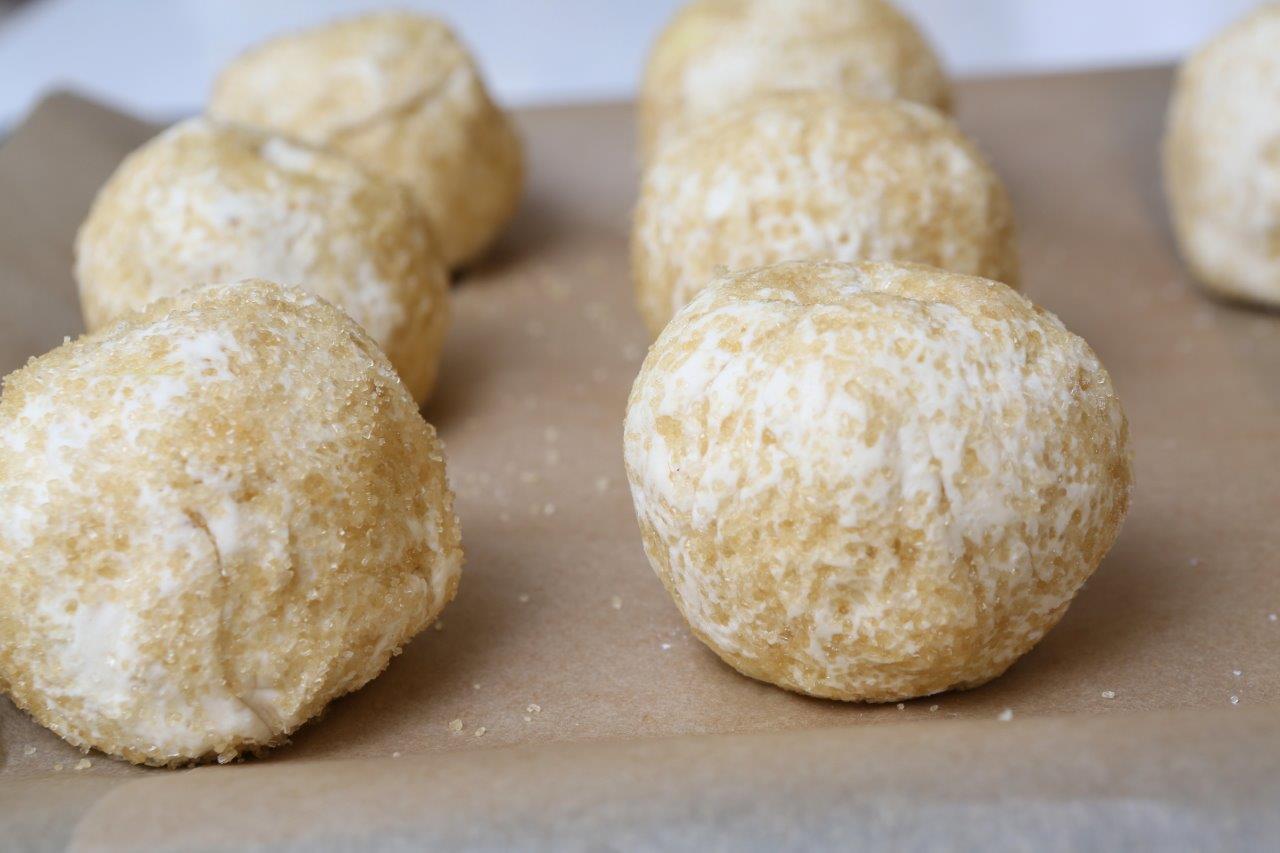
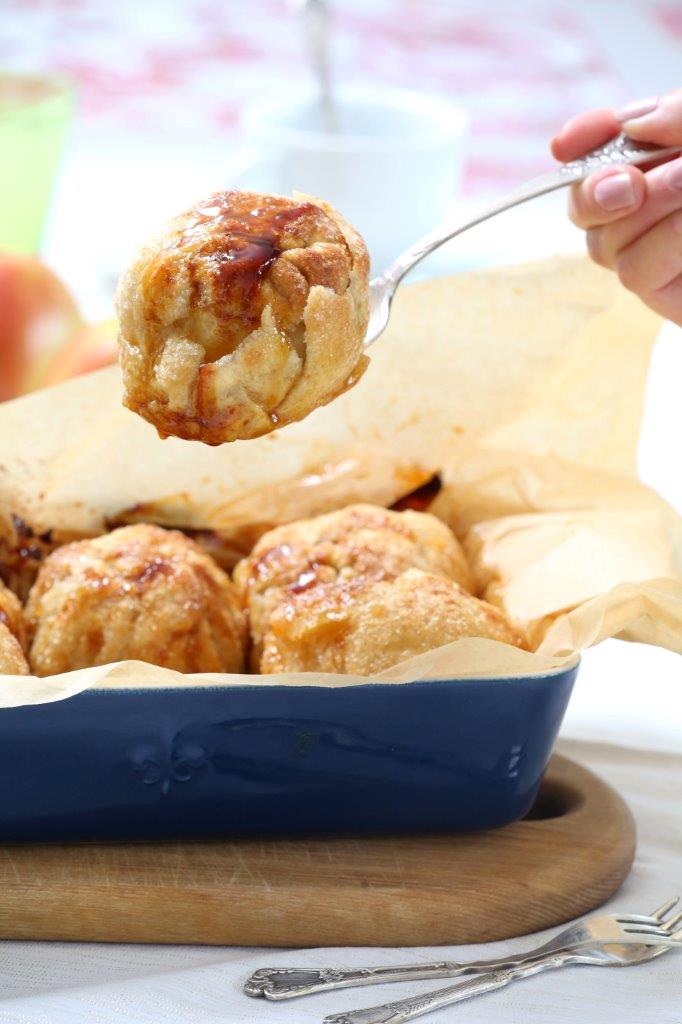
Baked apples in crunchy puff pastry
Another great fall treat with apples!
The puff pastry crust needs to be crunchy and caramelized, the apple in the center- soft and sweetly sour. You can scoop up the caramel from the bottom of the pan and pour it over the apples before serving- super delicious!
I figured out this recipe from a picture my sister in law sent from her trip to Holland. She said this dessert was absolutely amazing and a must-try in Holland. So from just looking at the picture and my sister in laws stories about how it tasted- we came up with this recipe. Sugar is a key ingredient here and you shouldn’t be afraid to use it generously. It is what makes the caramel ooze out at the bottom of the pan and just adds extra crunchiness to the crust.
8 sweet and sour apples, best for baking, peeled
1 pack of frozen puff pastry, should be 4 rectangles cut in half
8+ tbsp brown sugar
Cinnamon, ground
1. Preheat the oven to 180 degrees (celsius), line a deep baking pan with parchment paper.
2. Remove the dough from the freezer and place on the counter that has been covered with flour. After 15-20 minutes they will be ready to be rolled out.
3. Peel the apples and cut out the core like this: you cut a cone shaped hole at both ends of the apple, leaving the center intact so the sugar doesn’t spill through. One cone on the top needs to be bigger- that is where the sugar will be.
4. Once the dough has defrosted, cut the rectangles in half making 8 squares.
5. Roll out each square as thin and big as you possibly can to cover a whole apple. Sprinkle a tsp of sugar on the dough evenly. Place the apple in the middle and fill up the largest cone with sugar and sprinkle cinnamon on top.
6. Take the corners of the dough square and stick together on top of the apple. Sprinkle sugar on thecounter top and evenly roll the apple in the sugar to be completely covered.
7. Place in the prepared baking pan and bake for 20-30 min until golden brown and caramelized.
8. Serve hot or cooled- with some vanilla ice cream.
Recipe: Ārija Avota
Photo: Ieva Andersone (IG: @photoievaandersone)
Publication: Ievas Receptes


Lingonberry/apple jam
The lingonberry jam is my absolute favorite! The berries have so many health benefits upon being very delicious- something like a cranberry, but with a little more variety. It goes perfectly with hash browns, pork roast, or any type of pancakes. That is why this is the only jam I try and make every year.
2 kg lingonberries, washed
1 kg sour apples, peeled and diced
600 g + jam sugar
100 ml water
Makes 6 0.5l jars
1. Wash the berries through a sift, drain water and let dry.
2. In the meantime, peel and dice the apples.
3. In a large pot, put the berries and diced apples in water and simmer on medium heat. Stir occasionally and let it simmer until you see the juices coming up.
4. Lower the heat and let it cook for 15 more minutes, stirring and removing the foam from the top occasionally.
5. Add the sugar and keep cooking until the jam thickens.
6. Taste the jam and add more sugar if necessary.
7. In total the cooking time is about 50 min, but you can keep cooking for an extra 10 min if you want it thicker.
8. Pour the jam in jars while still hot, put lids on and set aside to cool. This will help preserve the jam.
9. Store the jars in a cool place.
Recipe: Ārija Avota
Photo: Ārija Avota
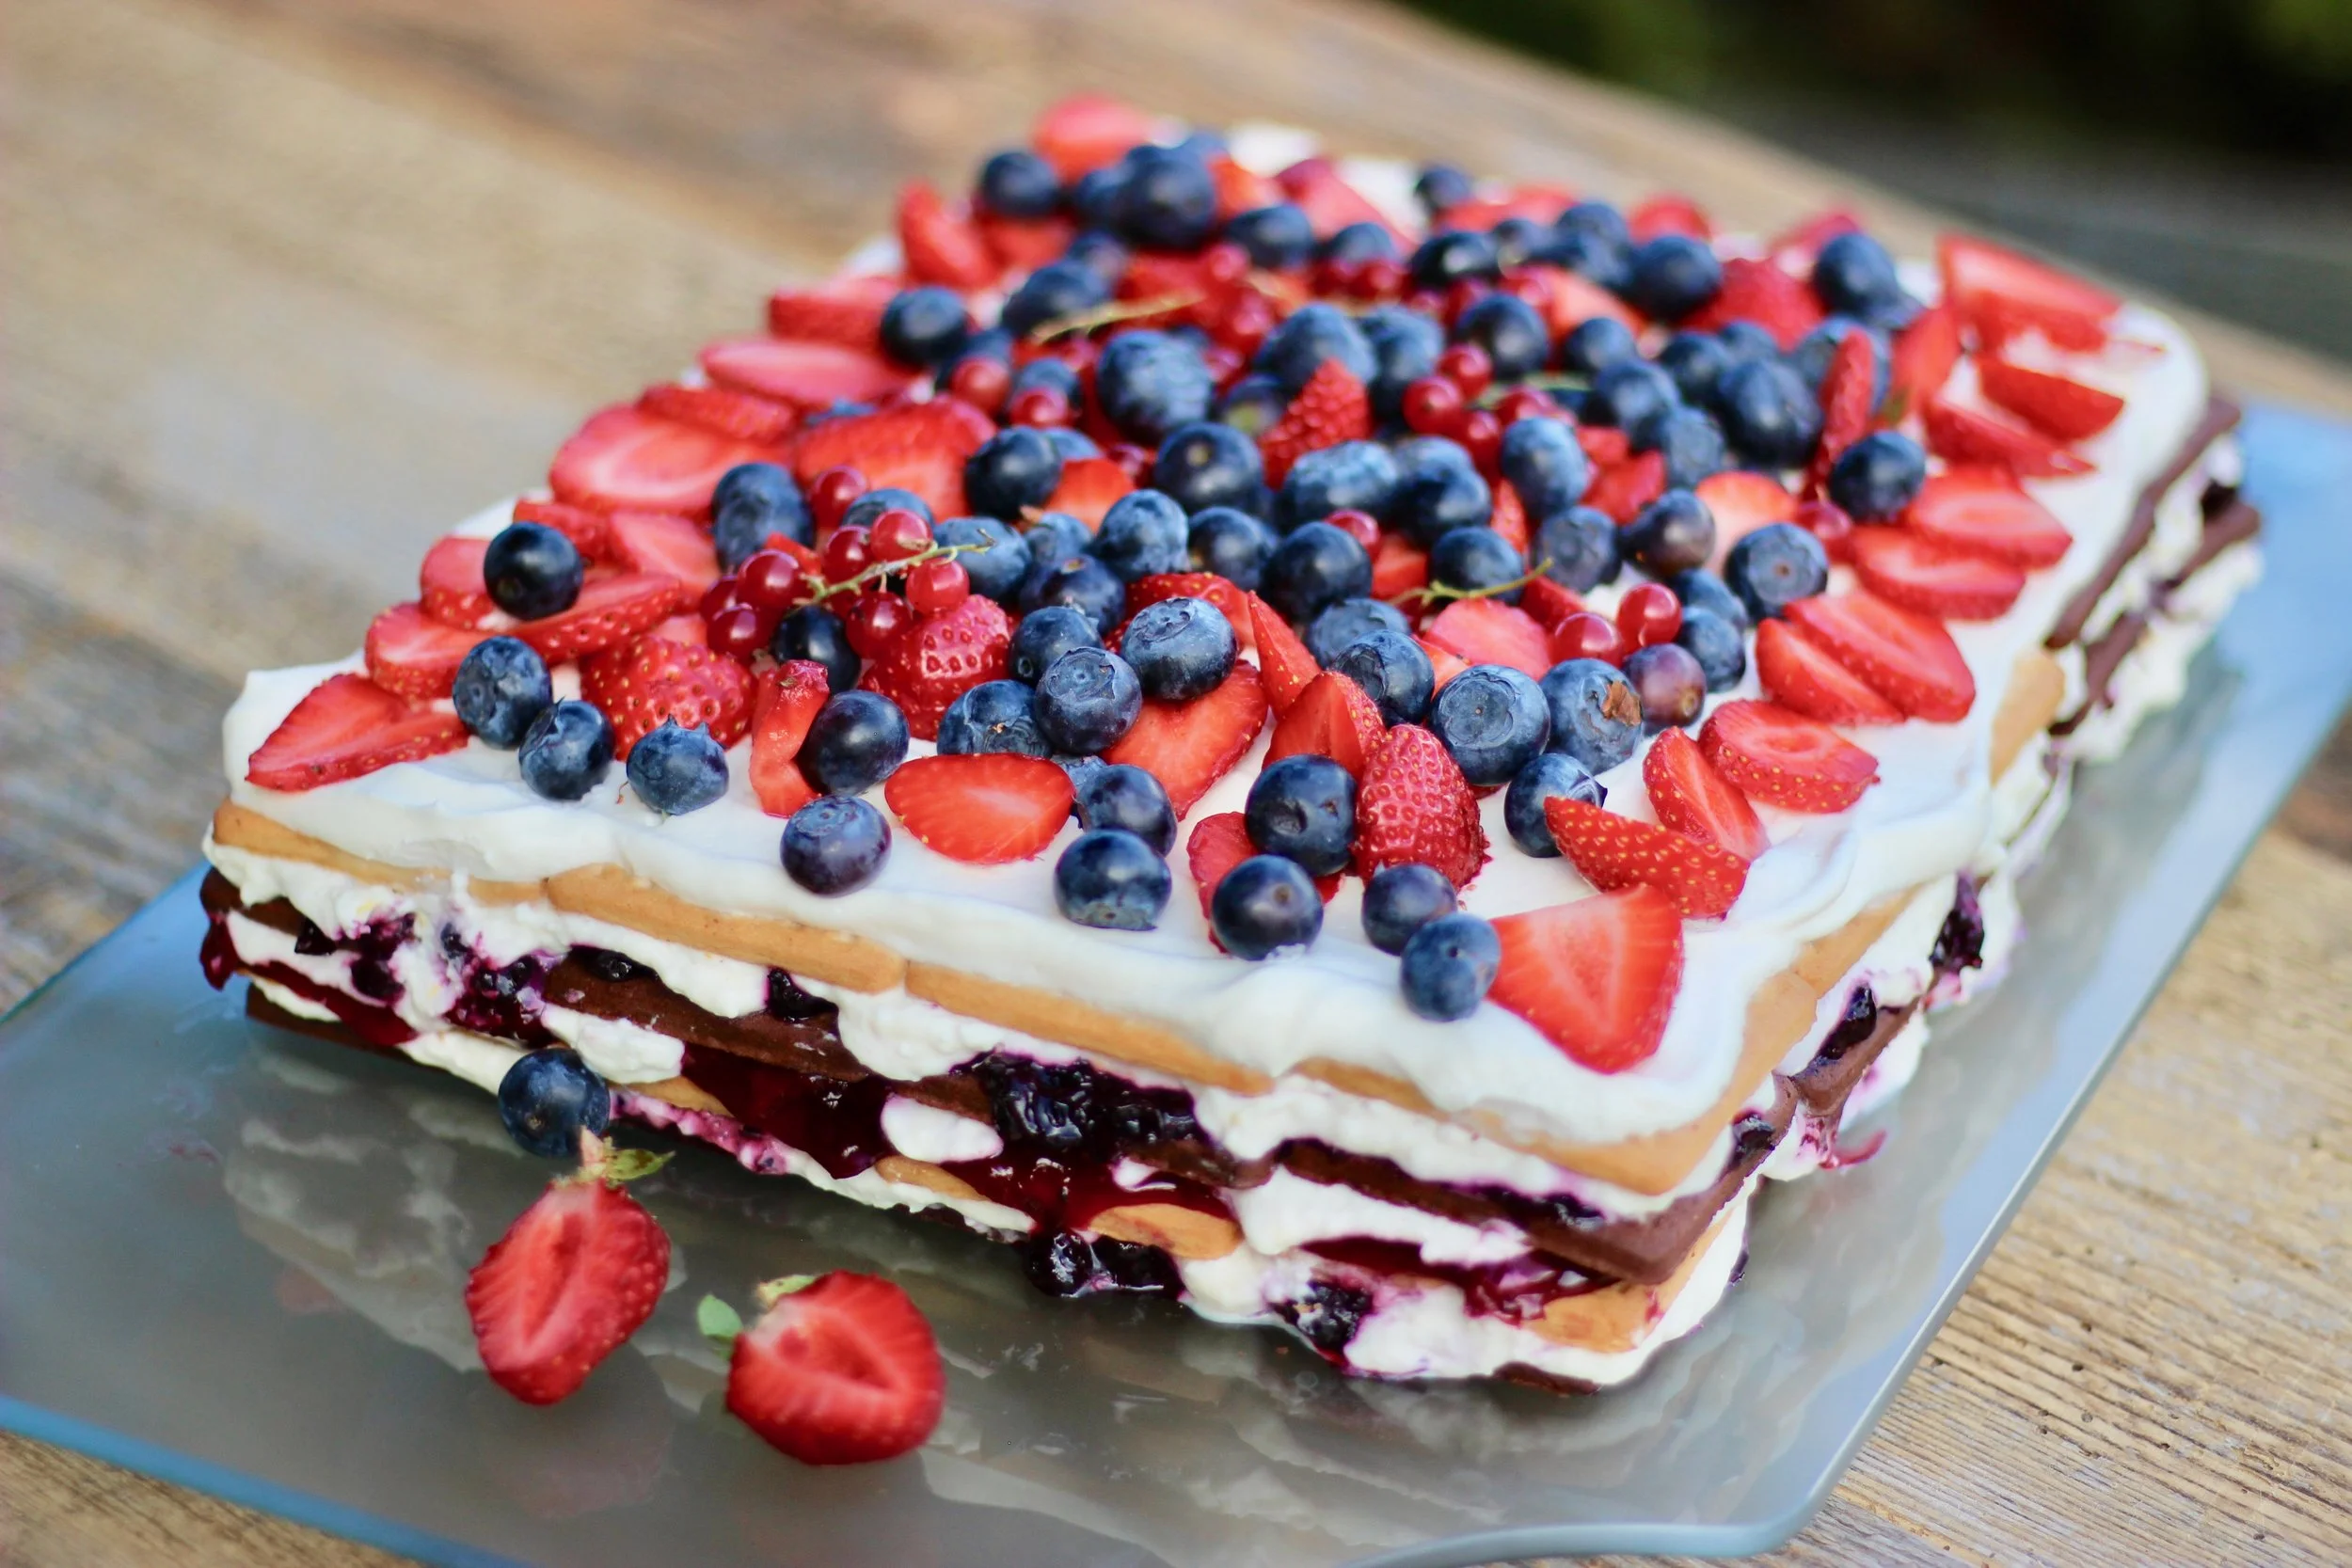
Stacked cookie and condensed milk cake
What an amazing recipe for a quick but super delicious cake- it is sweet and sour and very full of flavor! The only part that takes a bit of time is the stacking and building process, but this is where you can get the kids involved and have a fun time together.
I make a black currant jam just for this recipe, but you can use the ones available in stores too- just make sure to get one that is more sour (black currant, cranberry etc).
64 pieces (or however much it takes to make the shape and size you desire) of Graham crackers or any similar plain cookie
500 g cottage cheese
250 g heavy cream
350-400 g condensed milk (with sugar)
The zest of 1 lemon
400 g sour jam- black currant or cranberry
1 kg assorted fresh berries
2 cups of milk for soaking the crackers
1. Whip the heavy cream to make whipped cream and mix that with the cottage cheese and condensed milk.
2. Pour half the milk in a shallow, wide bowl and add more milk as necessary moving forward. Dip each cookie in the milk and place on a large platter or pan. One layer is 16 cookies, there will be 4 layers total.
3. when the cookie layer is done, spread jam smoothly to cover all the cookies and then do the same with a quarter of the cream.
4. When the top layer is done, decorate very generously with the fresh seasonal berries.
5. Leave in the fridge to soak for a few hours or even overnight. The longer it refrigerates, the better it will hold together.
Recipe: Ārija Avota
Photo: Ārija Avota
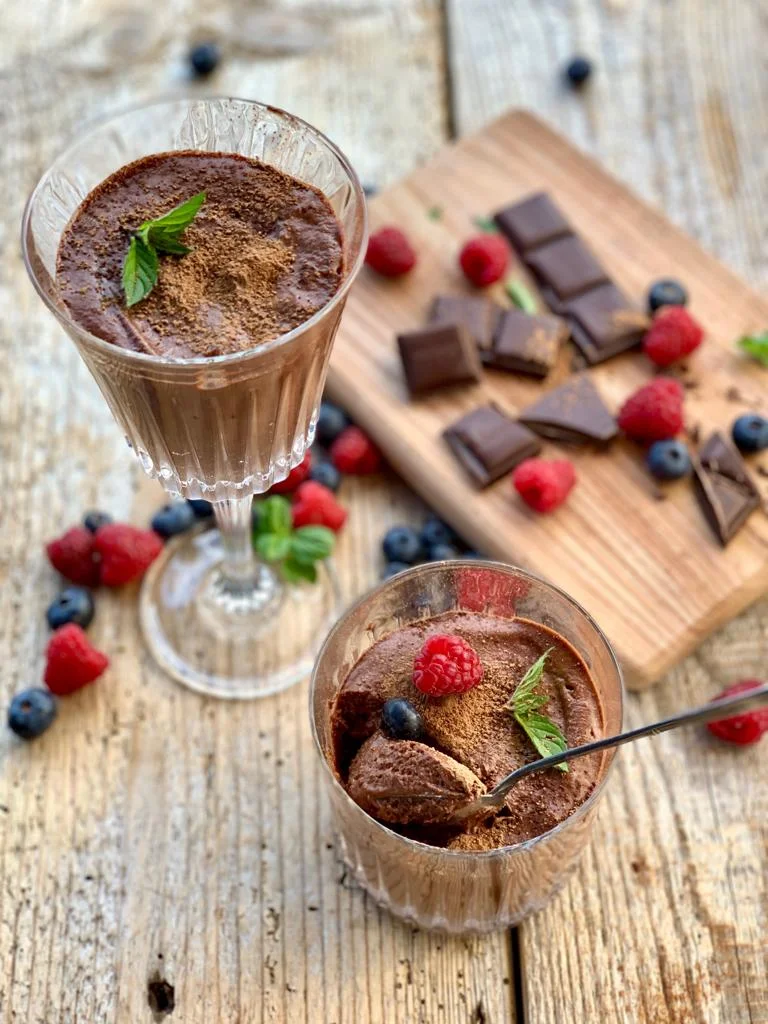
Chocolate mousse
This mousse is amazing- it has a silky smooth texture, but still is packed full of intense chocolatey flavor! Paired with fresh seasonal berries this is just a summer dessert must-have.
When served in beautiful glasses and decorated with berries this simple dessert can become very fancy and beautiful. If you want to bring the mousse to an event- to work or anywhere else- you can use transparent plastic cups and transport them easily.
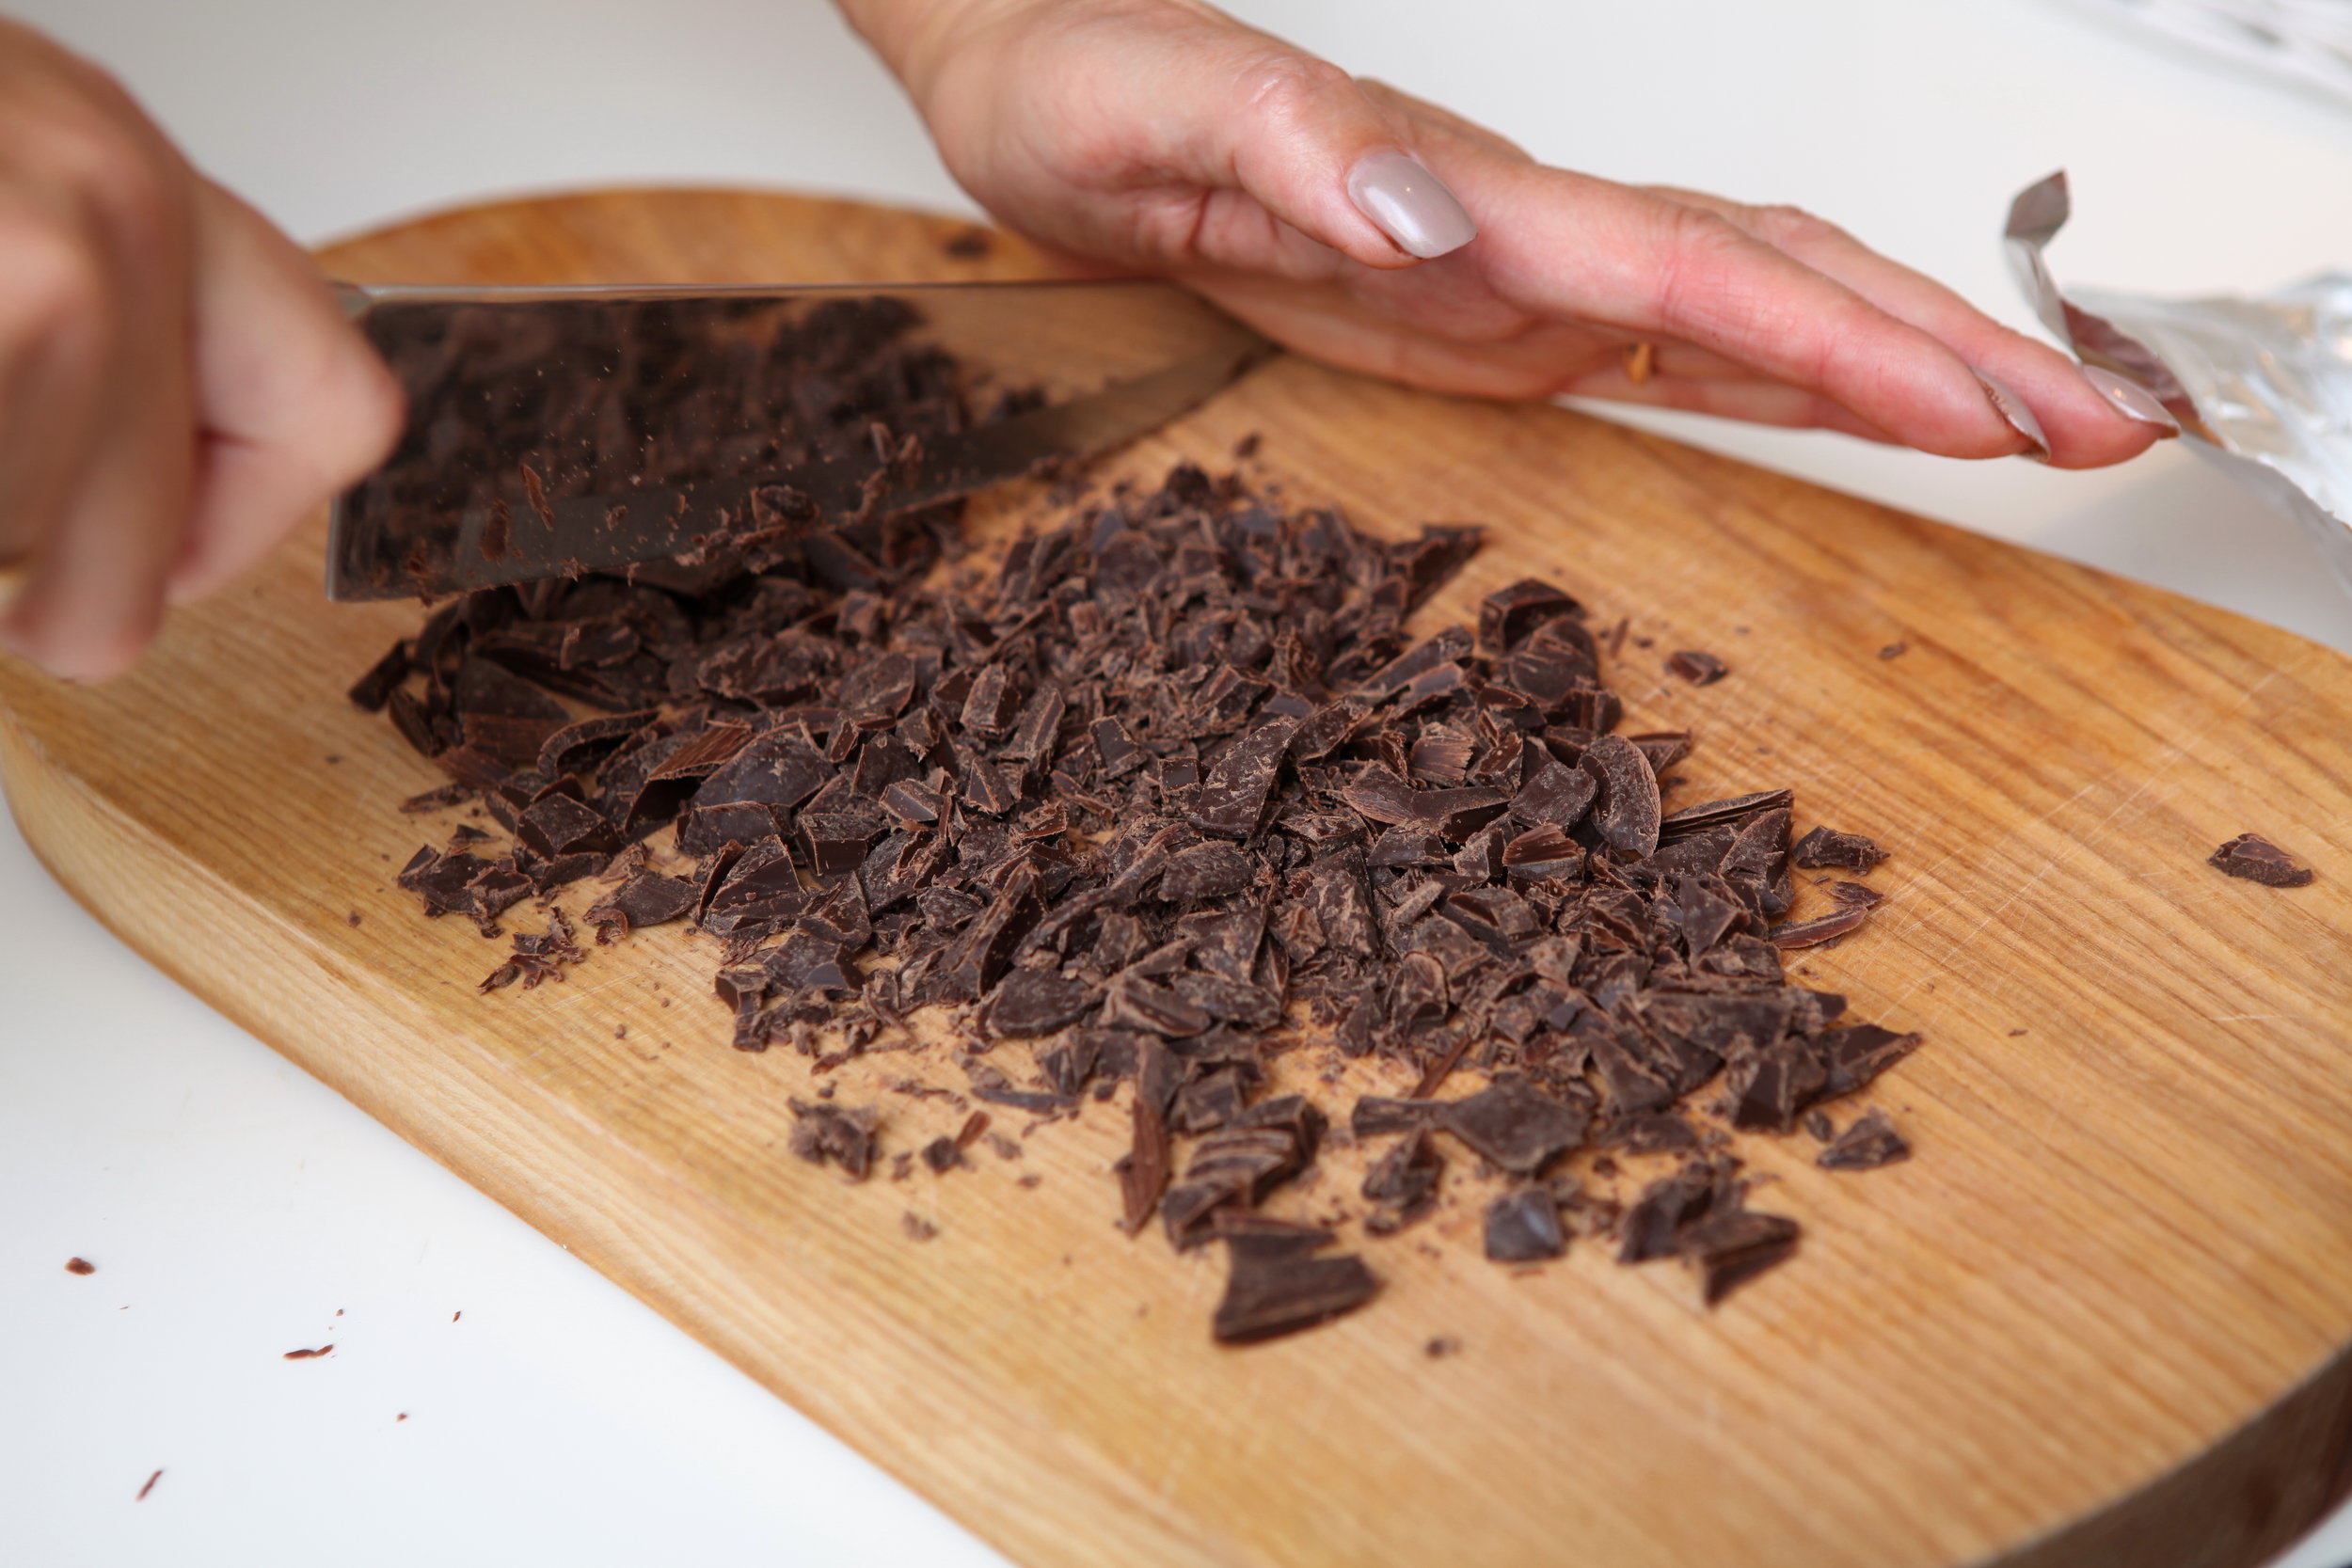
For this type of desert you really need to pay attention to what type of chocolate you use- choose one that has a higher cocoa content to achieve a deeper, richer flavor. It also wont create little clumps of fat when chilled, that can happen with lower quality chocolate.
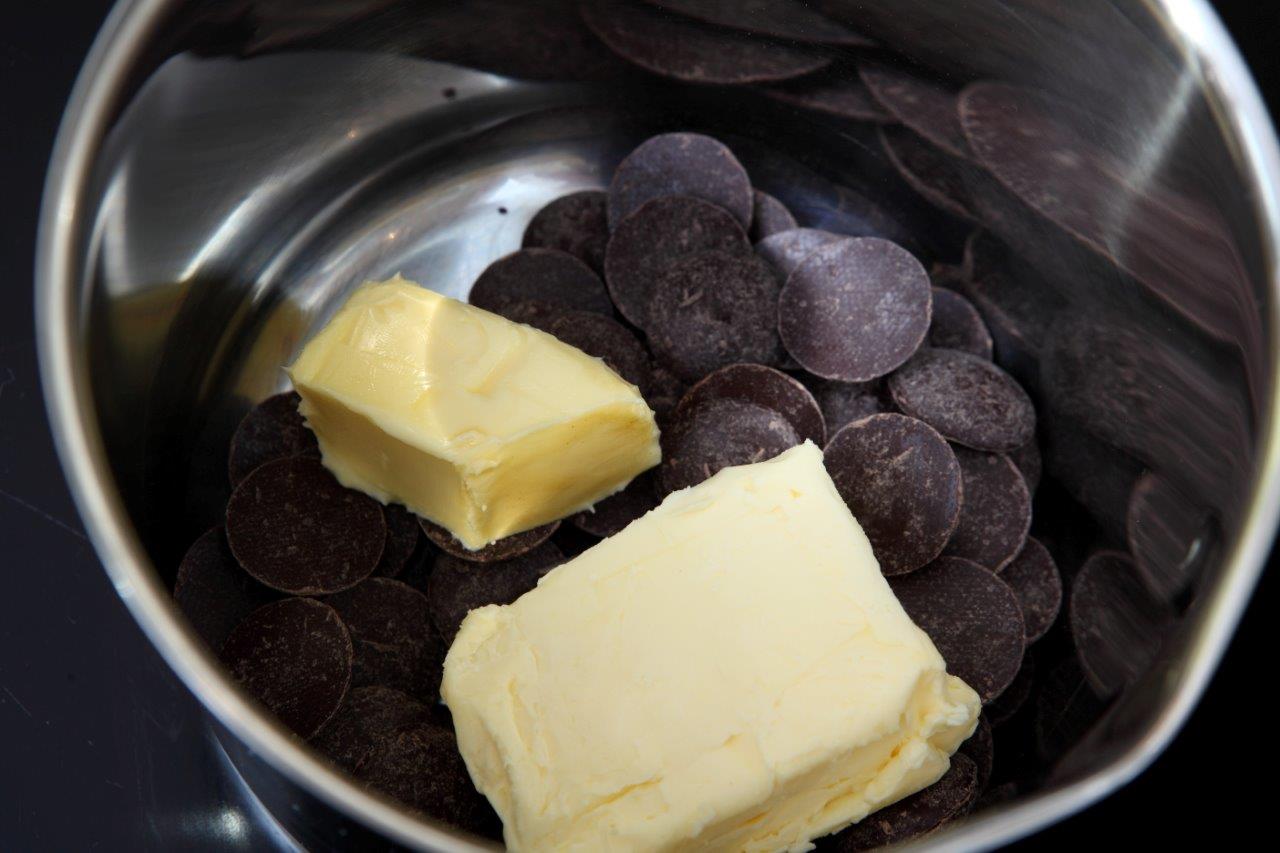
200 g dark chocolate (approx 70% cocoa content)
40 g butter
4 eggs
2 tbsp sugar
300 ml heavy cream
1 tsp vanilla paste or vanilla sugar
Pinch of salt
A few tbsp cocoa powder for sprinkling
For serving: assorted berries- blueberries, raspberries, cut strawberries; in winter- clementine.
Makes 8-10 portions
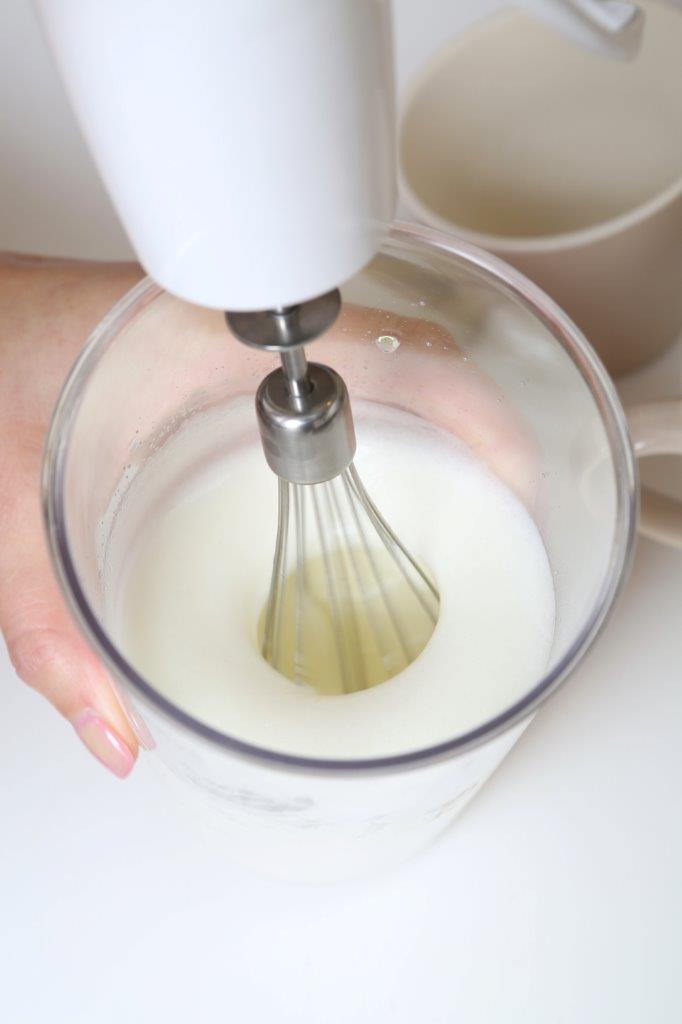
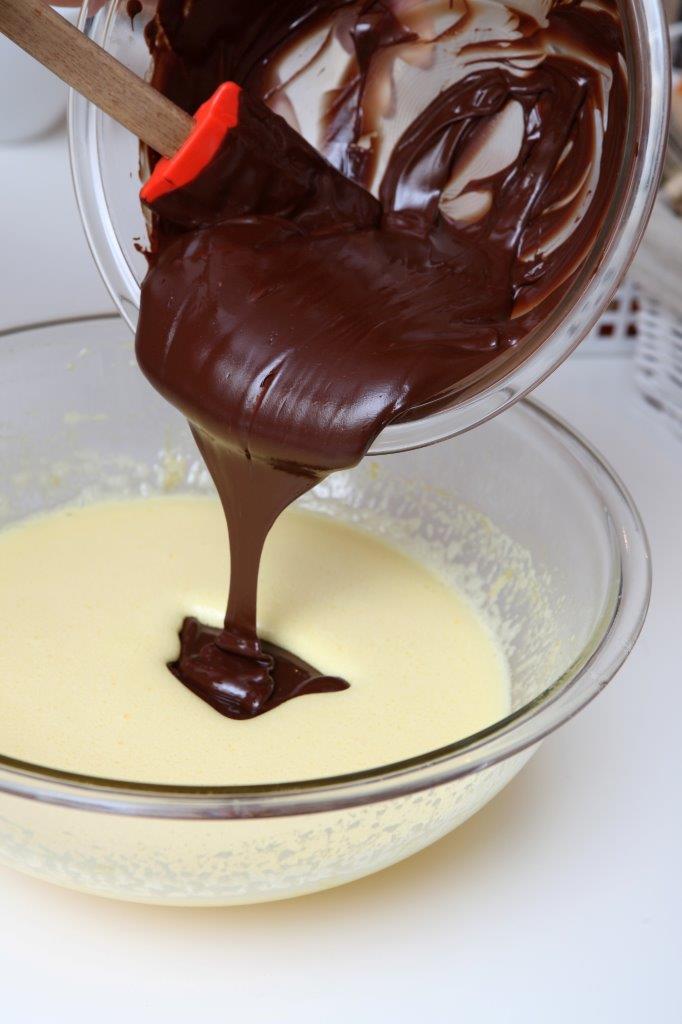
1. Melt the chocolate with the butter using the over water method and set aside to cool.
2. Separate egg whites from yolks.
3. Using an electric mixer beat the egg whites in a clean bowl with the pinch of salt until foamy. Then add half a tbsp of sugar and keep beating until stiff peaks form and the whites hold in the bowl when turned over.
4. In another bowl beat the egg yolks and gradually add the 1.5 tbsp of sugar and keep beating until it doubles in volume and sugar dissolves.
5. Slowly beat in the heavy cream to the egg yolk mixture just until incorporated.
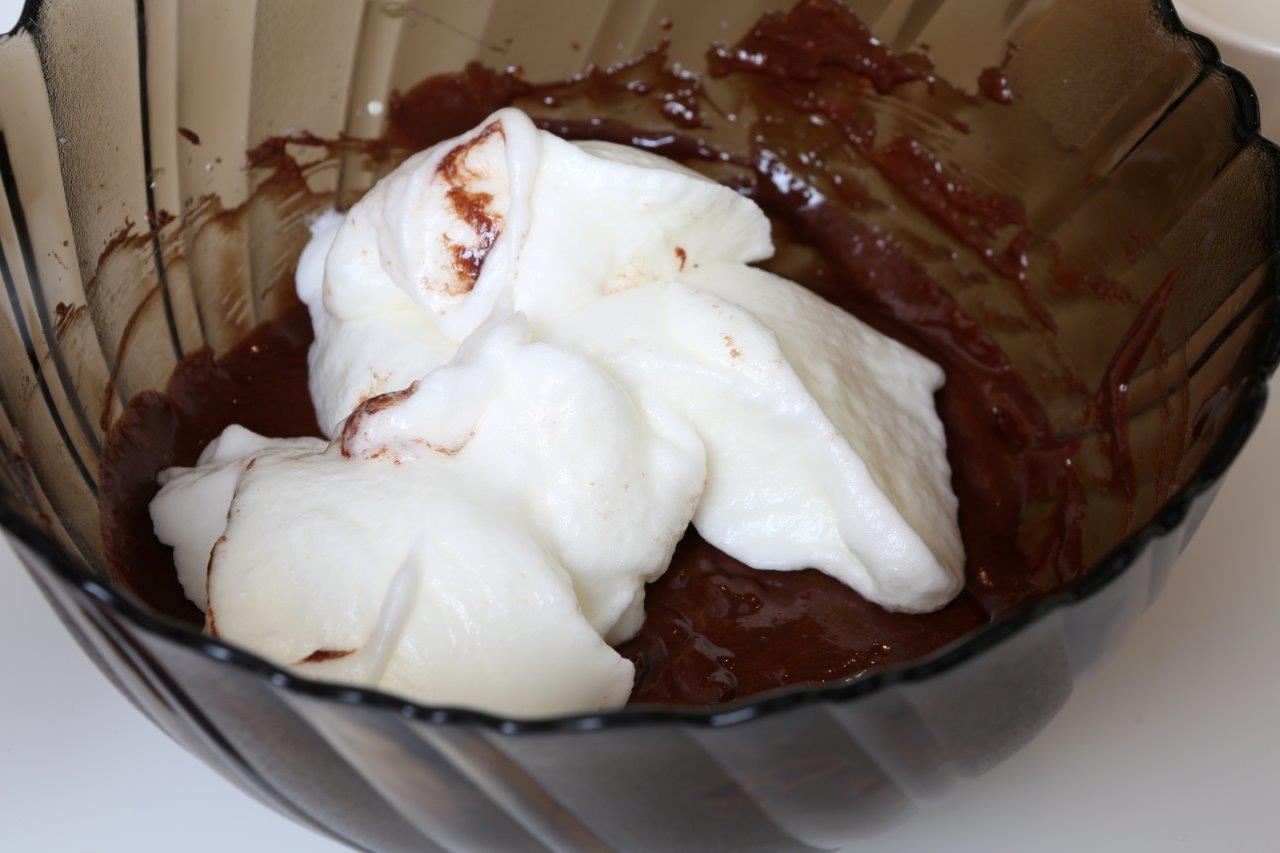
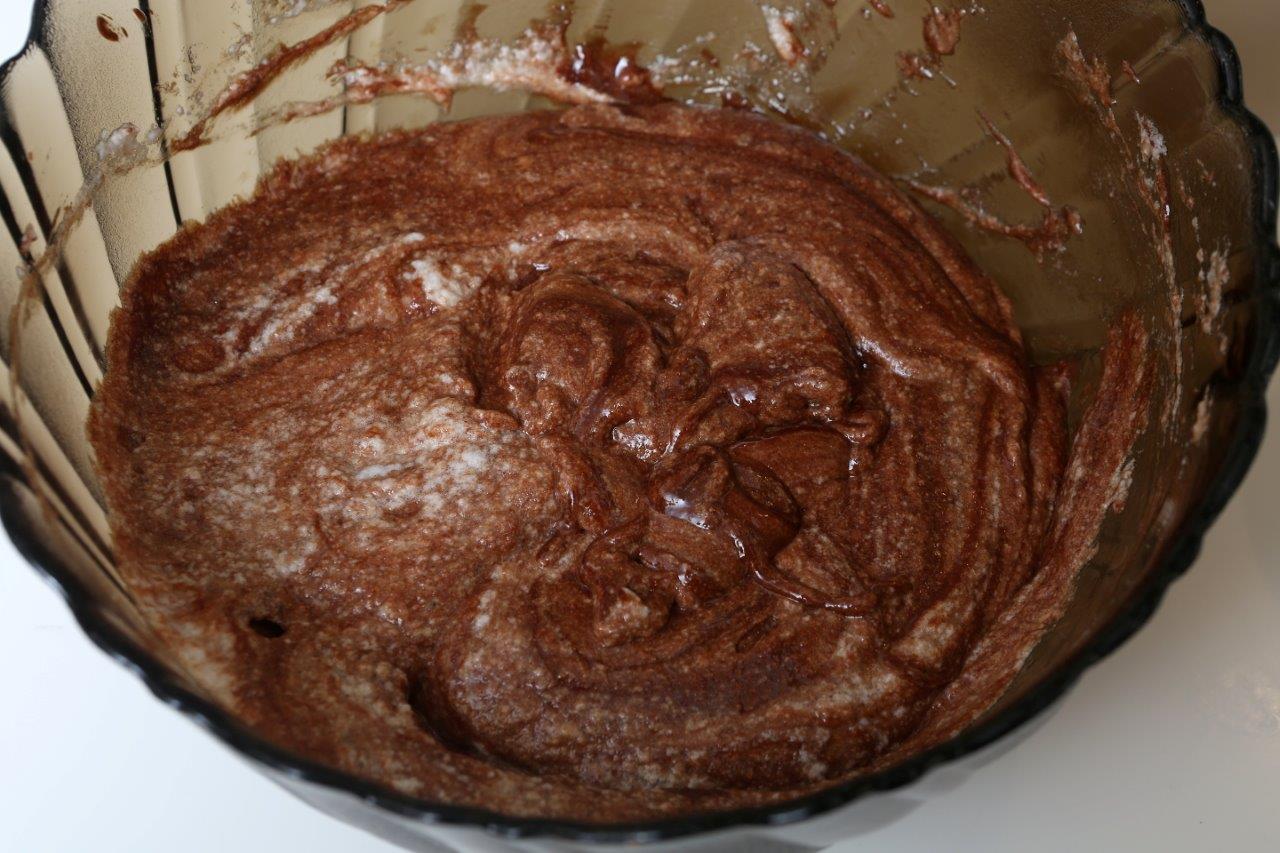
6. Now gradually mix in the cooled chocolate to the egg yolk and heavy cream mixture in 3-4 portions. Use a whisk for this task and do not mix too strongly, you just want everything mixed well together, but keeping the lightness.
7. Fold in the egg whites very carefully.
8. Now fill the chosen molds or glasses.
9. Place the molds in the fridge overnight or at least 4 hours.
10. Before serving, sift over some cocoa powder and decorate with berries.
Recipe: Ārija Avota
Photo: Ārija Avota

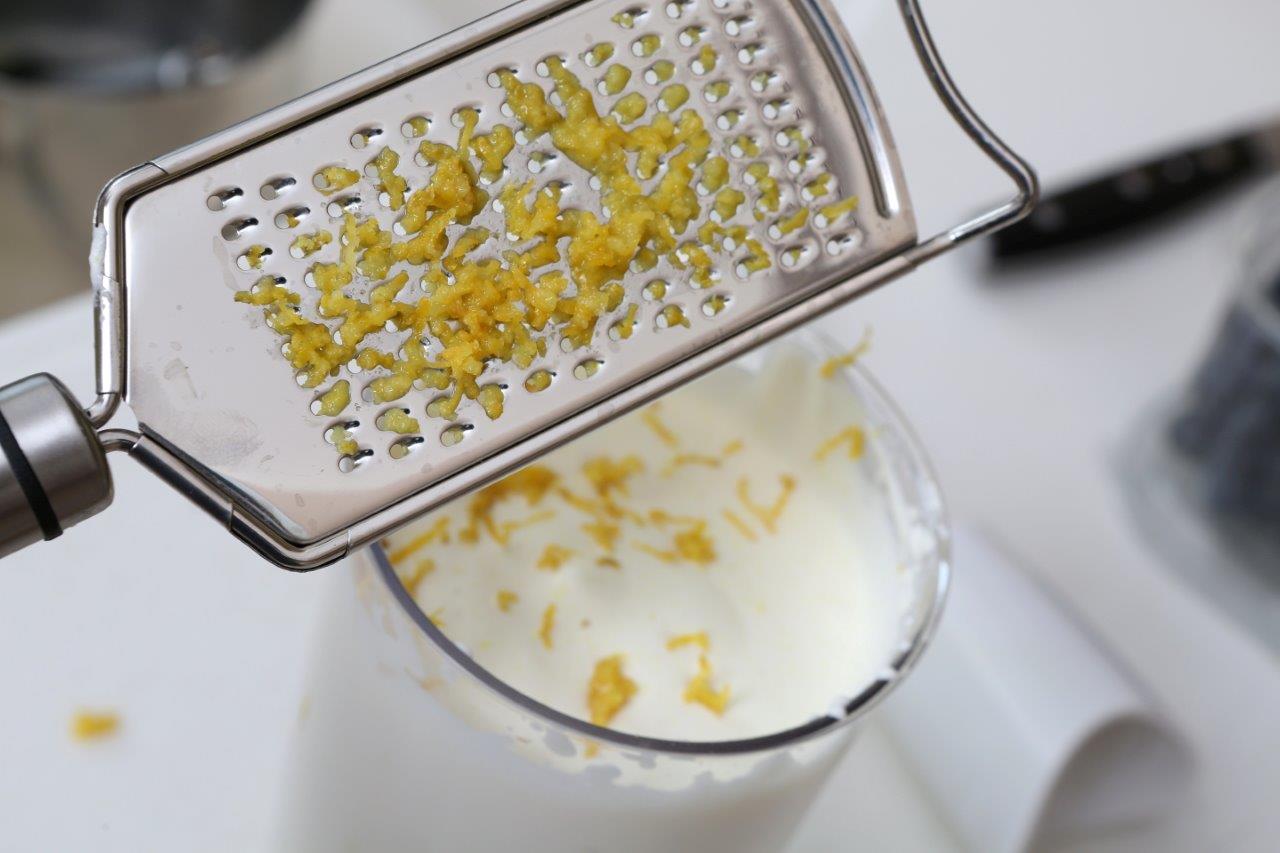
Quick lingonberry and buttermilk cake
This is oh so good- it’s like a huge muffin! The buttermilk makes it very moist and fluffy, the lemon zest adds aroma and the lingonberries give that amazing sour flavor. This can also be made with blueberries.
Maybe you want to make this for someone special this evening?
120 g butter, room temp
200 g sugar + 1 tbsp for sprinkling
1 egg, room temp
The zest of one lemon (only the yellow part)
1 tsp vanilla paste or vanilla sugar
250 g all purpose flour
2 tsp baking powder
Pinch of salt
150 ml buttermilk
1.5-2 cups of lingonberries, cranberries or blueberries
Butter or oil for greasing the pan
1. Grease a 20X22 cm square baking pan.
2. Preheat the oven to 185 degrees (celsius).
3. In a medium bowl beat together the soft butter with sugar until light and fluffy, add the vanilla, lemon zest and egg, beat until well incorporated.
4. In a smaller bowl, whisk together the flour, baking powder, salt and berries.
5. Add the dry ingredients to the butter mixture alternately with the buttermilk (gently stir in a little flour, then buttermilk, then flour and so on). Do not overmix as the dough will not be as fluffy.
6. Pour the dough in the prepared pan and sprinkle with a tbsp of sugar.
7. Bake in the center of the oven for 35-45 min until toothpick comes back clean.
Recipe: Ārija Avota
Photo: Ieva Andersone (IG: @photoievaandersone)
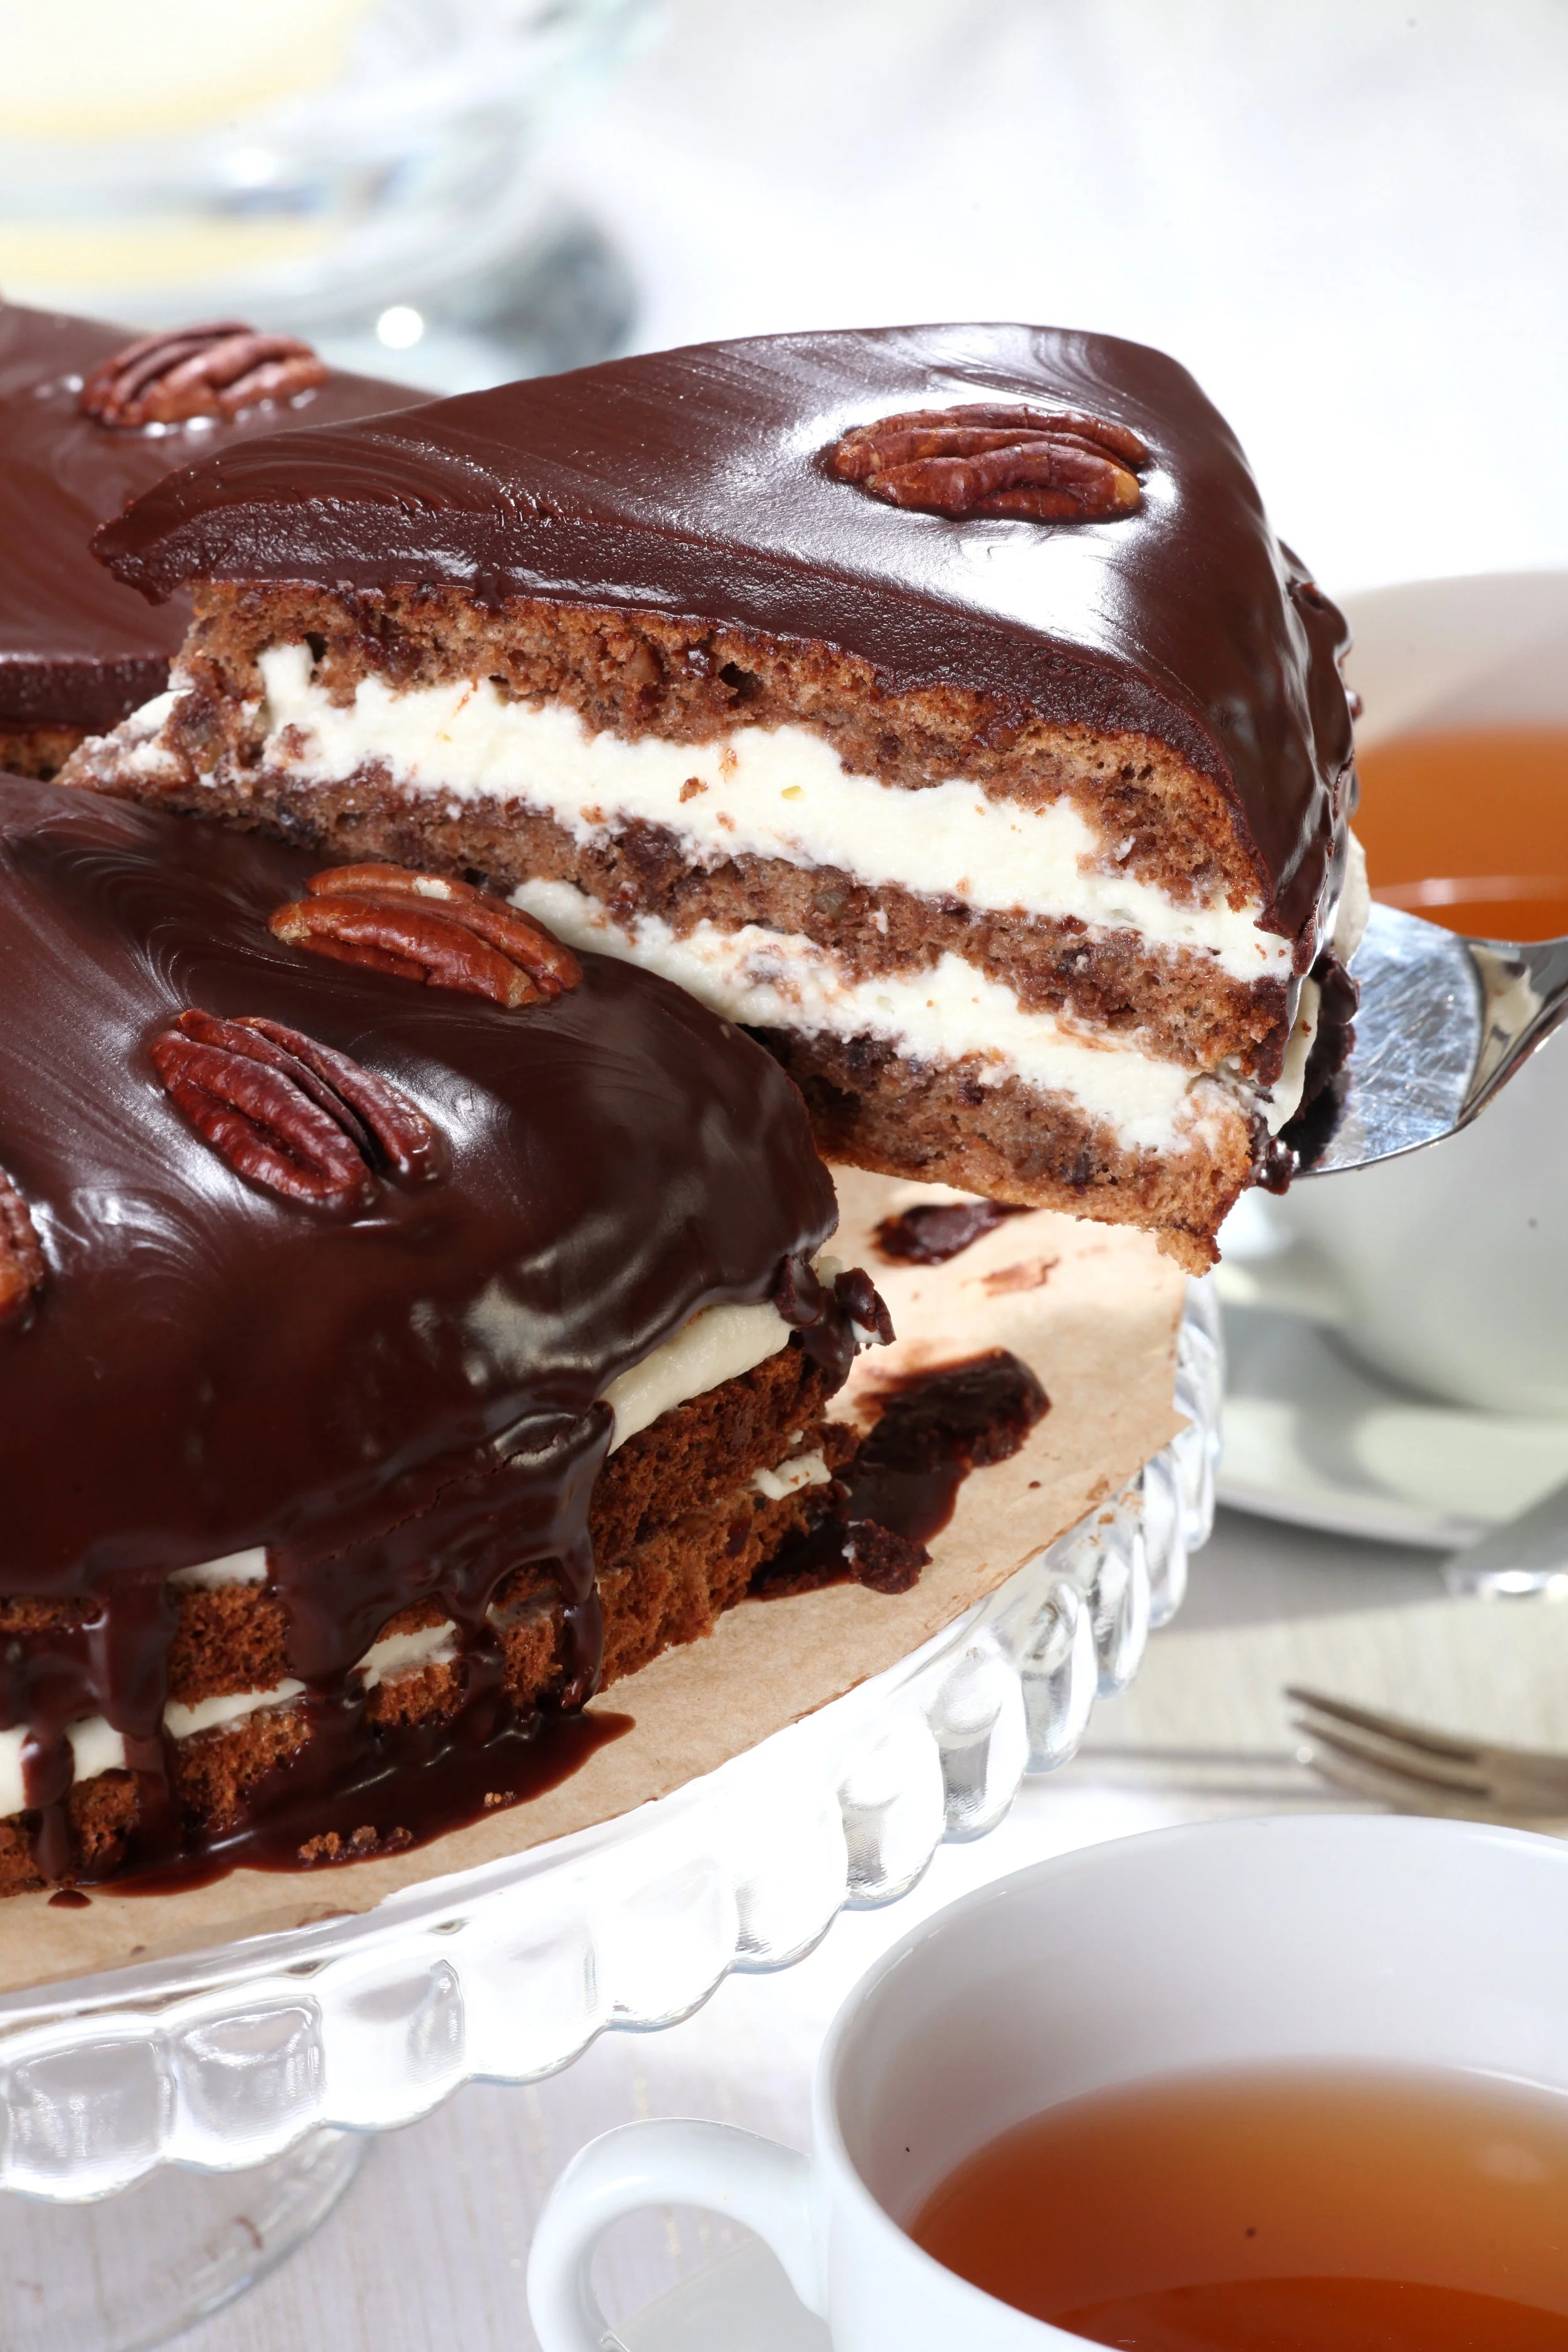
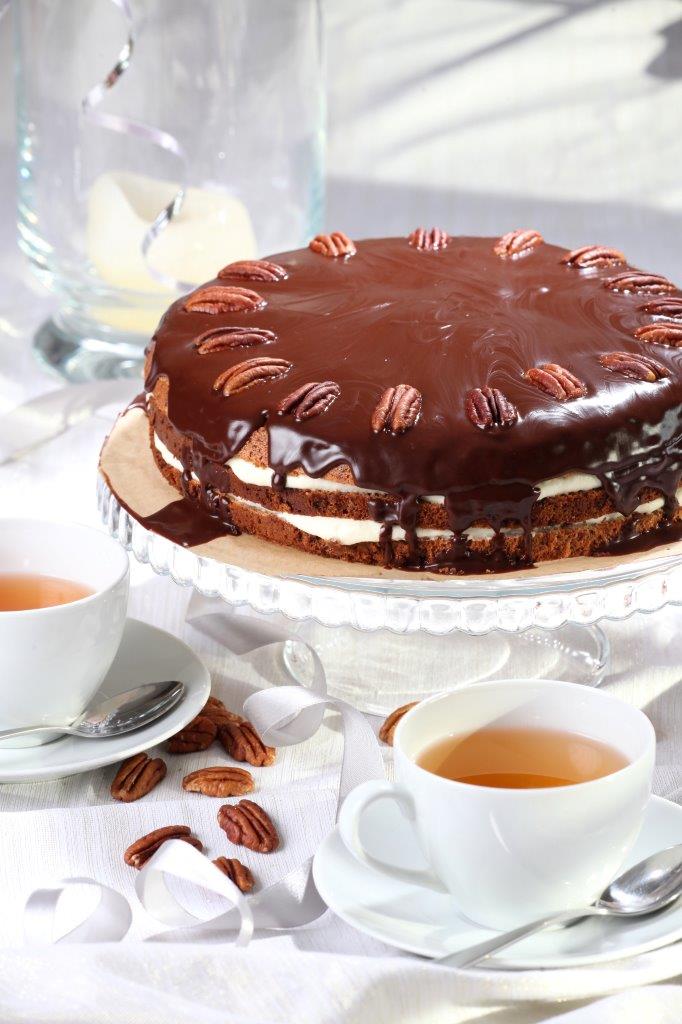
Chocolate pecan torte
This is a favorite of mine and my daughters. We have been making it for around 25 years! It has been an often centerpiece of our Christmas dessert table.
When my daughter was much smaller she used to help with glazing and decorating the cake and now she bakes it even more skillfully than me.
The original recipe is taken from a 1994 edition of the recipe magazine Bon Apetit, but we have made our adjustments and tweaks over the years. The chocolate in the biscuit is melted instead of shaved, which gives a darker color and better taste. We also add a bit more heavy cream since that adds height to the torte and also keeps it moist.
The baking itself isn’t very complicated, but this still tastes amazing and everyone who has tried it compliments that it is just the right sweetness. Perfect.
For the biscuit layers
100 g unsalted butter, room temp
200 g sugar
6 large egg yolks, room temp
1 tsp vanilla paste or vanilla sugar
60 g all purpose flour
170 g pecan nuts, toasted then chopped
60 g dark chocolate (cocoa content at least 50%), melted
8 large egg whites, room temp
For the cream filling
350 ml heavy cream, chilled then whipped
3 tbsp sugar
1 ½ tsp bourbon (can use brandy, rum or cognac)
For the glaze
160 g dark chocolate (cocoa content at least 50%)
100 g unsalted butter
1 tbsp light syrup or soft honey
For decorating
12 pecan halves
Make the biscuit
1. Preheat the oven to 180 degrees (celsius). Grease a 22-25 cm diameter round cake pan. line the bottom with parchment paper.
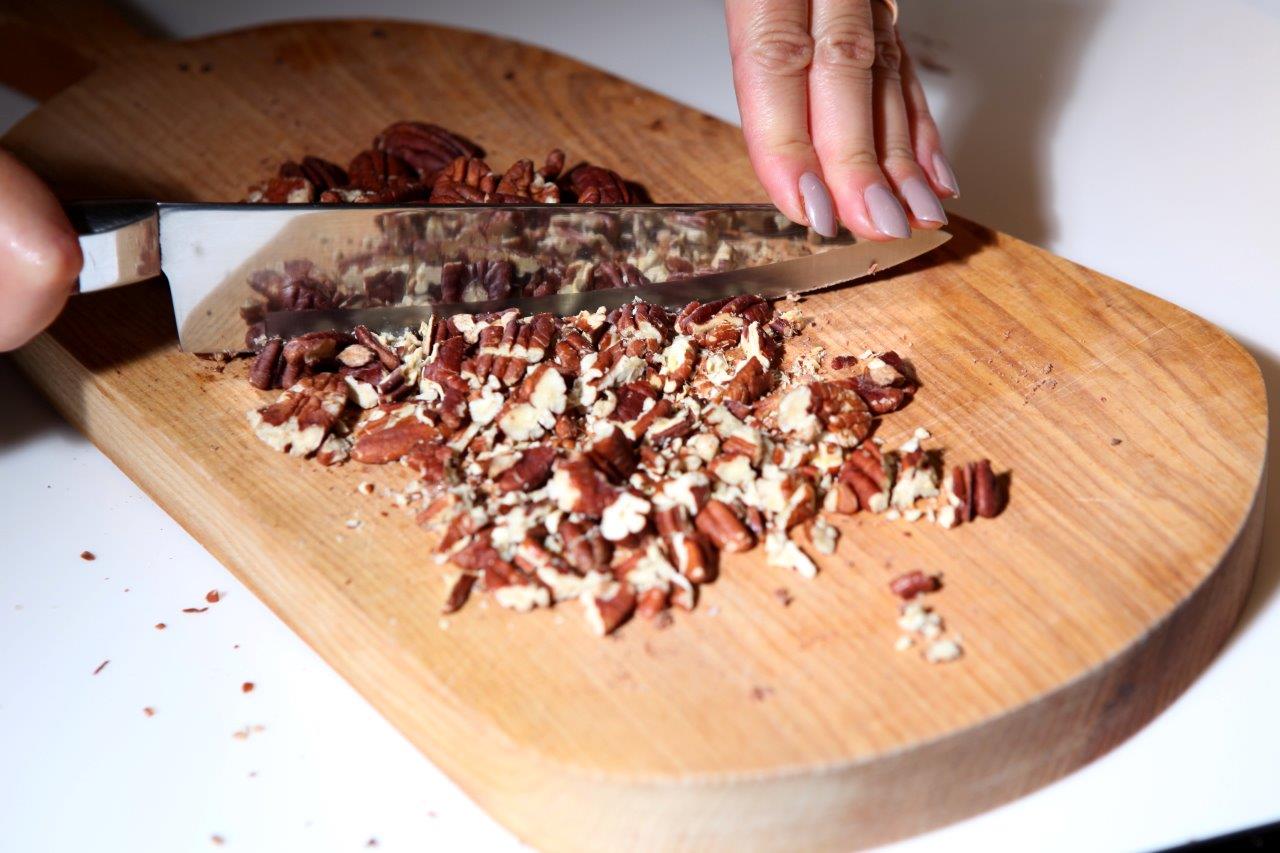
2. Place the pecans on a baking tray and toast in the oven for approximately 8 min until fragrant. When cooled a little, place the pecans on the chopping board and pick 12 of the best looking halves for decorating and finely chop the rest. You can use a food processor to pulse the nuts, they need to be in pretty fine pieces as they partially will act as flour.
3. Melt the chocolate (best using the over water method). Set aside to cool.
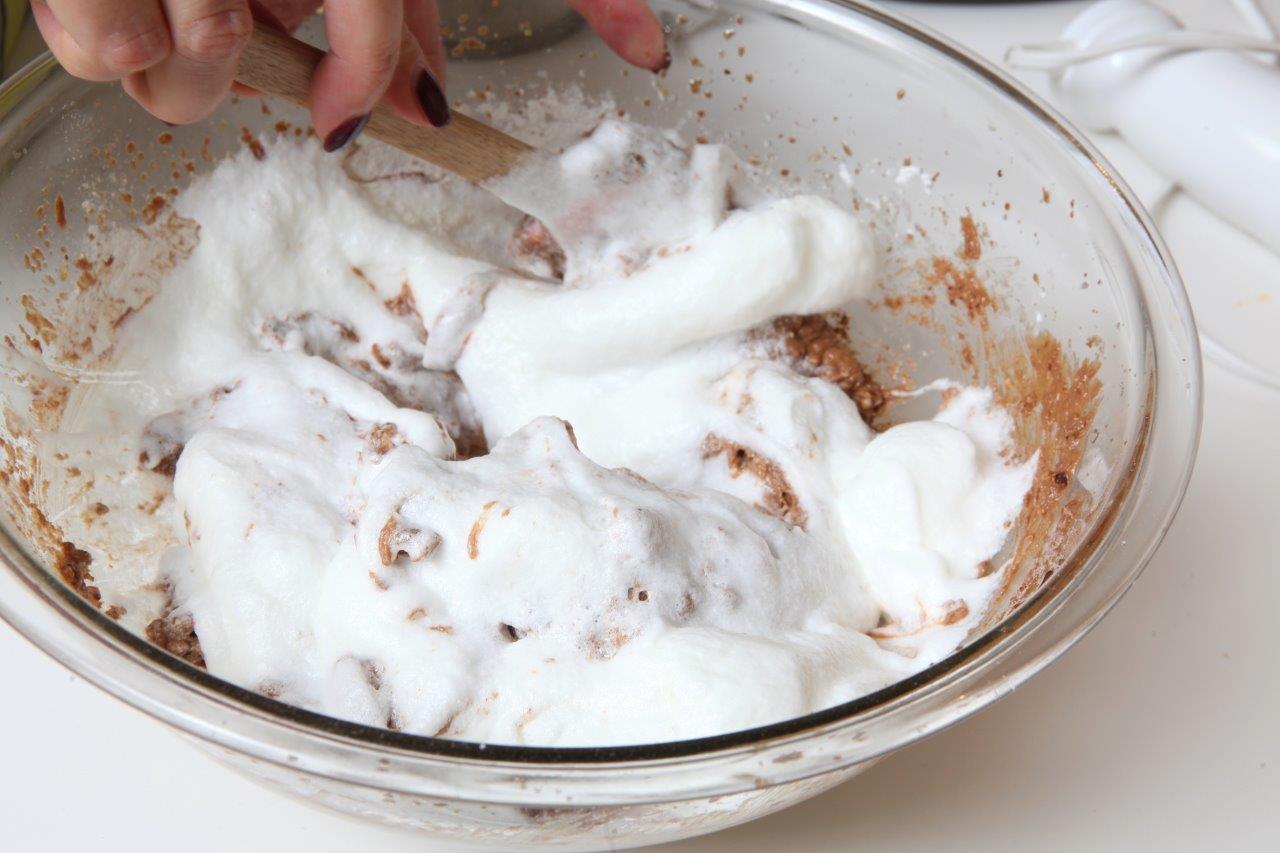
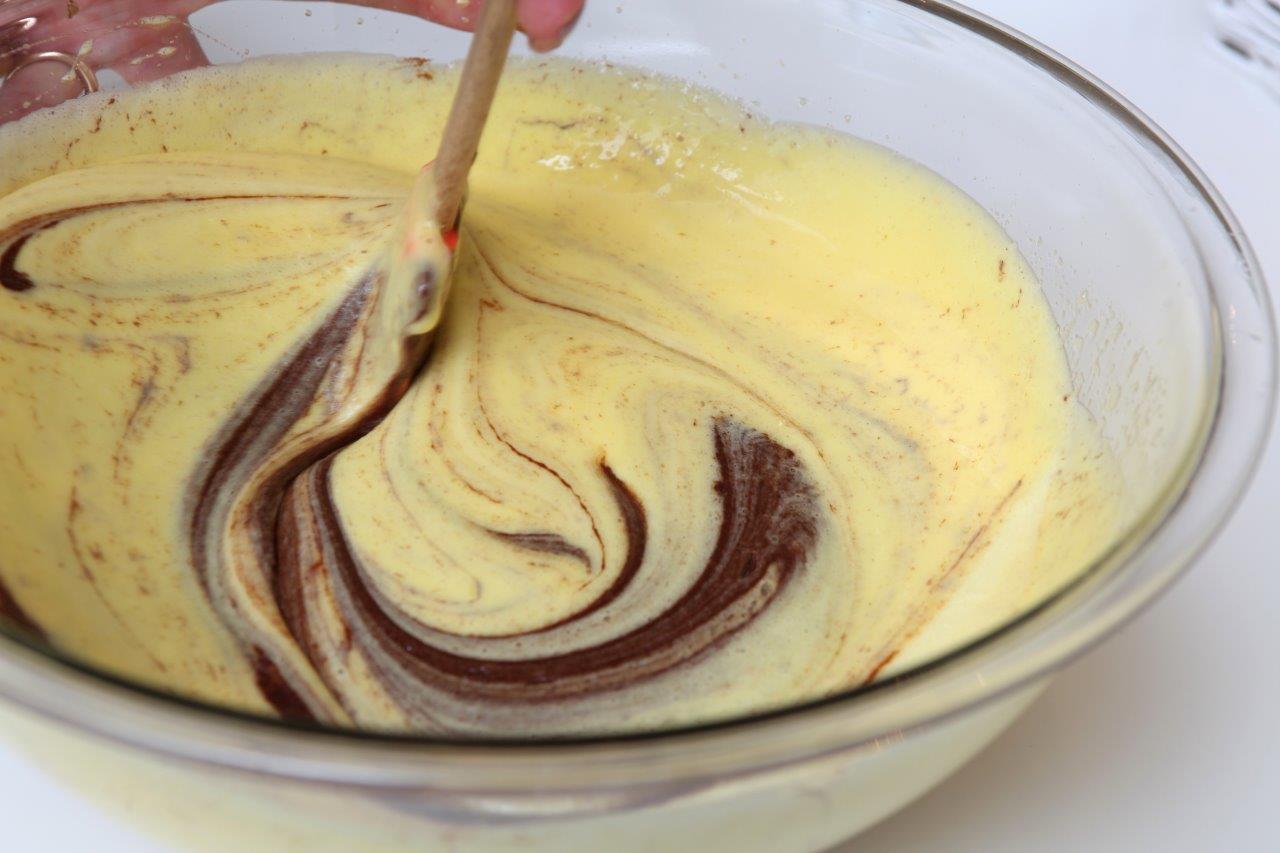
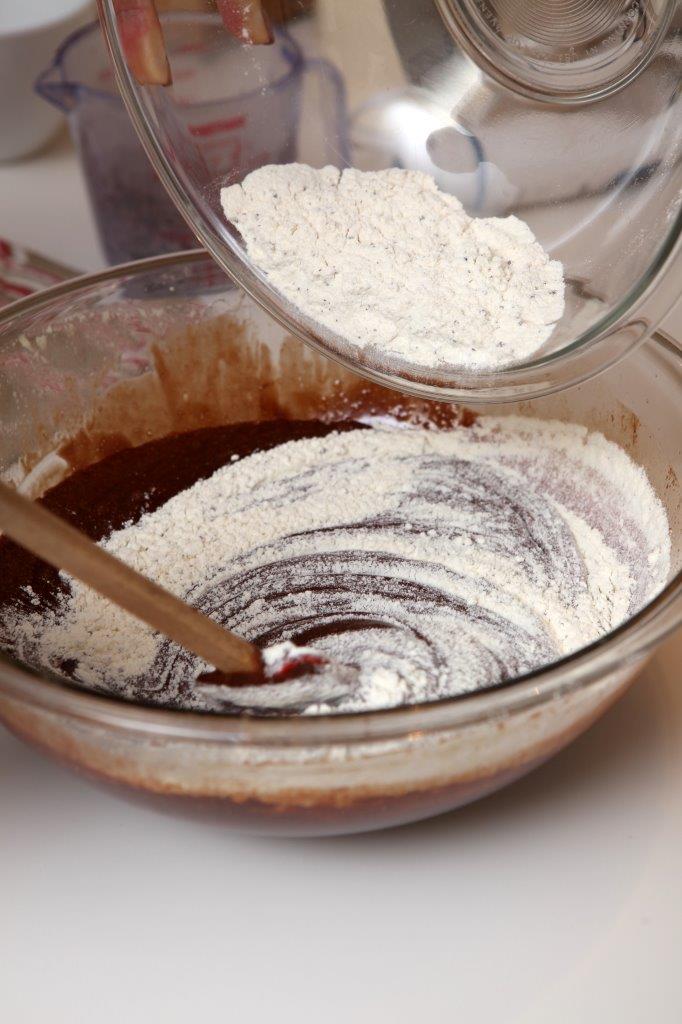
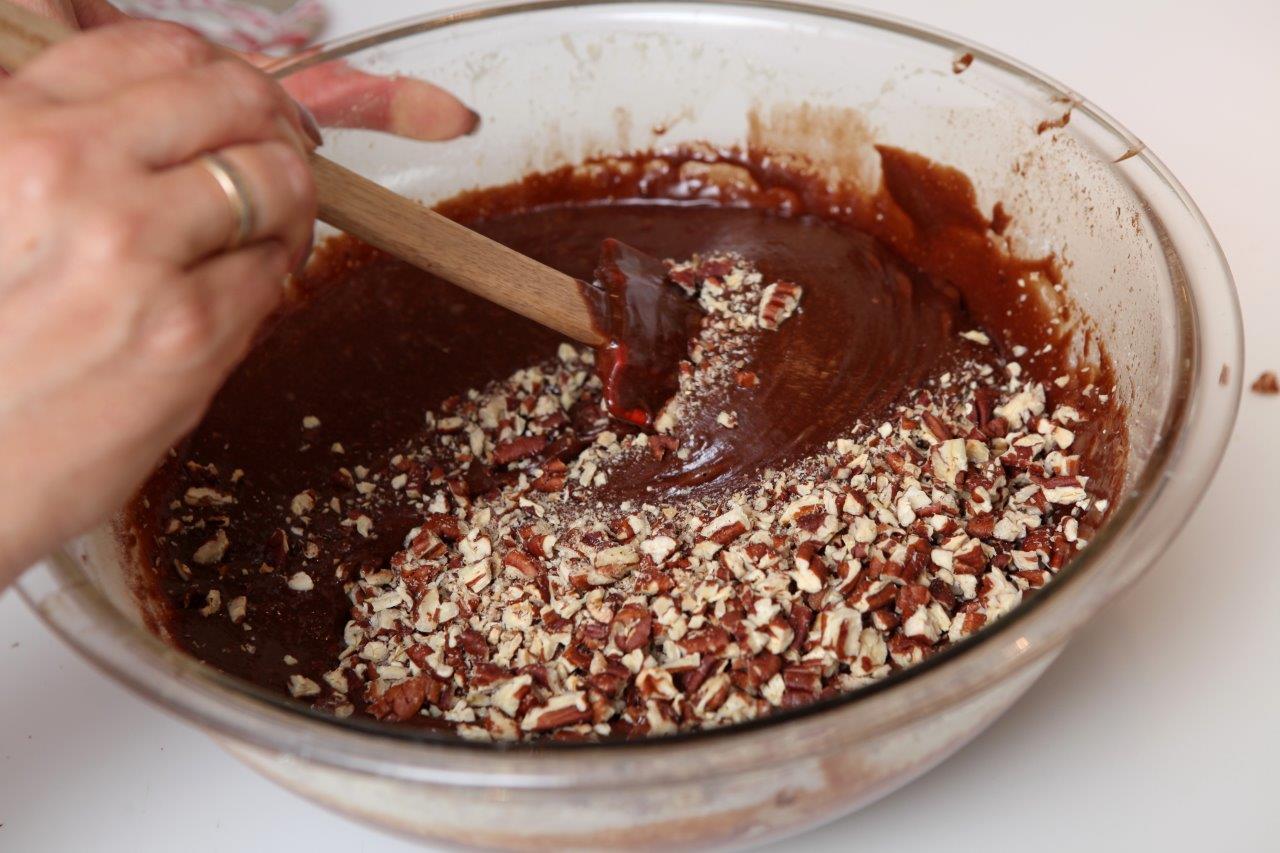
4. Using a mixer cream the soft butter until light and fluffy, then add half of the sugar and beat for a minute longer. Stir in the melted chocolate. Then add the egg yolks one at a time, beating well after each. Stir in the vanilla, sifted flour and chopped pecans.
5. Use a deep bowl and with clean, dry mixer beaters whisk the egg whites until fluffy. Gradually add the rest of the sugar and beat the whites until stiff peaks form. When you tip the bowl over, the whites hold in the bowl. Carefully fold in the whites in the dough mixture, do not over mix.
6. Pour the dough in the prepared pan and place in the middle of the oven. Bake in 180 degrees (celsius) for approximately 50-55 min. Check the biscuit with a toothpick, it is ready when nothing sticks to it.
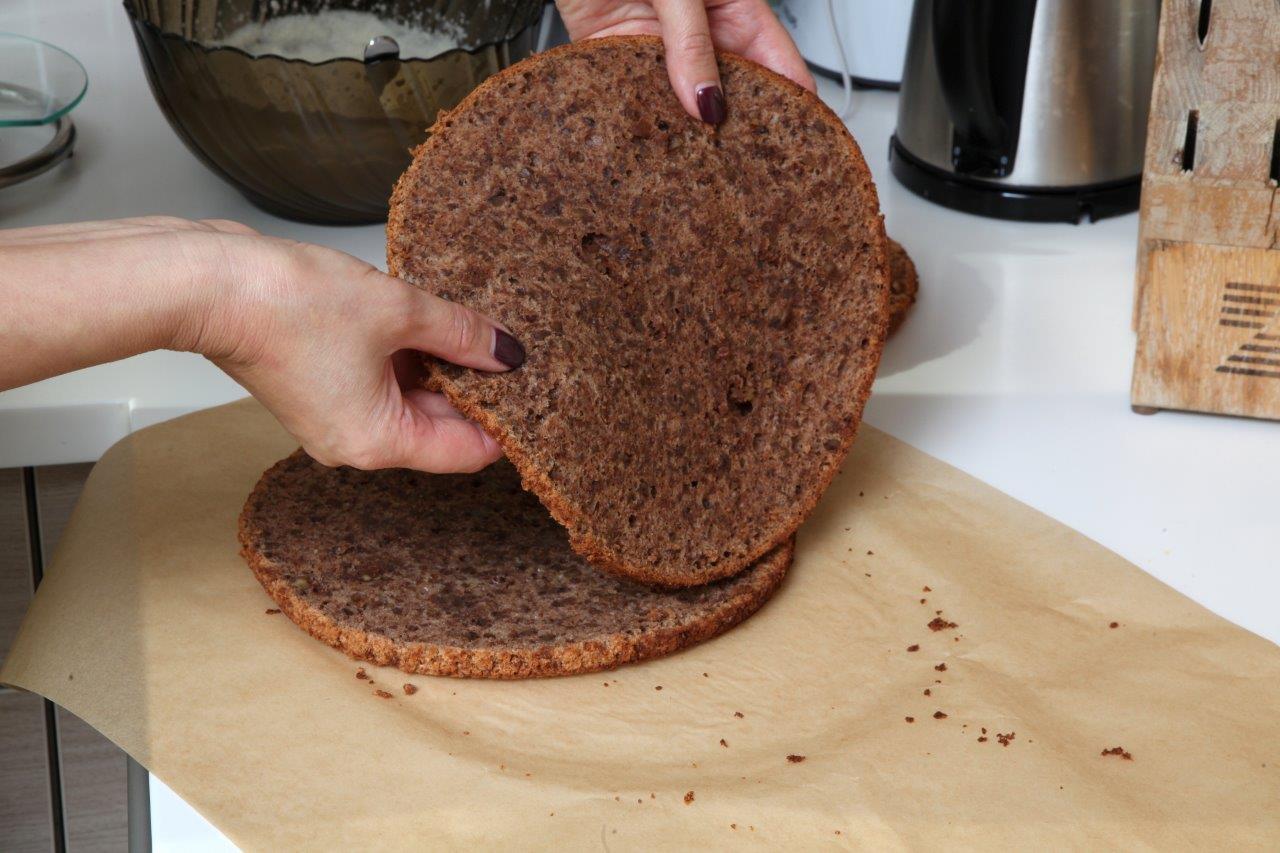
7. Remove biscuit from oven and cool for 15 min. Use a sharp knife to cut around the edges of the pan, remove the sides and flip the biscuit over on to a plate or tray, peel off the baking sheet.
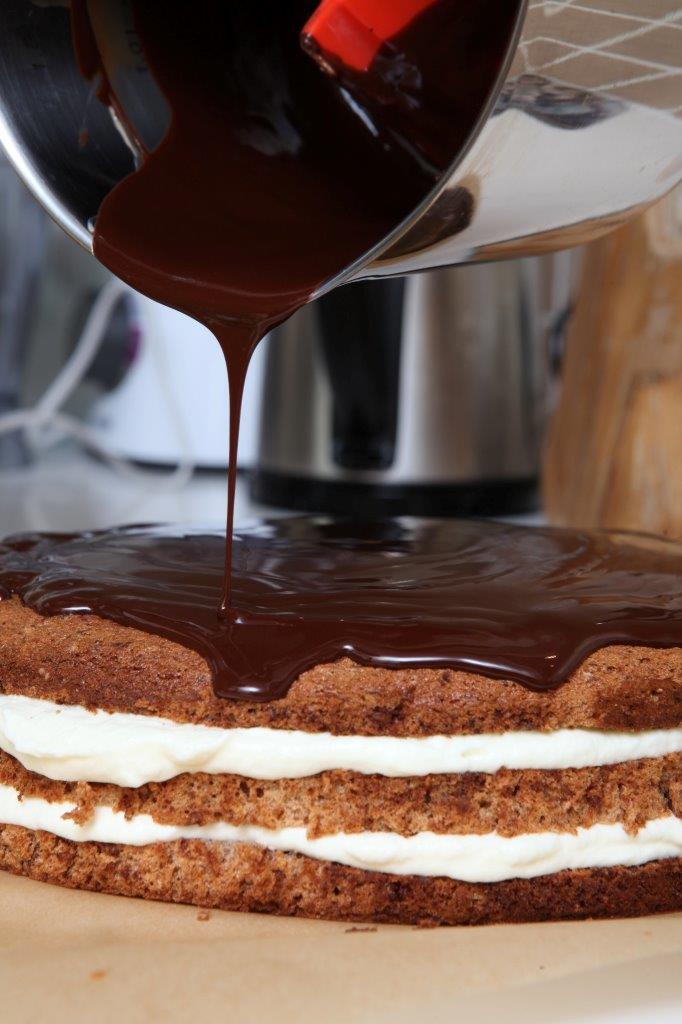
Make the glaze
8. In a small pot or using the over water method, melt the chocolate with the butter. Be careful not to burn it or over heat it as it could turn thick and lumpy.
9. Stir in the syrup, remove from heat and leave to cool for 20-30 minutes so it slightly thickens. The glaze needs to be in a consistency so it pours over easily but isn’t too runny.
Make the cream filling
10. In a deeper bowl, beat the cold heavy cream and sugar, stir in the bourbon at the end. Set aside.
Assemble the torte
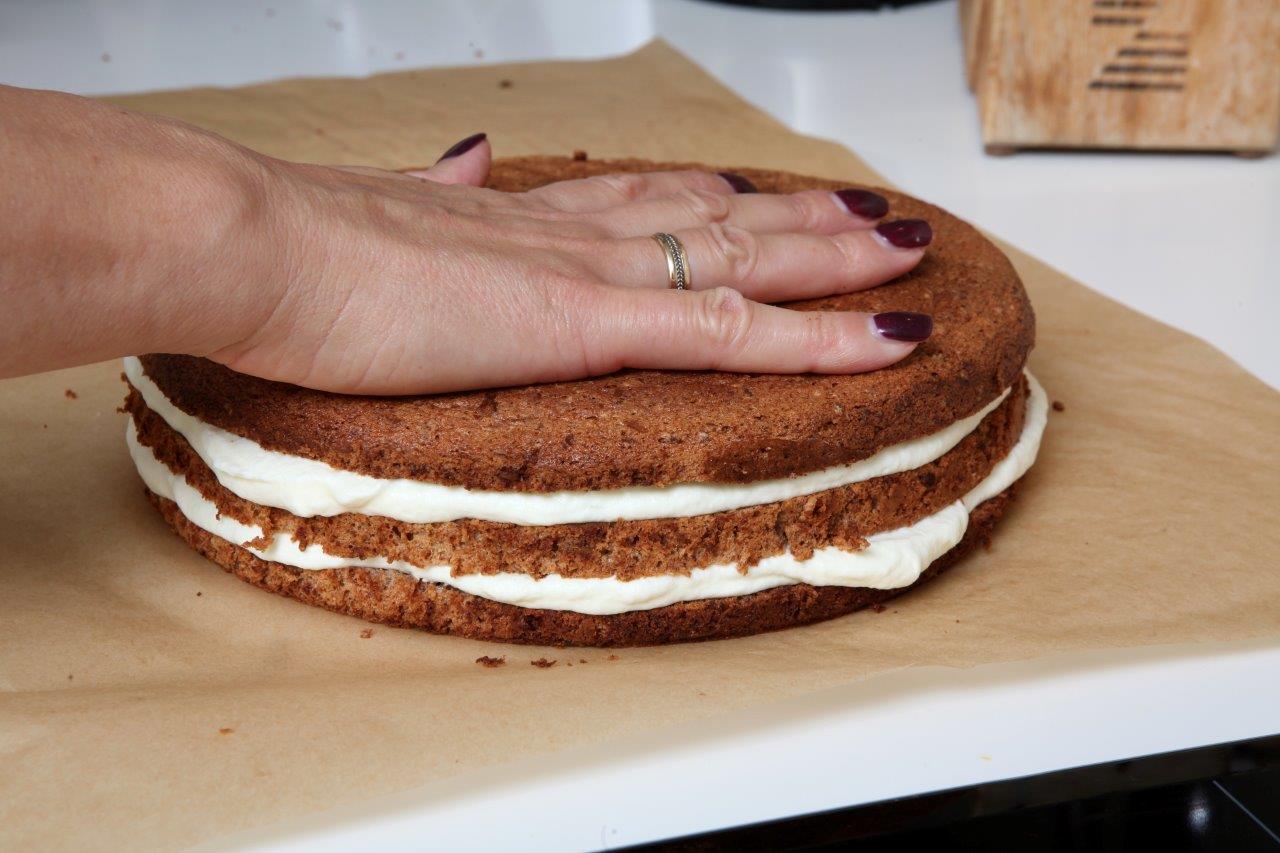
11. Using a long, sharp knife, cut the biscuit in three even slices. Place one at the bottom of a plate and spread half of the cream filling on it. Place the second slice of biscuit on top, press down a little and spread the other half of the cream. Press down the third slice on top evenly. Pour over the cooled glaze from the middle of the cake, letting it drip over the sides. Use a spatula or knife to even it out if necessary. Then decorate with pecan halves along the perimeter of the torte- each piece will have a pecan half when cutting.
12. Place in the fridge to cool for at least an hour. Before cutting, let it sit in room temp for 20 min so the glaze doesn’t crack when cutting. us.
Recipe: Ārija Avota
Foto: Ieva Andersone (IG: @photoievaandersone)
Published: Ievas virtuve, santa.lv
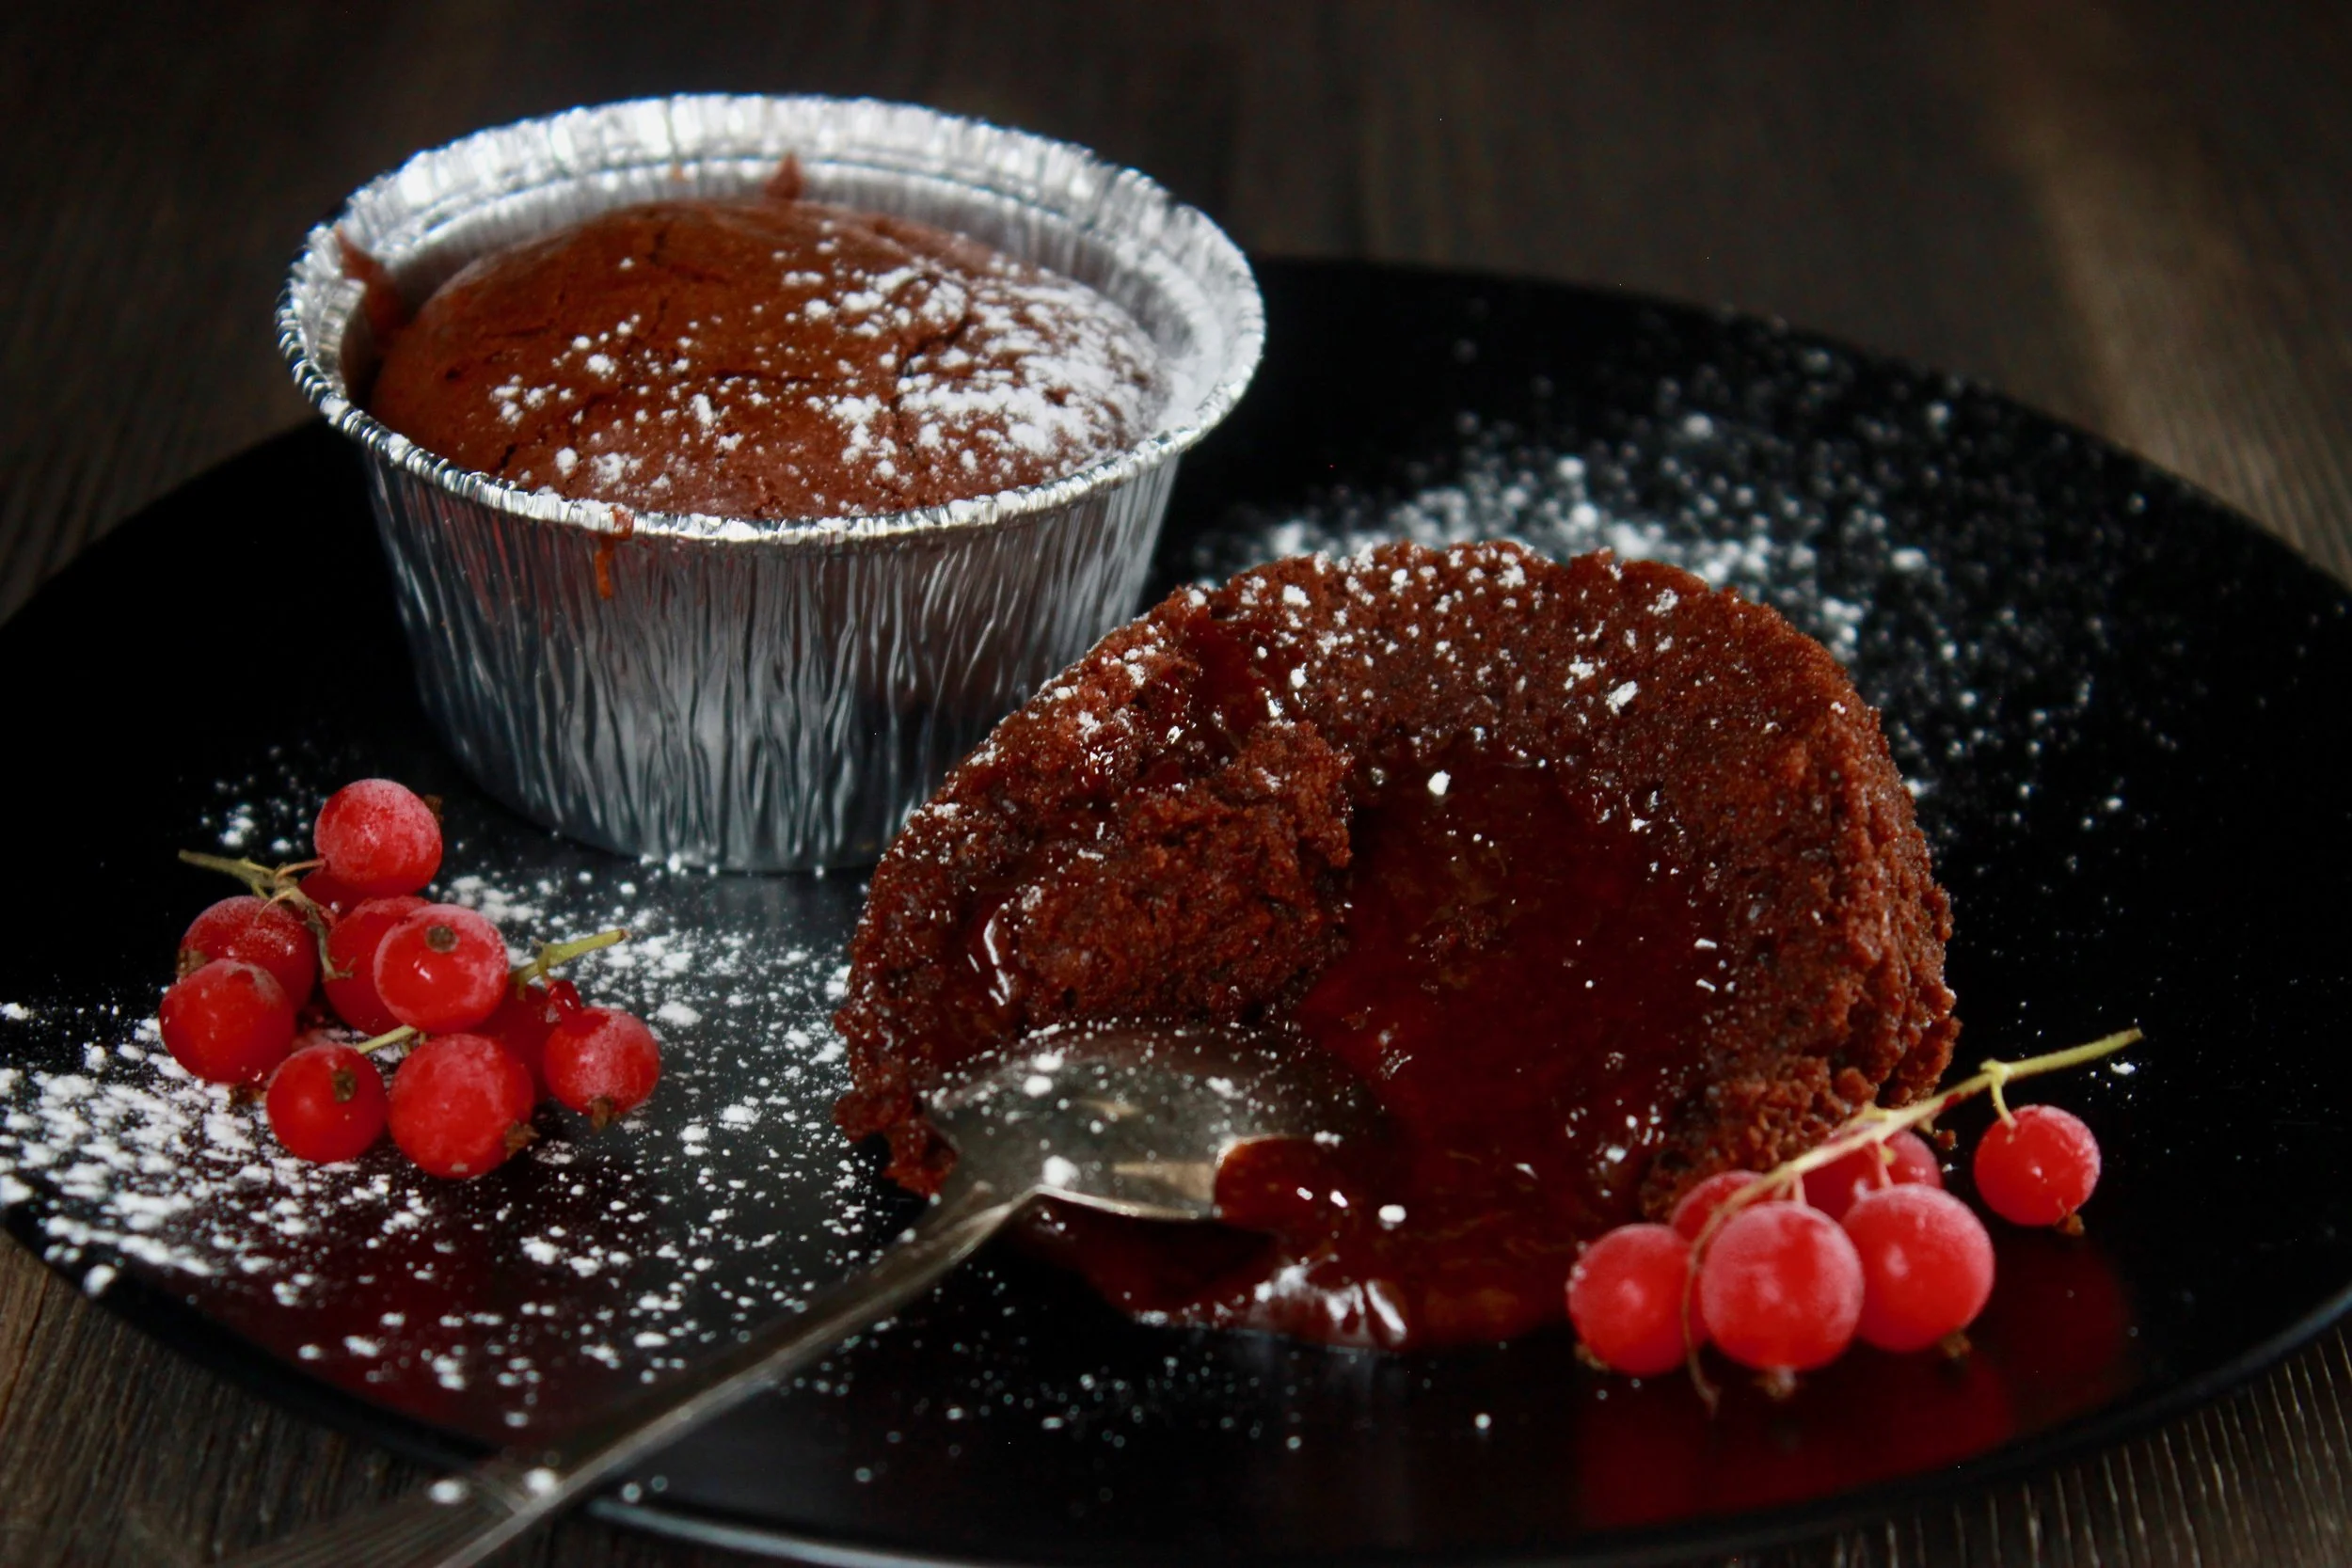
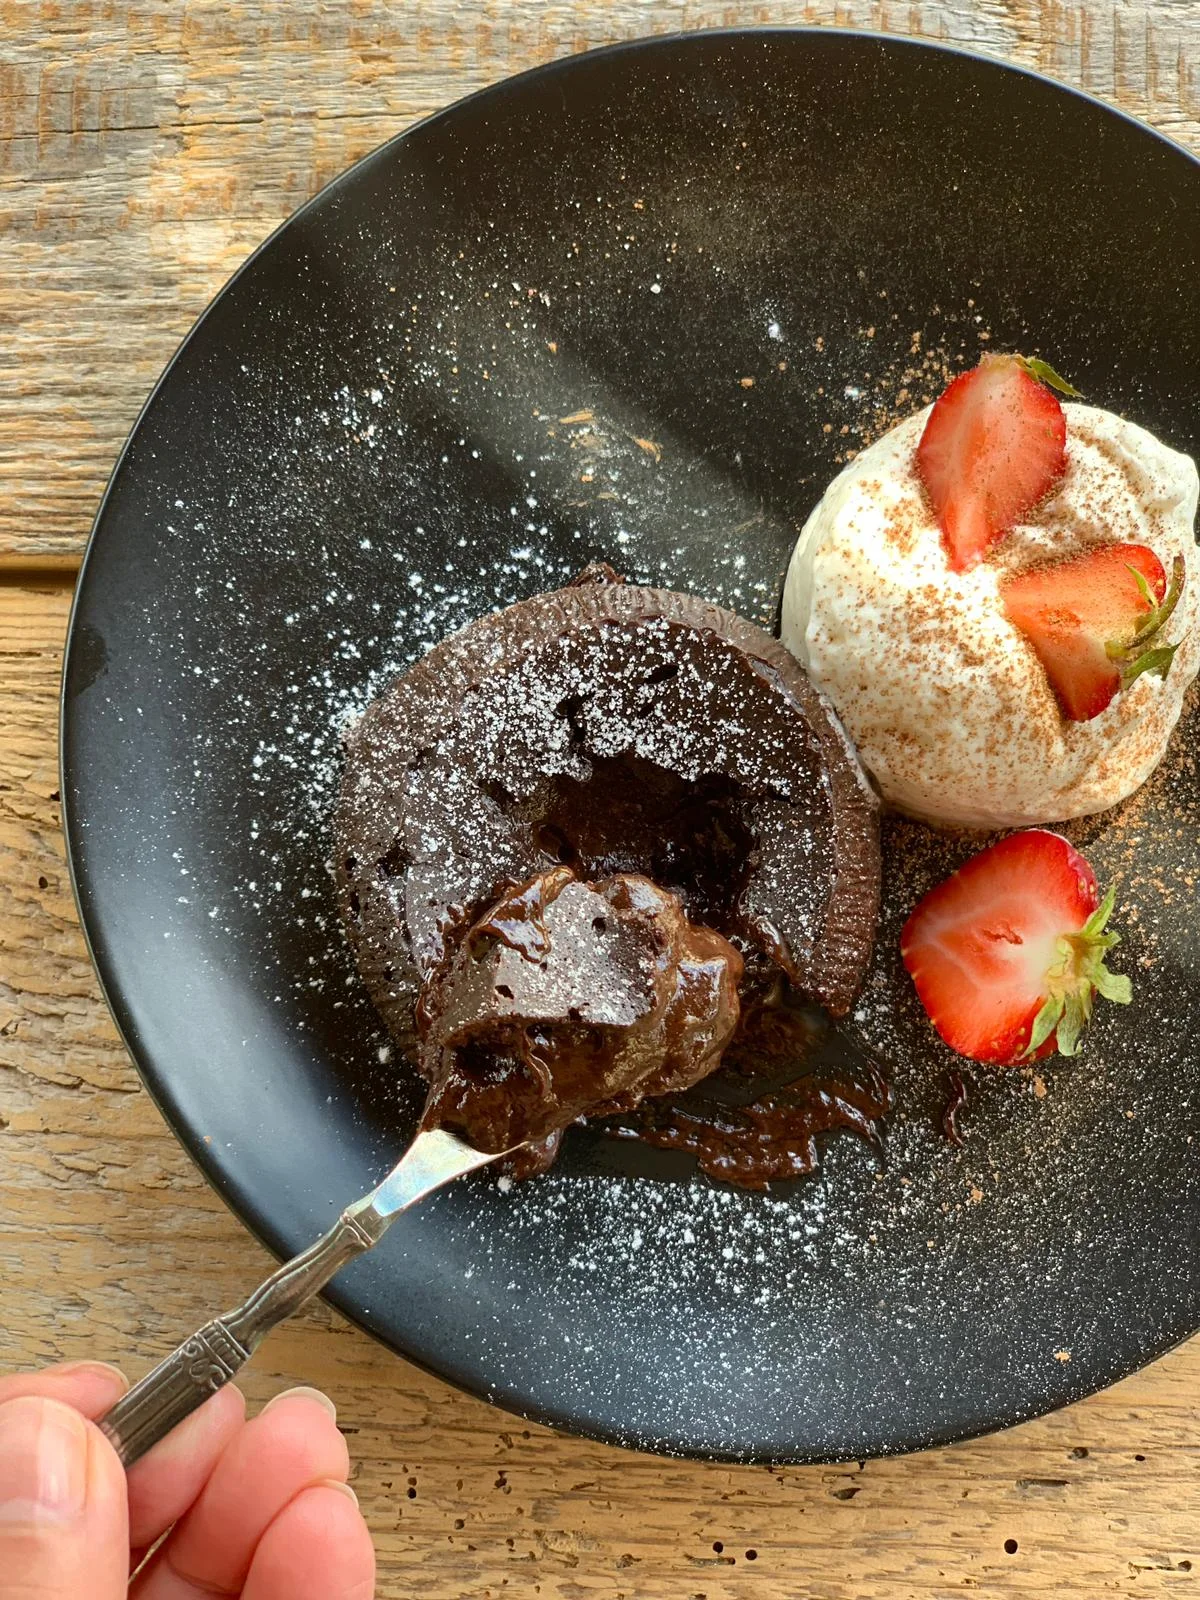
Chocolate fondant
This is the real deal- easy to make with that gooey melted chocolate center, just how it was meant to be. I feel that this is my favorite, especially when you consider the investment vs the gain. It is super easy to make and it just melts in your mouth, has a perfect balance of butter, chocolate and sugar. Yummmm :)
250 g dark chocolate (cocoa content at least 50%)
250 g unsalted butter
5 eggs, room temp
200 g sugar
130 g all purpose flour
1 tsp vanilla paste or vanilla sugar
Makes 10 servings
1. Melt the chocolate with butter in a saucepan on very low heat- be careful not to burn it. Set aside to cool a little.

2. In a medium bowl, beat the eggs with sugar and vanilla with a mixer until the sugar has dissolved.
3. Add the melted chocolate with butter to the egg mixture and mix until incorporated.
4. Add the flour, but best to sift it in. Slowly stir the dough, but do not overmix.
5. Fill the baking molds slightly over half way. We use tin foil ones, that can be discarded afterwards- this makes storage easier. Ceramic molds can be used just as well.
6. Put the fondants in the fridge for at least 30 min or overnight.
7. Meanwhile heat the oven to 200 degrees (celsius). Bake the fondants in that heat 17 min precisely.
8. Let the fondants set for 5 min before serving- then turn the molds over and transfer the fondants to a plate. Serve while still warm with fresh berries or vanilla ice cream.
Recipe: Anna Inne-Smilga
Photo: Oto Avots
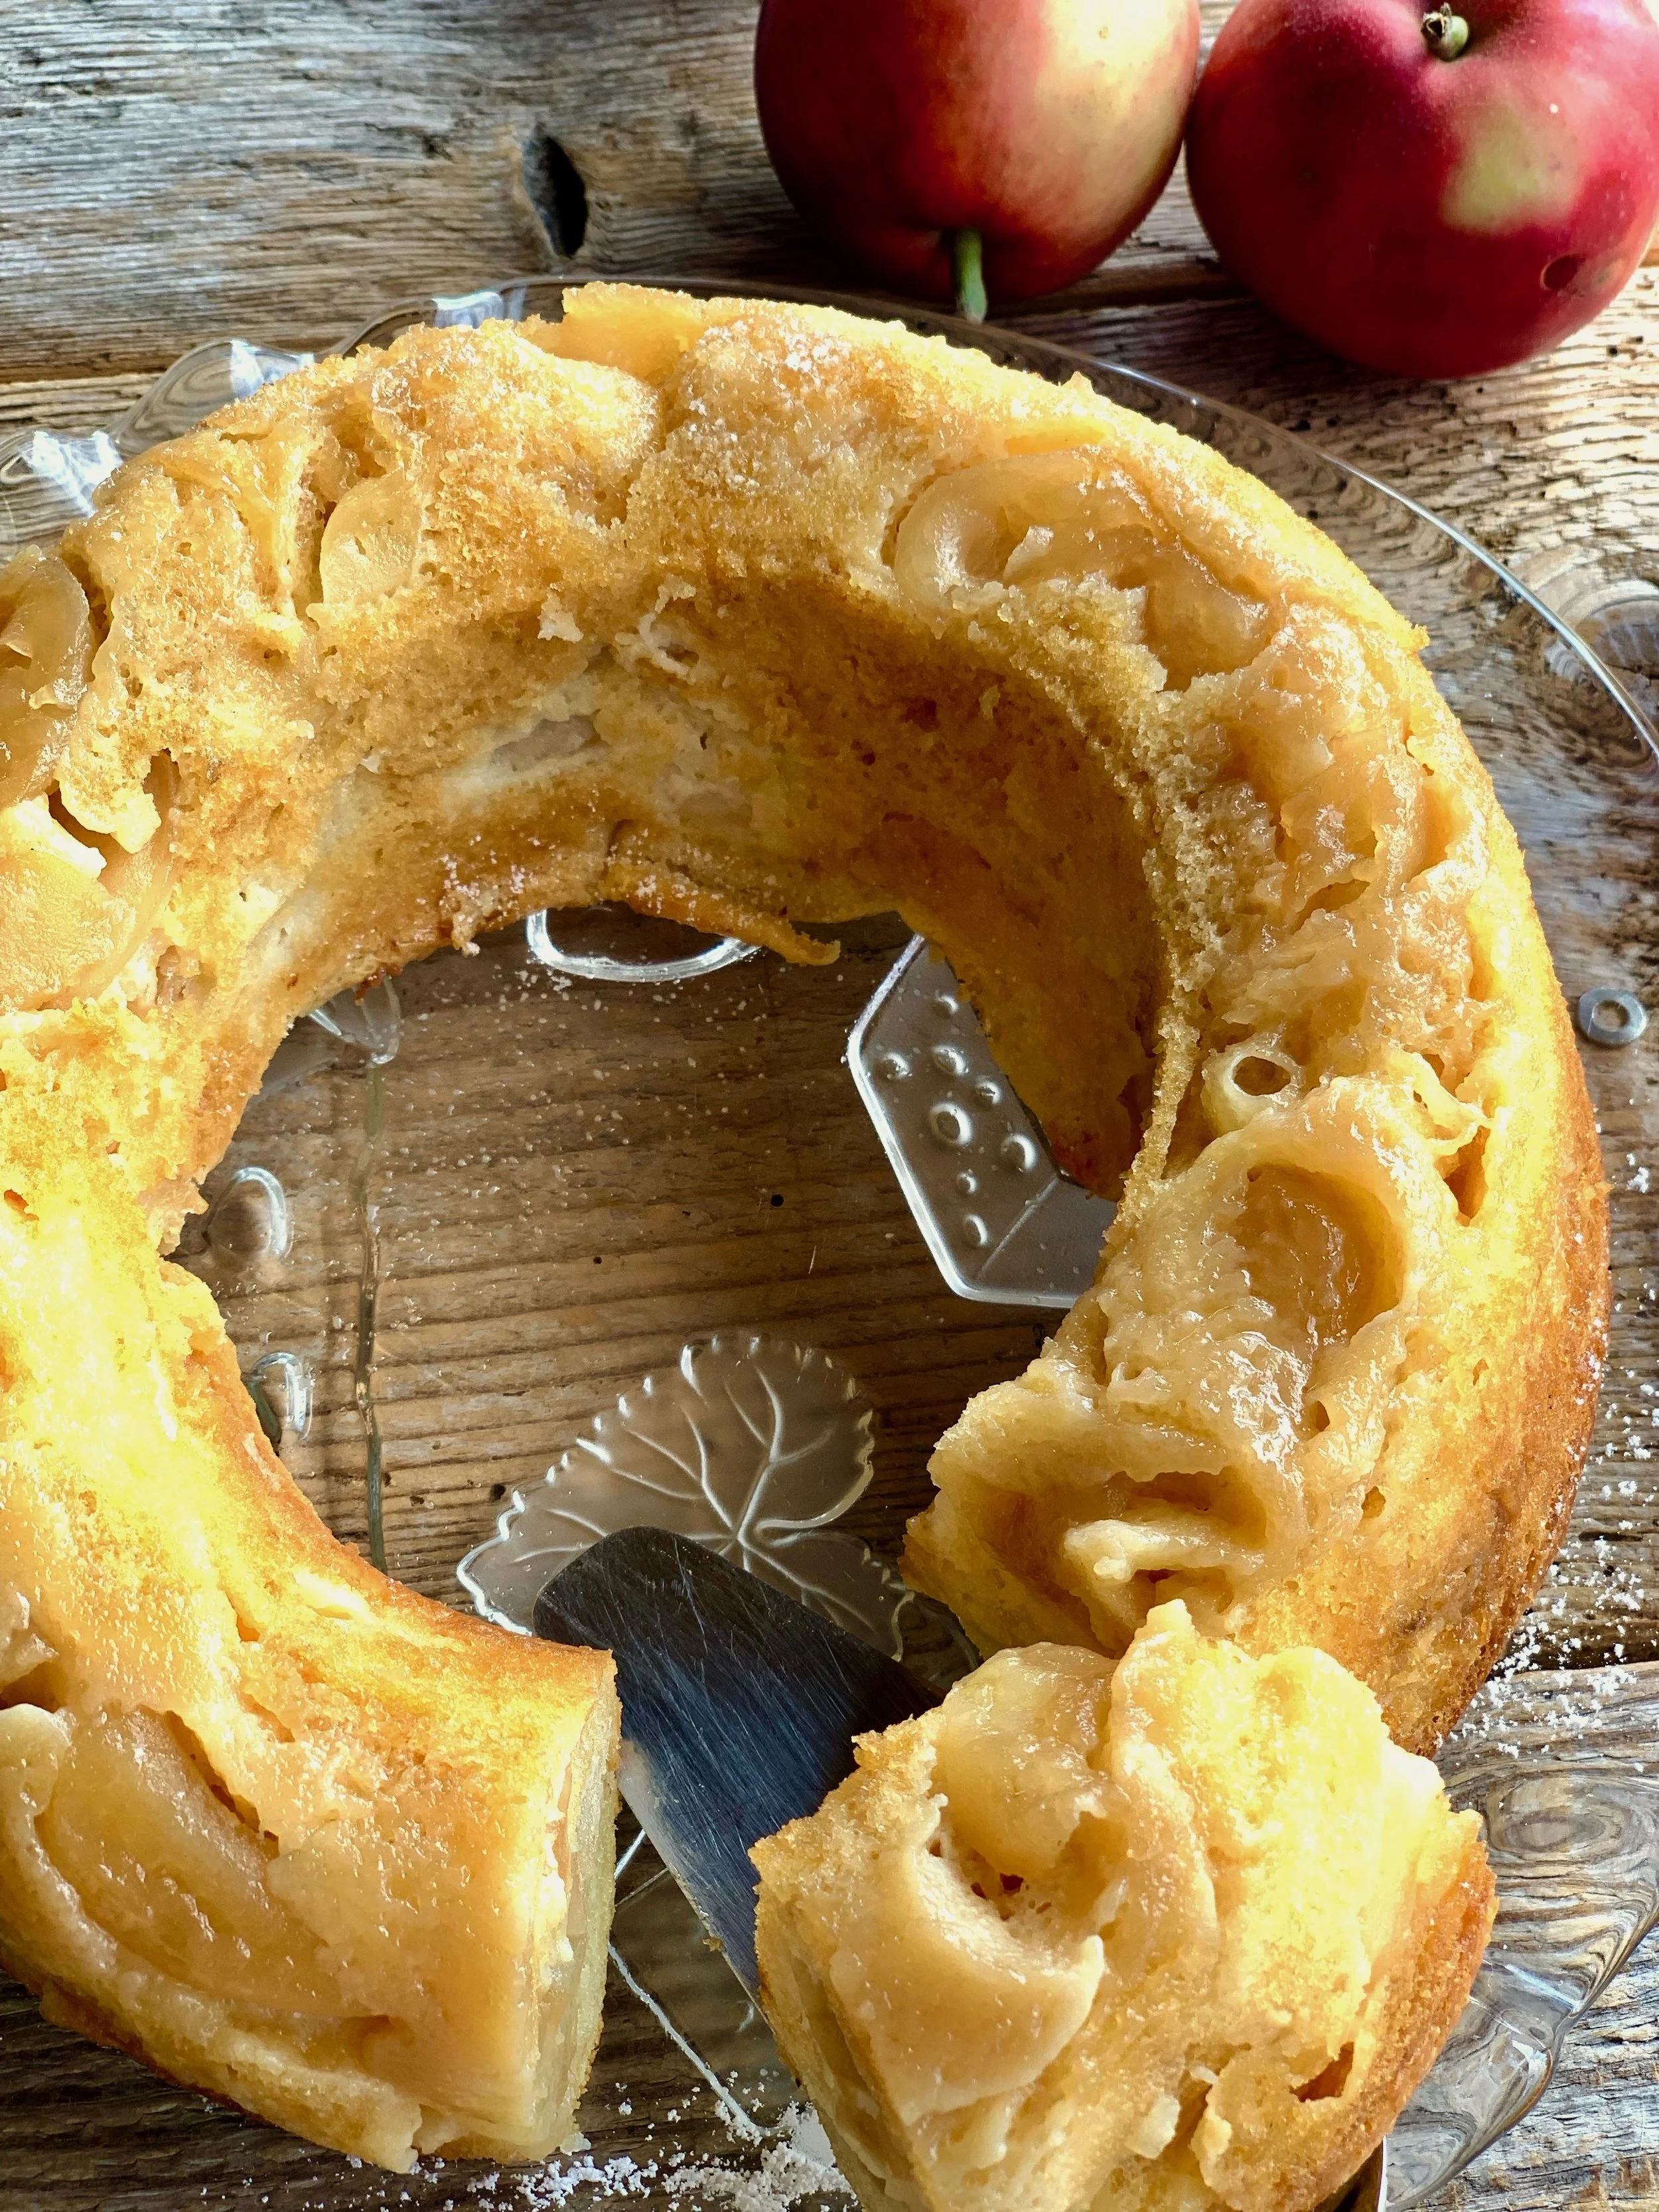
Apple pound cake
The best quick apple cake recipe! All the other recipes really have nothing on this one- it is an absolute winner!
Originally the recipe calls for baking it in the classic round cake pan, and that can easily be done if that is the look and shape you prefer. But I wanted to make it as a pound cake as pictured, which seemed easier to cut and just overall looked better (just my opinion). This called for slight alterations to the recipe- I used 280 ml of condensed milk, 80 g of flour and 60 g of butter- everything then came out perfect!
5-6 medium apples best for baking, peeled, cut in 0.5-1 cm segments
2 tbsp light brown sugar
80 g (60 g) unsalted butter
For the dough
2 eggs, room temp
320 ml (280 ml) sweetened condensed milk
110 g (80 g) all purpose flour, 1/3 can be substituted with wholegrain flour
1 tsp baking soda
1. Preheat the oven to 180 degrees (celsius).
2. Place a baking sheet on the bottom of a round baking pan (or butter a pound cake tin if using).
3. Peel the apples, cut out the core, cut in segments. Put the cut pieces in the chosen pan and evenly sprinkle with 2 tbsp of sugar and the butter separated into small pieces.
4. Place in the center of the oven to bake for 10 min.
5. Make the dough. Beat 2 eggs until fluffy, add the condensed milk and then mix in the flour with baking soda.
6. When the apples have baked for 10 min, remove from oven and pour the dough over the apples. Place back in the oven to bake for 22-25 more min.
7. Test the readiness with a toothpick- if nothing sticks to it, the cake is ready.
8. Leave to cool on a wire rack for at least 20 min.
9. Trace the edges of the pan with a sharp knife and then remove the cake from the pan.
Recipe: Ārija Avota
Photo: Ārija Avota

Chocolate fondant from the movie Chef
I just couldn’t help myself, I really wanted to try another recipe from the movie Chef. I already have a very good fondant recipe in my collection, but I wanted to try if it can get any better? The answer: yes, it can!
The magic in this recipe is that you get the molten lava filling by placing a ball of Ganache in the center (usually it would be the cake not being baked completely). If you want the taste to be a bit more mild, you can use chocolate with a 50% cocoa content, but for a stronger taste- 70%.
For the fondant
400 g chocolate, cocoa content at least 50%
170 g unsalted butter
6 eggs, room temp
100 g brown sugar
60 g all purpose flour
1 tsp vanilla paste or sugar
2 tsp liqueur, like Grand Marnier
For the Ganache
100 g dark chocolate, cocoa content 70%
100 g heavy cream
For serving
100 ml heavy cream
½ tsp sugar
Vanilla paste or sugar
Berries
Makes 10 fondants
Make the Ganache
1. Place 100 g of chopped chocolate in a bowl, meanwhile heat the heavy cream just to the point of boiling (but do not let it boil). Pour the hot heavy cream over the chopped chocolate immediately and leave for 5 min for the chocolate to melt. Then use a whisk to stir everything in a smooth consistent cream and place in the freezer to harden (but not freeze).
Make the fondant
2. Melt the chocolate on low heat or using the method over water. Once evenly melted, set aside (keep a close eye on it not to burn).
3. Beat the eggs until light and fluffy, then add the sugar and vanilla paste and beat some more. Finally add the liqueur.
4. Add the melted chocolate to the egg mixture, slowly mixing together with a spatula.
5. Add the flour, best sifted and stir in gently.
Assemble the fondants
6. Check on the Ganache in the freezer- it should be solid, but not frozen.
7. Preheat the oven to 200 degrees (celsius). Butter the molds and sprinkle with sugar.
8. Fill the molds half way with the dough, then put a ball of Ganache in the center and fill the rest of the mold up with dough (almost to the top, but leave some room to raise). Use a small spoon or scoop to create the Ganache balls, ti doesn’t have to be perfect.
9. Bake the fondants for 10-13 min depending on how soft of a filling you prefer (maybe bake the first one alone as a test).
10. Serve while still warm with fresh berries and maybe whipped cream or vanilla ice cream.
Recipe: Ārija Avota
Photo: Ārija Avota

Chocolate fondant without flour
This is one recipe from the fondant collection that is here to stay- no flour added! Yay!
I usually make these and store some in the freezer so I can pop them out whenever the craving for something sweet comes up. You can bake just one if you want, guilt free!
120 g unsalted butter
180 g dark chocolate (cocoa content at least 50%)
3 large eggs, room temp
60 g sugar
1 tsp vanilla paste or vanilla sugar
1 tbsp butter to grease the molds
1 tbs sugar to sprinkle the molds
Makes 6 small coffee cups (200-240 ml) or ceramic molds
1. Preheat the oven to 200 degrees (celsius). Prepare the molds by greasing them with butter and then sprinkling the inside with sugar.
2. In a small pot on low heat melt the butter with the chocolate. Stir constantly not to let it burn as it will become thick and grainy. Or you can use the over water melting method. Set aside to cool.
3. In a medium bowl beat the egg yolks with the sugar until light and fluffy, add the vanilla. Then mix in the melted chocolate.
4. In another clean, dry bowl, beat the egg whites until they become foamy. Then add a tablespoon of sugar and beat until stiff peaks form. When the bowl is turned over, the whites should hold in the bowl.


5. Carefully fold in the egg whites in the chocolate mixture. Do not over mix as this way you can lose the aeration.
6. Using a spoon or ice cream scoop divide the dough between the molds. Place in the middle rack of the oven for 13-15 min. The center should still look wet, but the top will crack.
7. Remove from the oven and let cool for a few minutes. Can be served hot or cooled later. Can be eaten straight from the mold or cup. If you want to present it on a plate- run a sharp knife along the edges of the molds and flip over on the plate. Sprinkle with powdered sugar and serve with vanilla ice cream.
Recipe: Ārija Avota
Photo: Ieva Andersone

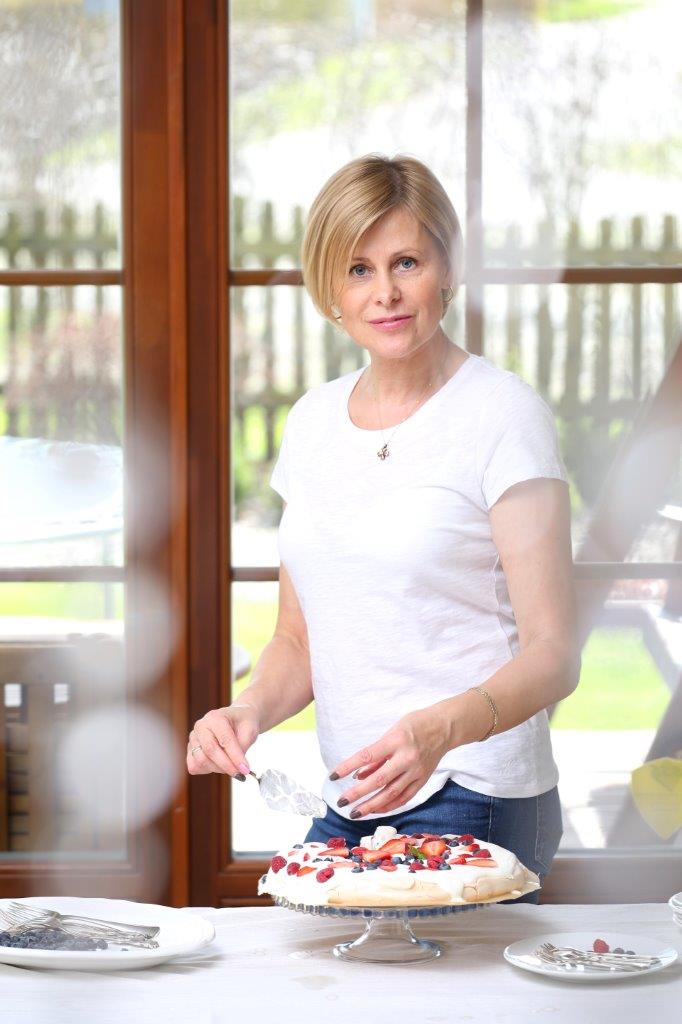
Summer pavlova
Light meringue that’s crunchy on the outside but is marshmallow soft in the center, covered with cold whipped cream and topped with sour seasonal berries. That is what a real summer pavlova is!
I have published this recipe years ago in the magazine “Ievas Virtuve” and it hasn’t changed one bit since then. That means it is perfect.
Many recipes tend to use powdered sugar for the meringue, but I like to use plain sugar since I feel it makes the taste better and more real. Also, this recipe has gotten many compliments over the years from my friends I have shared it with. That it is easy and turns out perfectly every time you try it. So don’t be afraid to try it for yourself, good luck!
For the meringue
4 large egg whites, room temp
200 g fine granulated sugar
1 tsp vanilla paste or sugar
1 tsp vinegar (9%)
1 tsp corn starch
For the cream
300-350 ml heavy cream
2-3 tsp sugar
1 tsp vanilla paste or sugar
For decorating
Seasonal berries- strawberries, raspberries, currants, black berries etc.
1. Preheat the oven to 130 degrees (celsius).
Prepare the meringue
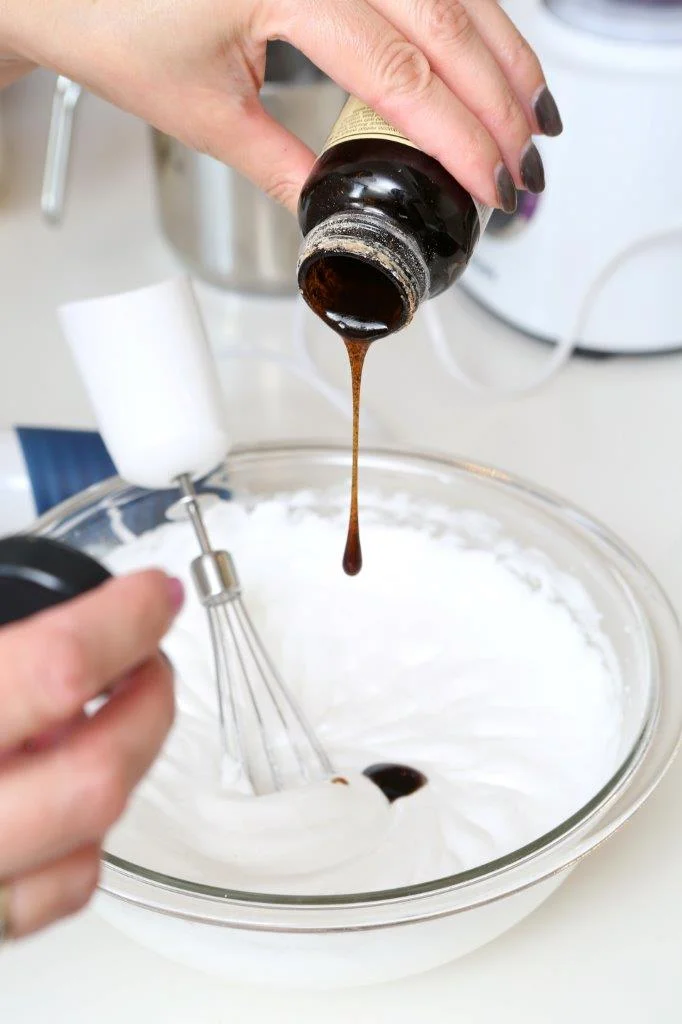
2. Beat the egg whites until light and fluffy, then gradually add the sugar and keep whisking. Finally add the vinegar and whisk until the sugar dissolves (feel between the fingers) and the whites are very stiff. When you turn the bowl around, the meringue holds in the bowl and nothing drips.
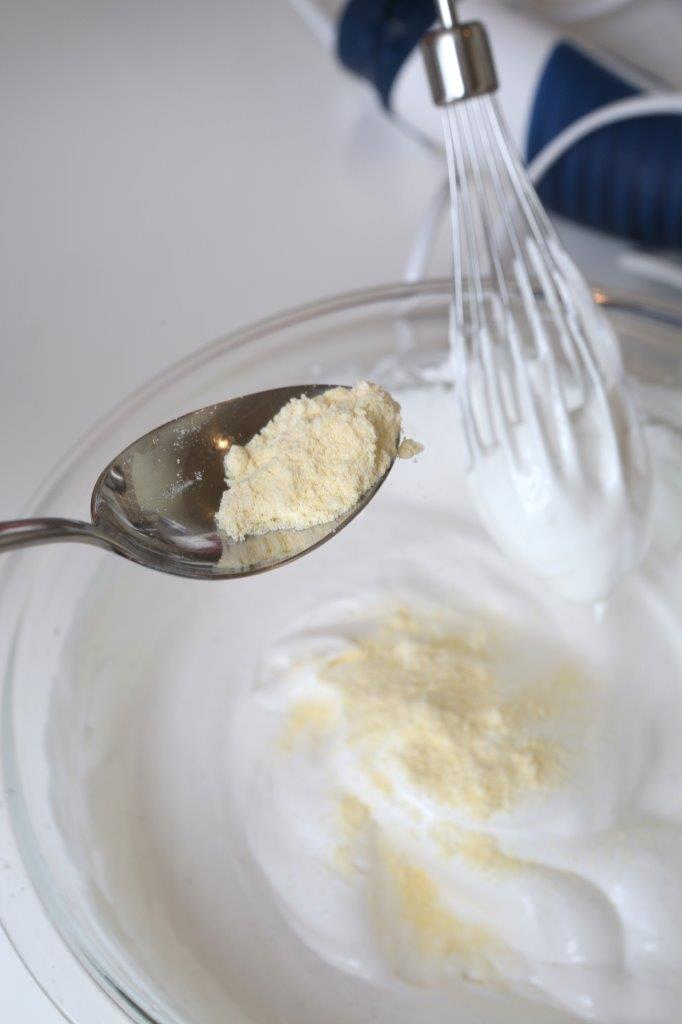
3. Stir in the vanilla paste and corn starch very slowly.
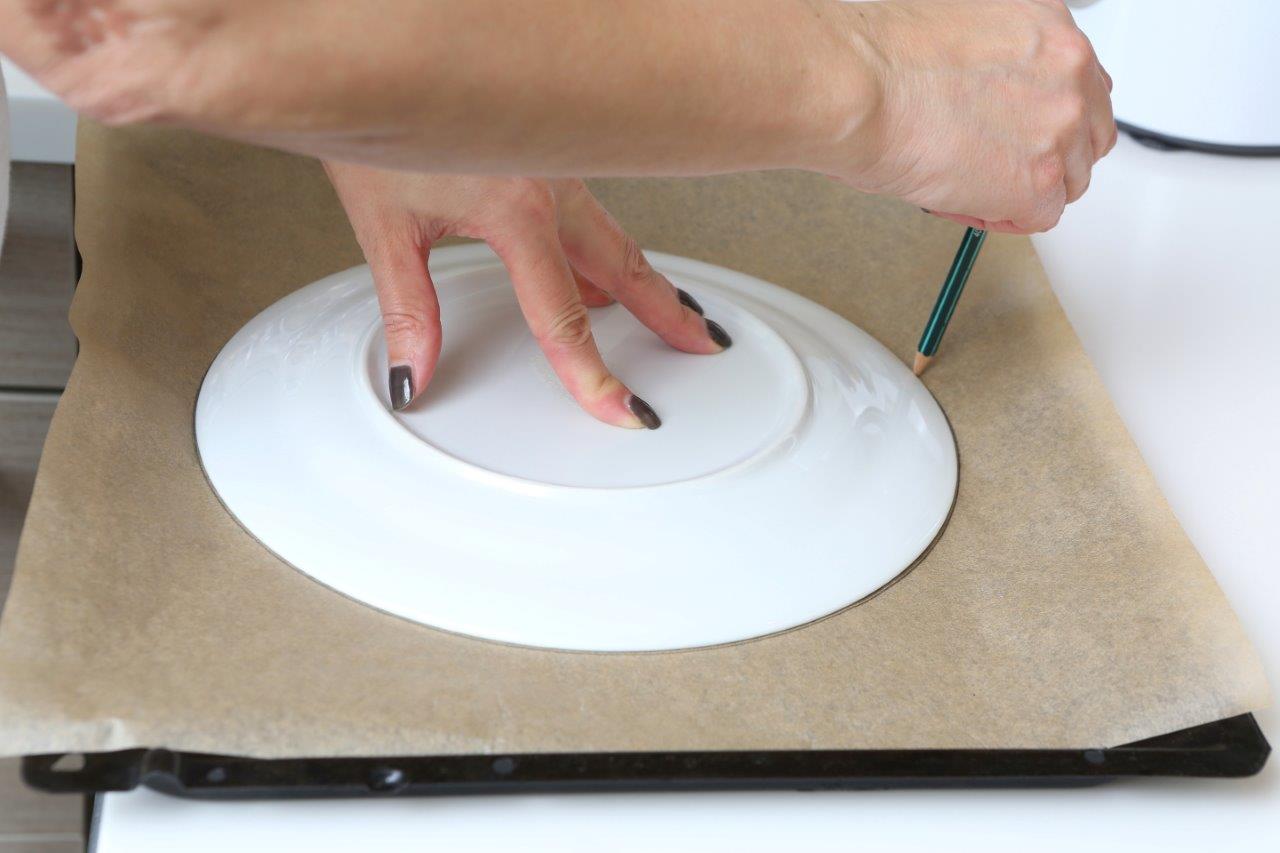
4. Draw a 20-22 cm circle on a baking sheet. Turn the sheet over so you can use the circle as a baking form.
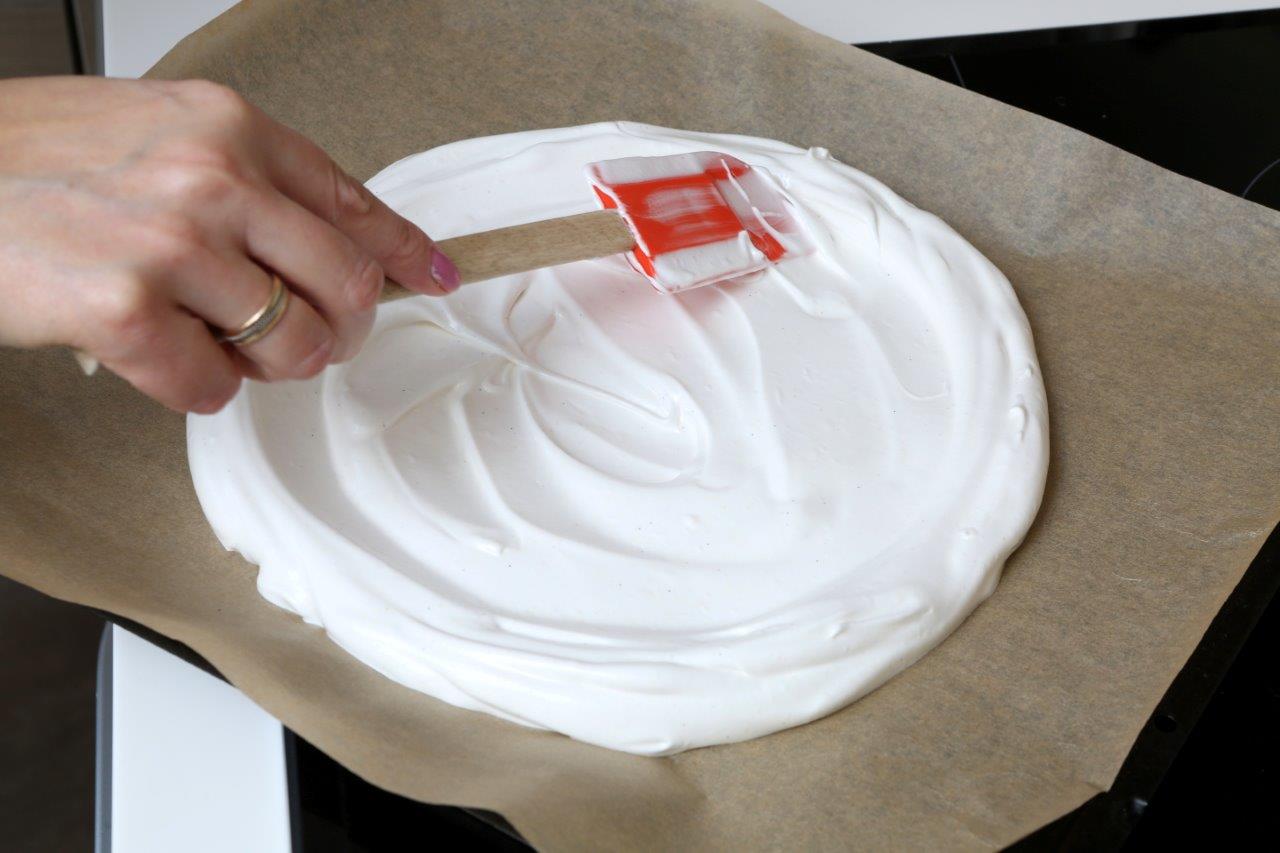
5. Place the meringue in the center of the circle and spread it evenly around the circle. Create a bit higher edges so that it is easier to hold the cream when baked.
6. Bake in the middle rack of the oven for about 70 min. The meringue will turn a slightly cream color. Once done baking, turn off the oven and leave a small crack open (put a spoon in the door, just so the hot air can escape). Leave the meringue to cool completely, about 2h. This can be done the day before as well.
Make the cream
7. When the meringue has cooled, and shortly before serving the pavlova, start preparing the cream.
8. Using an electric mixer beat whip the heavy cream until it starts doubling in size. Then gradually add the sugar and keep beating until nice and gentle peaks form. Add the vanilla. Be careful not to over mix.
Assemble the cake
9. Gently remove the meringue from the baking sheet and transfer to the plate or stand you will be serving it on.
10. Spread the cream on top of the meringue evenly.
11. Decorate generously with seasonal berries.
Recipe: Ārija Avota
Photo: Ieva Andersone
Published: Ievas Virtuve, santa.lv

Peach galette
This is a great dessert for the summer season! When gardens and the woods are full of berries and fruit, it is time to make this galette.
A galette is basically the very origin of a classic pie- just without the use of that perfectly round pie tin.
The peach galette isn’t very sweet, you can definitely add more sugar to the recipe if you are feeling up to it. It is very juicy and with nice pieces of fruit that dance in the mouth. The dough is light and a slightly crumbly- and it pairs perfectly together with any other seasonal fruit, like plums, blueberries or apples. If you decide to try this recipe with nectarines, you can skip the part of blanching and peeling the skins off.
For the filling
700 g peaches, approximately 5
40 g sugar
40 g light brown sugar
1 tsp vanilla paste or sugar
½ tsp ground cinnamon
Pinch of salt
the peel of 1 lime, grated
2 tbsp corn starch
1 tsp butter
For the dough
200 g all purpose flour, 1/3 can be replaced with whole grain flour if desired
160 g unsalted butter, cold
80 ml ice cold water
Pinch of salt
1 tbsp sugar
Optional: a handful of berries like currants, blueberries, raspberries etc.
Make the dough
1. In a large bowl or on a clean counter surface stir together the flour, sugar and salt.
2. Cut the cold butter into 2-3 cm large cubes and put it in the flour mixture. Start by flattening the butter cubes and then slowly kneading the dough, add the ice cold water and knead until the dough holds together but is still flaky. No need to over mix.
3. Wrap the dough in plastic wrap and refrigerate for at least 30 min.
Make the filling
4. Blanch the peaches. Boil water and pour it immediately over peaches placed in a deep bowl or pot. Drain the water a minute later and rinse peaches in cold water.
5. Peel the skin off the peaches and cut them into 1 cm segments, place them in a bowl and cover with sugar, salt, cinnamon, vanilla and corn starch. Mix together.
Assemble the galette
6. Preheat the oven to 200 degrees (celsius).
7. Sprinkle a baking sheet with flour and flatten the refrigerated dough on it. Use a rolling pin to roll out the dough in a round shape about 5 mm thick.
8. Place the peaches in the middle of the dough circle and spread out evenly, leaving 5-6 cm free from the edges.
9. Fold the edges of the dough to the center and press together the folds so they hold together better and don’t open when baking.
10. Put small clumps of butter on top of the peaches and the sides of the galette and then sprinkle brown sugar over everything.
11. Place the galette in the middle of the oven and bake for 40-45 min. The bottom must be golden brown too, not only the top, so be sure to check before removing from oven.
12. Remove from the oven and top off with fresh berries, let it all rest for 15 min.
Recipe: Ārija Avota
Photo: Ārija Avota

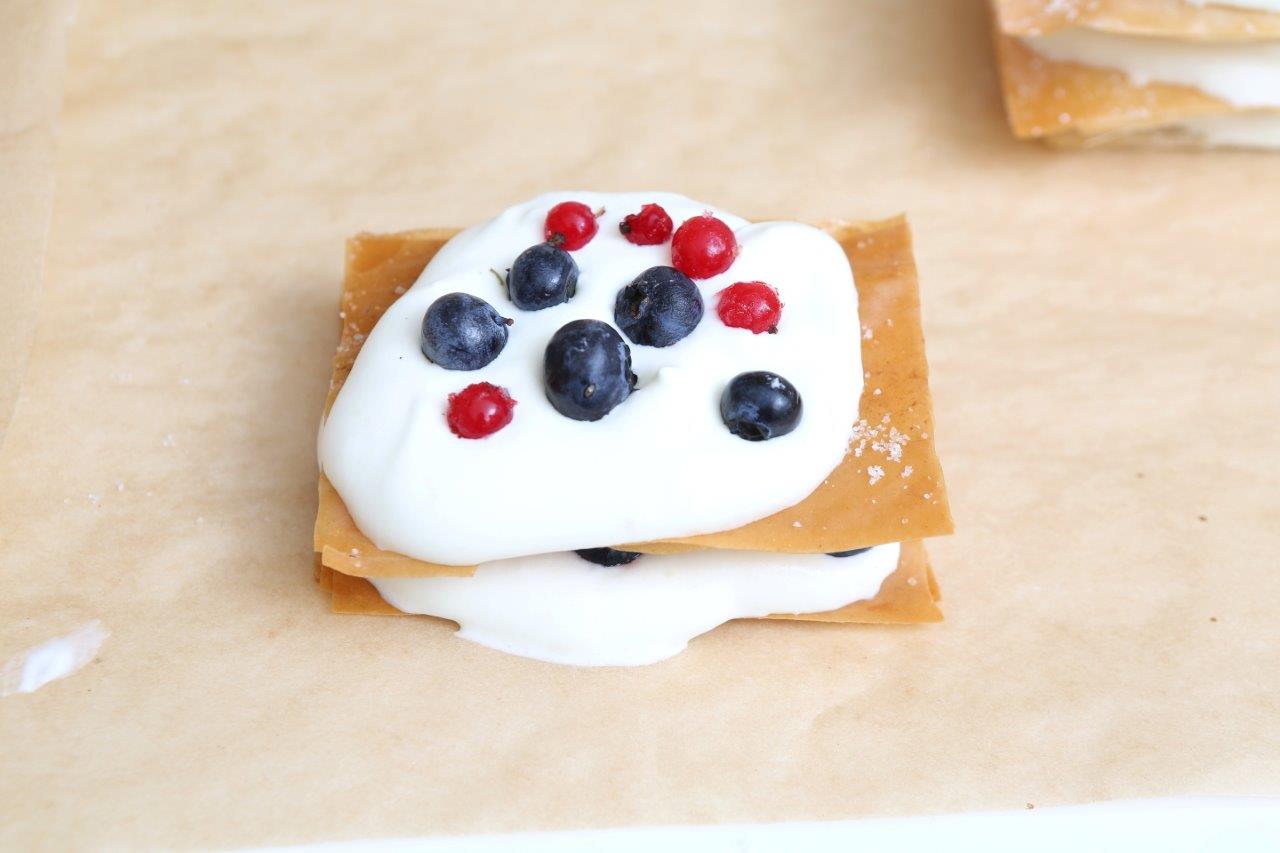
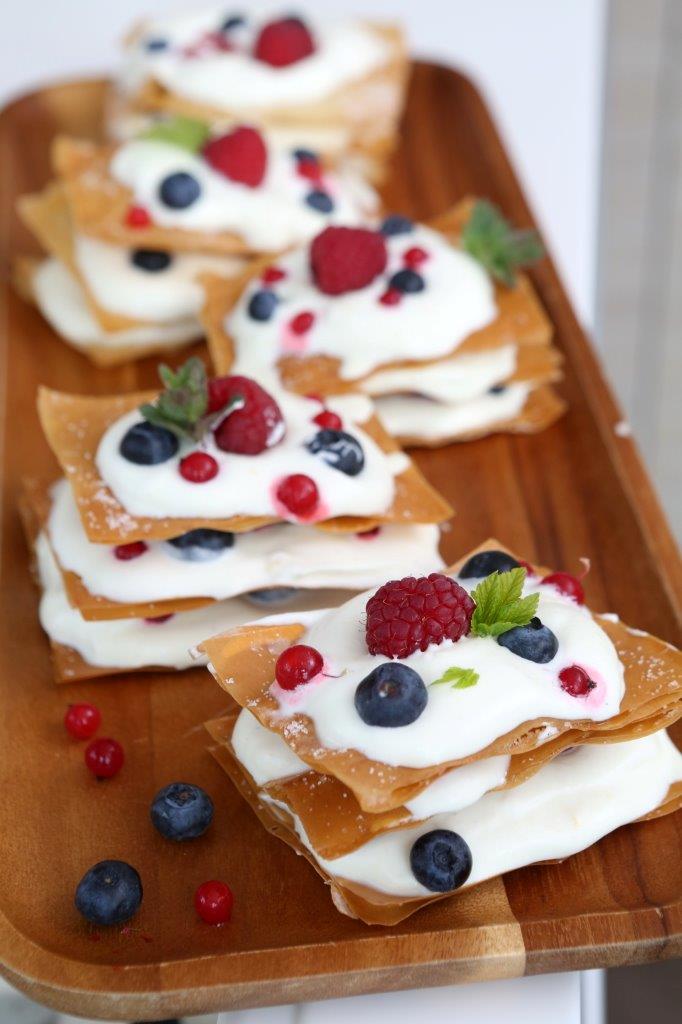
Quick Napoleon cakes with berries
This is a quicker and easier alternative to the well known classic- Napoleon cake. If you are feeling creative and want to make something just beautiful and delicate, definitely try to make this dessert, it is like edible art.
6 sheets of filo dough 20x30 cm (frozen)
6 tsp sugar for sprinkling
2 tbsp unsalted butter, melted
For the cream
400-500 ml heavy cream
6 tsp sugar
Vanilla paste or sugar
2 tsp orange liqueur (or 1 tsp brandy or cognac)
the peel of 1 lemon, grated
300 g seasonal berries- raspberries, blueberries, currants etc.
Makes 6 cakes
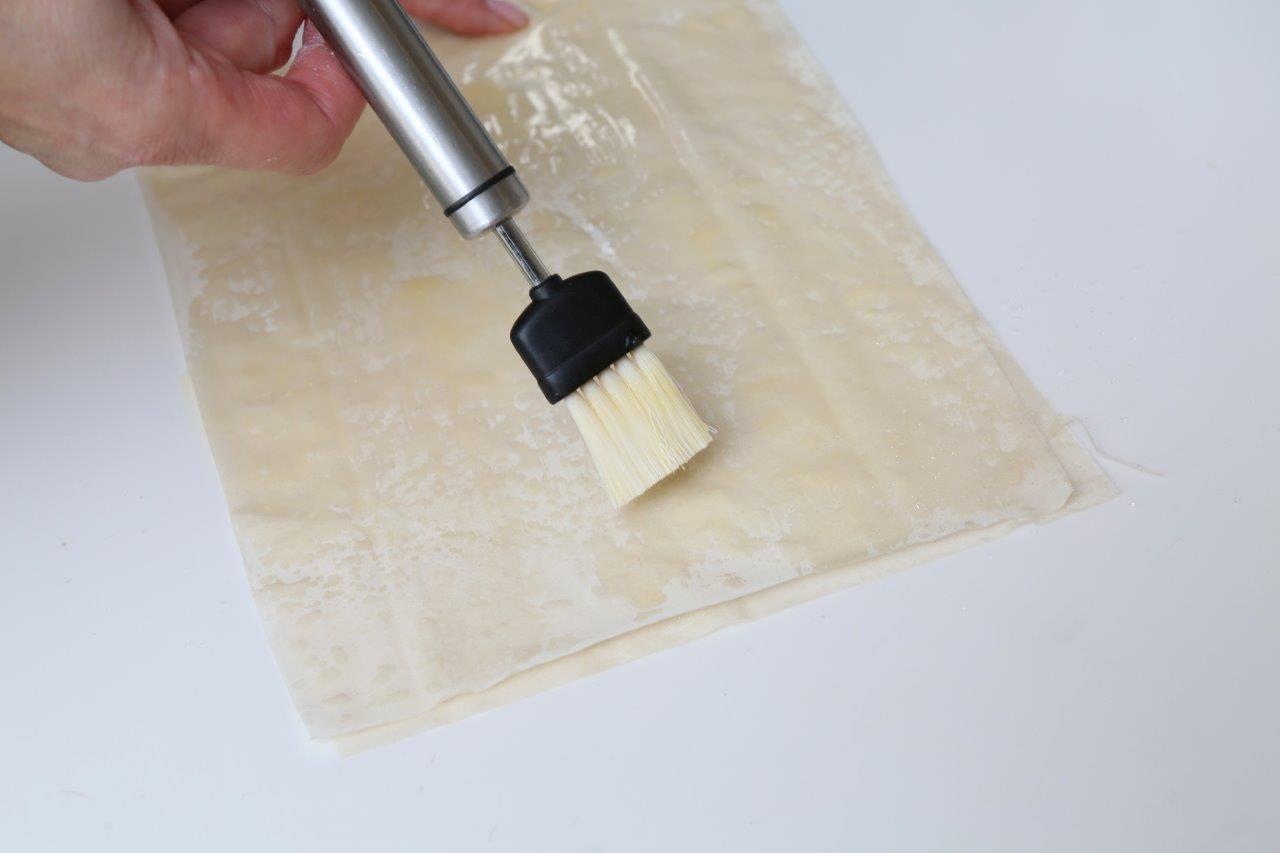
1. Defrost the filo dough as instructed on packaging.
2. Preheat the oven to 185 degrees (celsius) and melt the butter.
3. Place baking sheets on two shallow oven pans and set aside.
4. Take 6 filo dough sheets and stack them on top of each other and cover them with plastic wrap and a moist towel.
5. Take the first sheet of dough and evenly sprinkle with 1 tsp of sugar. Lightly press the sugar crystals in the dough.
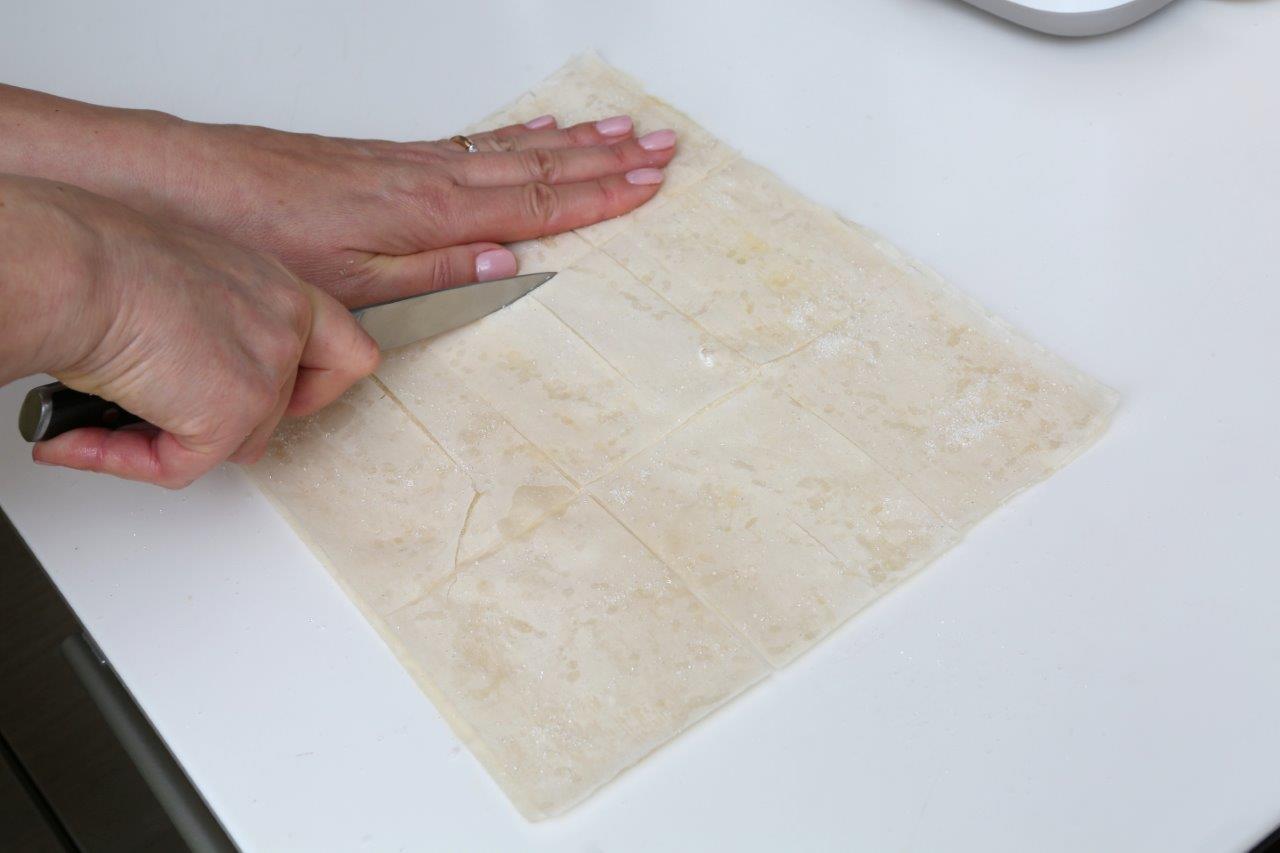
6. Stack the next sheet on top of the first one and use a brush to cover it with the melted butter. Then sprinkle with 1 tsp of sugar like the first one. Stack the third sheet on top and sprinkle the sugar on it, press down lightly so all sheets hold together properly. Then cut the sheets in 9 even pieces. They won’t hold together too well, but that’s ok.
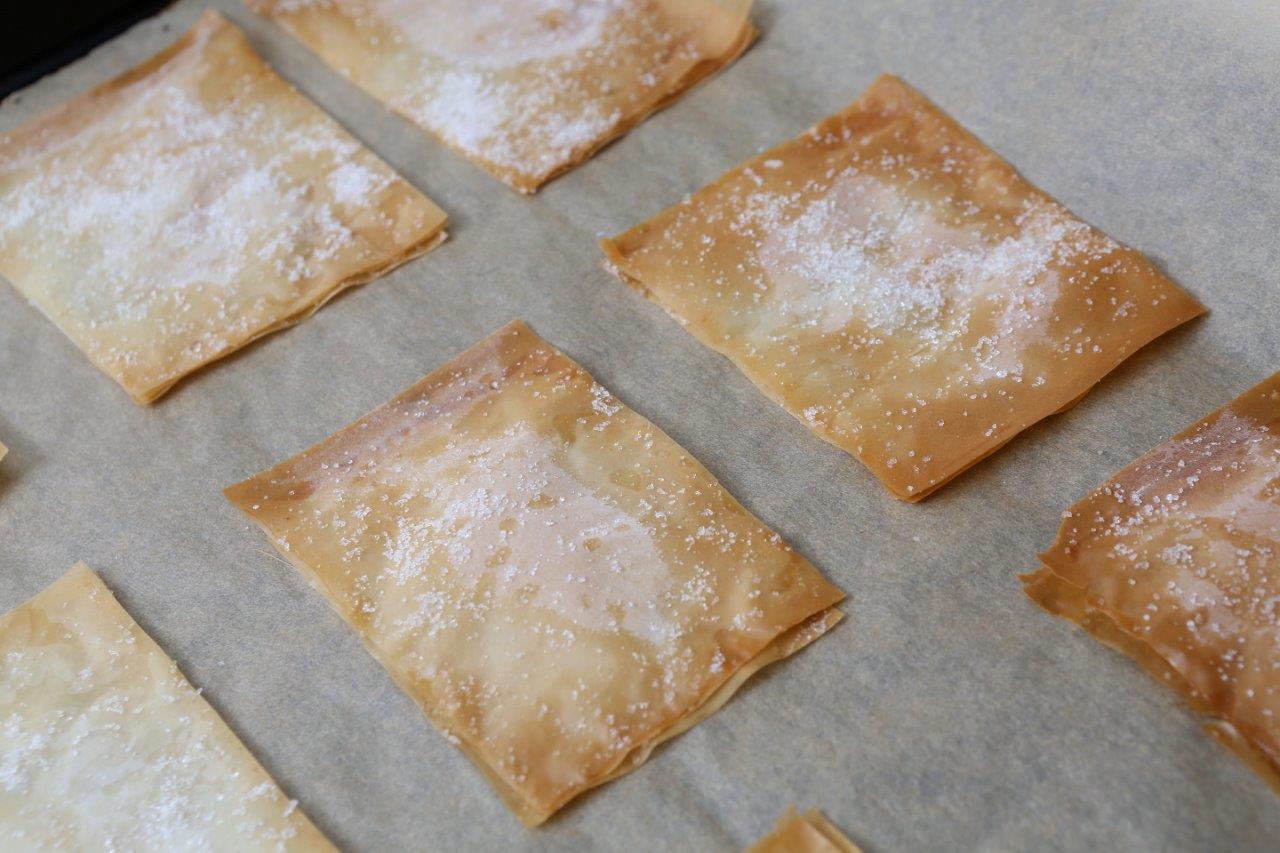
7. Place all the pieces on the prepared pans and put them in the oven to bake for 5-7 min until golden brown. Ovens can be different so keep an eye on the pastry so it doesn’t burn.
8. Repeat steps 6 and 7 to the rest of the 3 pastry sheets.
9. When all sheets are baked (should make 18) set aside to cool.
10. Once the pastry has cooled, start whipping up the cream. Use an electric mixer and clean bowl to beat the heavy cream, only when it is starting to double in size, add the sugar, liqueur, vanilla and lemon peel to whisk until everything is soft and fluffy, not stiff. Do not over mix.
Assemble the cakes
11. Each cake will need 3 of the baked filo squares.
12. Spread a tbsp of cream on the first square and place some berries on top. Then stack the second square on that and do the same. Sandwich the third filo square on top and spread half a tbsp of cream and decorate with more berries.
The cakes can be made freely as desired, there are no rules. If you want them to still be a little crunchy, serve immediately as they will become softer later.
Recipe: Ārija Avota
Photo: Ieva Andersone (IG: photoievaandersone)

Triple chocolate fudge cookies with pecan nuts
This is like a miniature cake in the form of a cookie!
These cookies differ from the kind we are used to- they are very soft and chewy in the middle. This is because the dough is made similarly to that of a cake instead of a classic cookie. And these really are super chocolatey. Even the biggest chocolate lover will be satisfied with this.
120 g pecan nuts (or walnuts)
60 g all purpose flour
1 tsp baking powder
¼ tsp salt
1 tsp instant coffee powder (this is optional, but it gives a deeper flavor)
450 g dark chocolate, melted (cocoa content must be at least 50%)
60 g unsalted butter
250 g sugar
4 large eggs
1 tsp vanilla paste or vanilla sugar
100 g dark chocolate, chopped (or chips)
100 g milk chocolate, chopped (or chips)
Makes 24 large cookies
1. Preheat the oven to 180 degrees (celsius)
2. Bake the pecan nuts in the oven for about 8 min until fragrant, set aside to cool. Turn the oven off for now.
3. Melt the 450 g of dark chocolate and the butter (be careful not to burn). When melted, set aside to cool a little.

4. In a small bowl, mix together the dry ingredients- flour, baking powder, salt and instant coffee powder.
5. In a large bowl mix the eggs with sugar for 5 min using a mixer. Add the vanilla and melted chocolate with butter, stir until all is combined well.
6. Add the dry ingredients and stir until incorporated. Don’t over mix.
7. Chop the remaining chocolate into chunks, then do the same with pecan nuts. Add these to the cookie mixture.
8. Cover the bowl and place it in the fridge to cool and set a little for 30 min (the dough could be slightly runny).
9. Meanwhile heat the oven again to 180 degrees (celsius). Cover the baking tray with paper.

10. Using a table spoon or ice cream scoop, place the dough on the baking sheet 8 cookies at a time (they might melt together if not enough room is left). Shape the form of the cookie with wet fingers.
11. Bake for approximately 11-13 min (depending on your oven and the size of the cookies) in the middle of the oven. The cookies are ready when they still look very soft, but have cracked on the surface. They will set when cooled- only then should you take them off the baking sheet to avoid any breaking.
Recipe: Ārija Avota
Photo: Ieva Andersone (IG: photoievaandersone)
Published: Ievas Virtuve, santa.lv
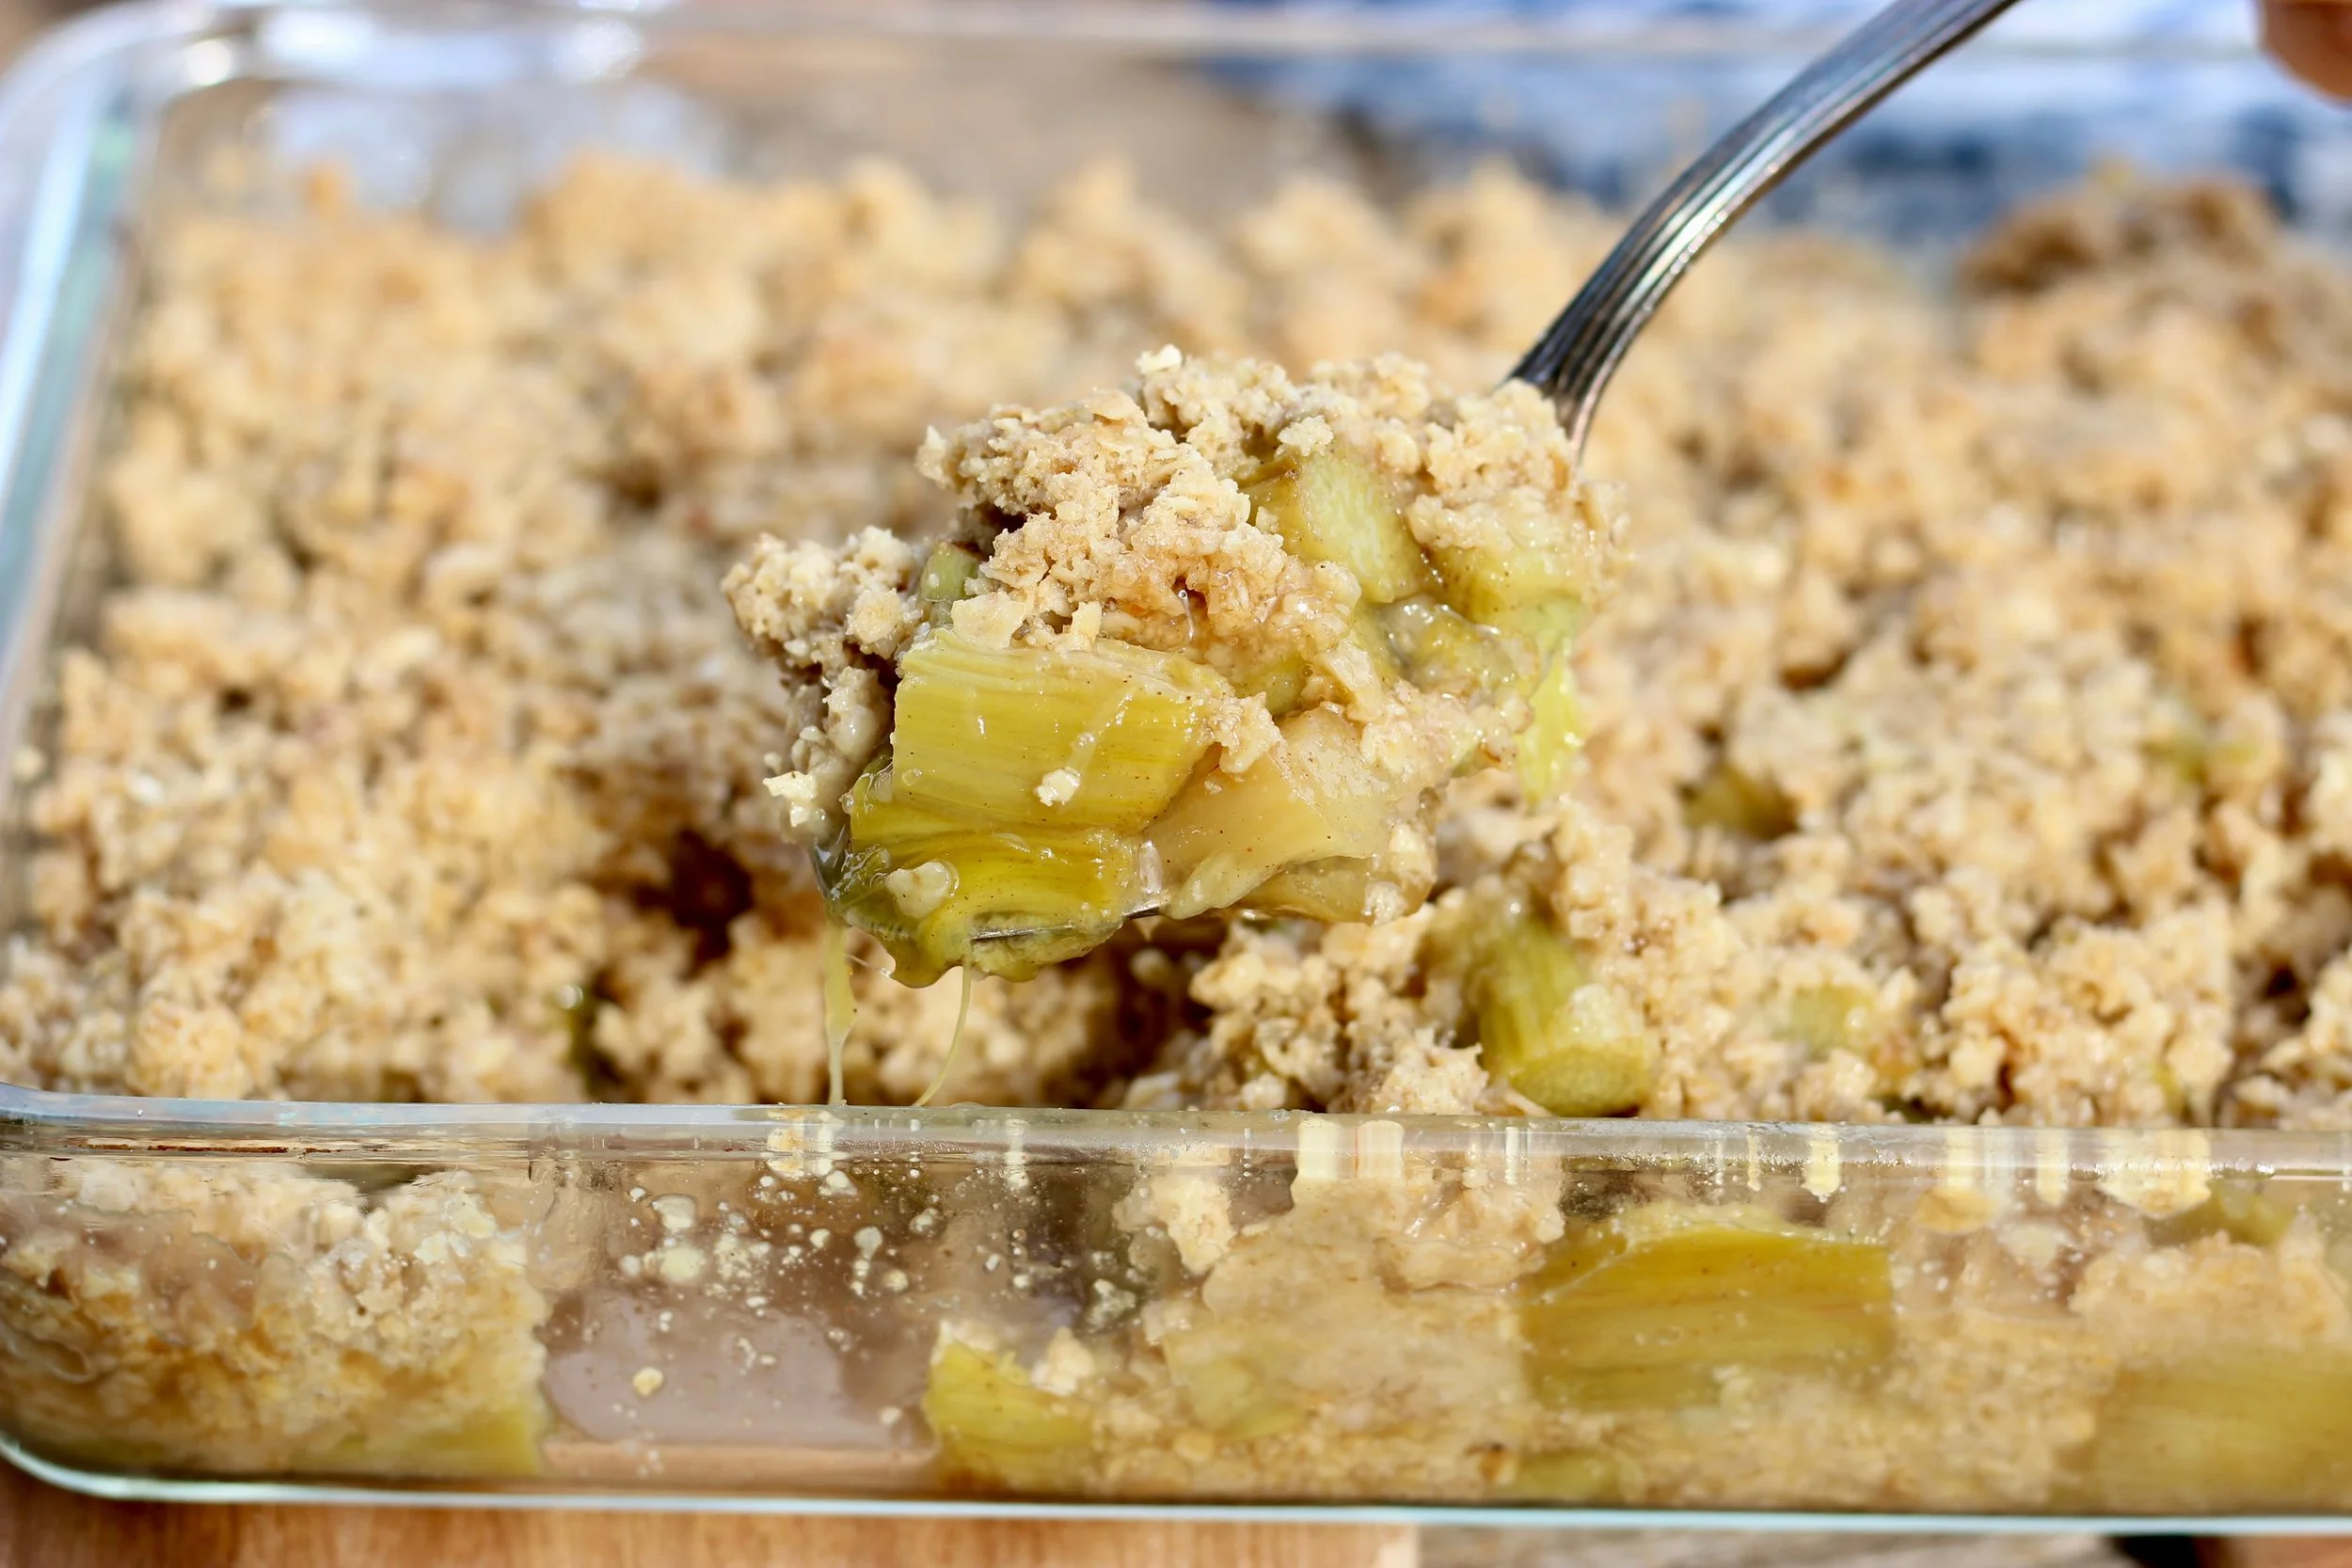
Rhubarb crumble
800 g rhubarb, washed, cut into 1 cm pieces
100 g light brown sugar
50 g sugar
Optional: cinnamon or a few handfuls of fresh or frozen berries
For the crumble
200 g all purpose flour, can use whole grain for healthier option
200 g old fashioned rolled oats
200 g unsalted butter, cold
100 g light brown sugar + 1 tbsp for sprinkling
Pinch of salt
1. Preheat the oven to 180 degrees (celsius).
2. Wash and peel the rhubarb, then cut in 1 cm pieces, mix with both sugars and set aside. Add the berries or cinnamon here if desired. If using frozen berries, no need to defrost, just add straight from the freezer.
3. Butter or oil a 30x20x6 cm baking pan, pour the rhubarb mixture in and press down lightly. Place in the oven to cook for 10 min.
Make the crumble
4. In a bowl, mix the flour, oats, sugar, salt and cold butter (cut into cubes). Use your hands to press everything together until a crumble forms.
5. When the rhubarb has been cooking for the 10 min, remove the pan from the oven and sprinkle evenly with the crumble mix. Then top it all off with more brown sugar for extra crunch.
6. Place the pan back in the oven for about 25-30 min, until the crumble is golden brown.
7. Can be served hot or cold with a ball of vanilla ice cream or a glass of milk.
Recipe: Ārija Avota
Photo: Oto Avots

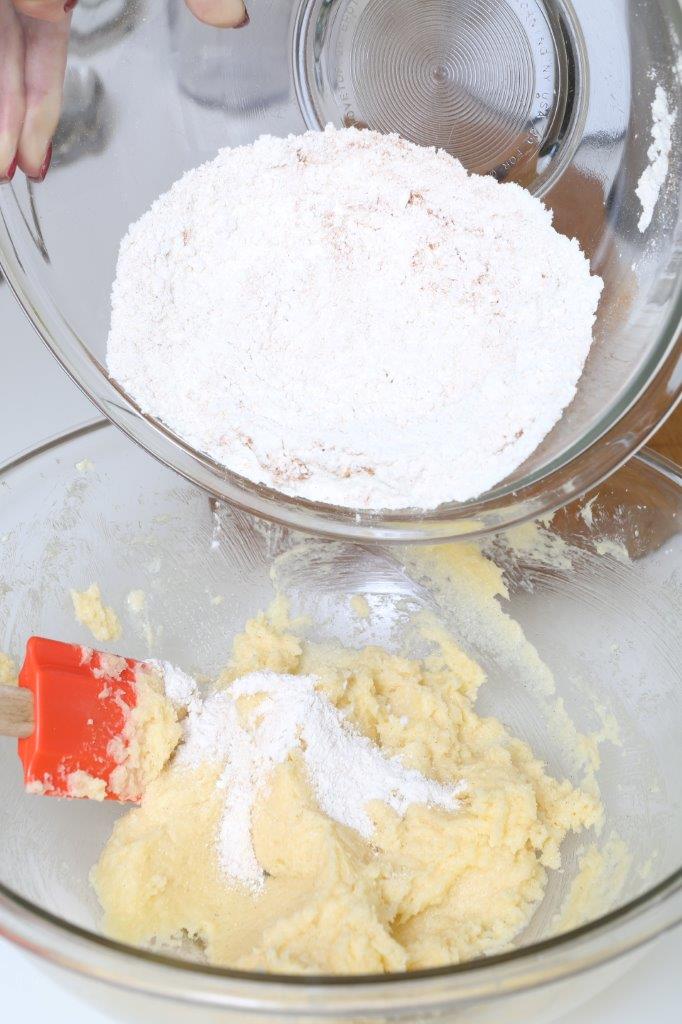
Chewy oat cookies
110 g walnuts or pecan nuts
170 g unsalted butter, room temp
210 g light brown sugar
1 large egg
1 tsp vanilla paste or vanilla sugar
95 g all purpose flour
½ tsp baking powder
½ tsp salt
½ tsp cinnamon
250 g old fashioned rolled oats
100 g dried cranberries or cherries
100 g chocolate, chopped (can use white or dark chocolate- whichever you like better)
optional- handful of fresh cranberries
Makes 18 large cookies, must be preserved in a container
1. Preheat the oven to 180 degrees (celsius). Bake the nuts for 8 min until fragrant on a baking sheet and set aside, then chop.
2. In a medium bowl mix the soft butter and sugar until light and fluffy (2-3 min). Add the egg and vanilla.
3. In another bowl, stir together the dry ingredients- flour, baking powder, salt and cinnamon.
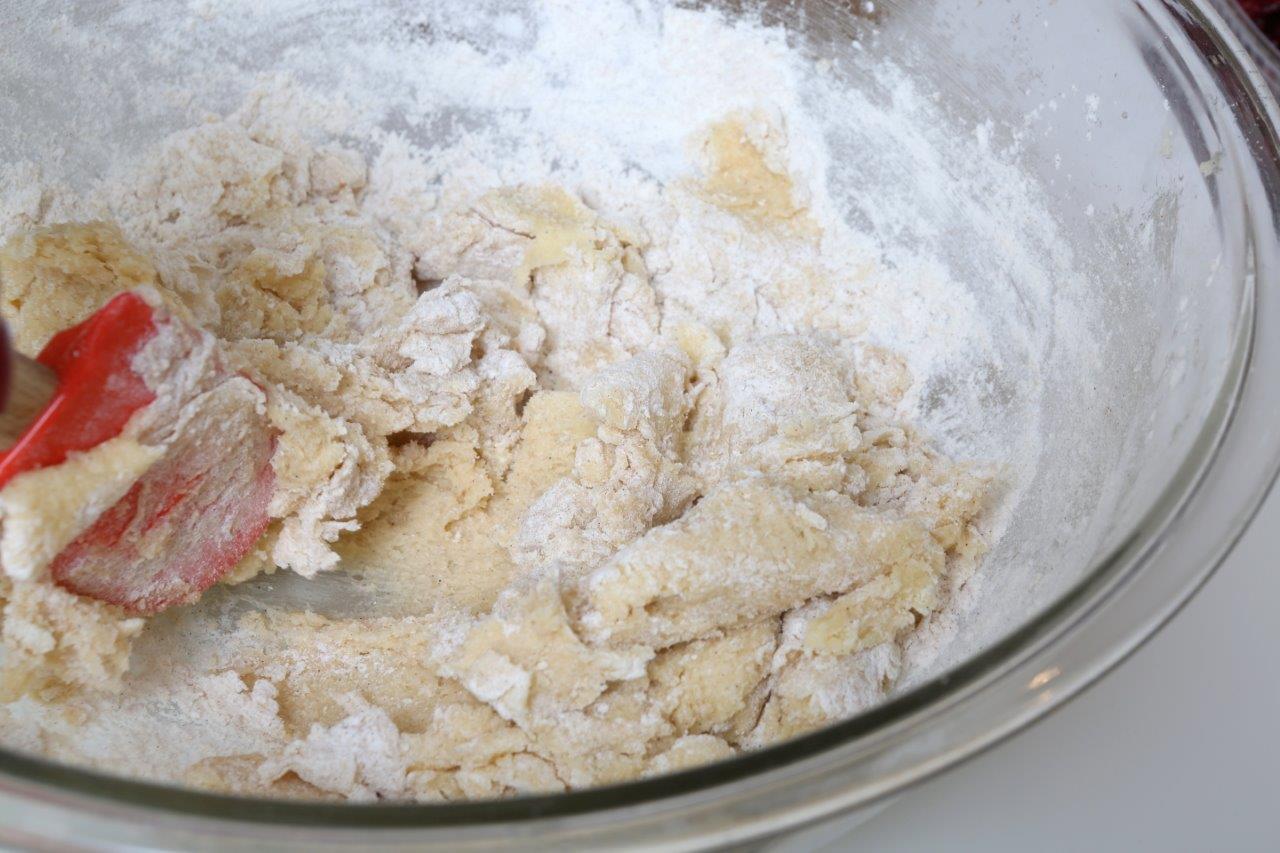
4. Add the dry ingredients to the butter mixture and stir until incorporated.
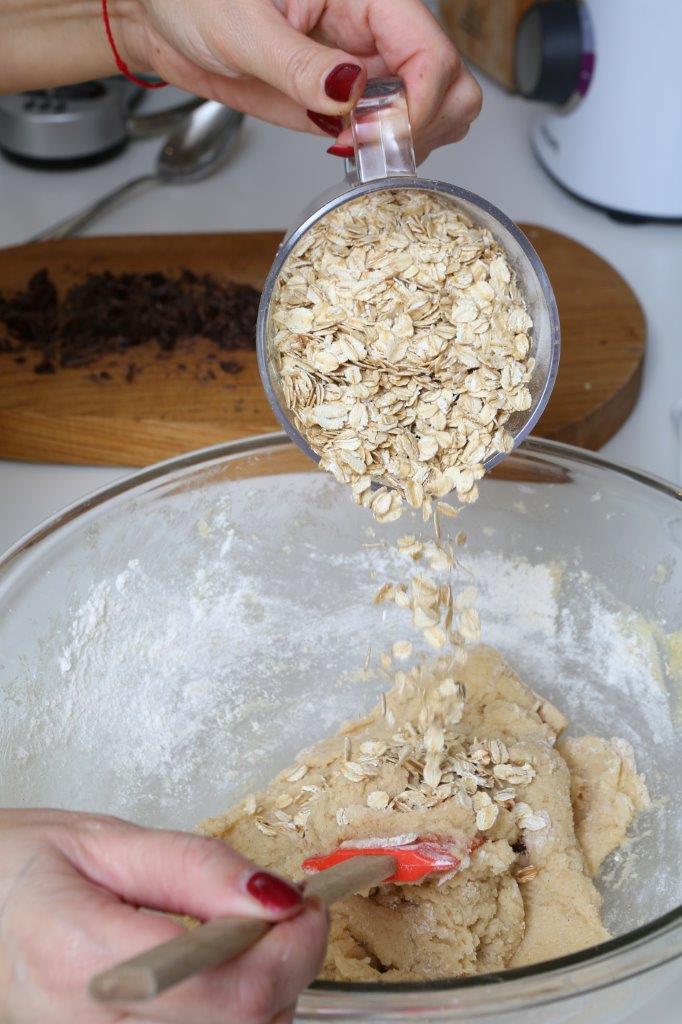
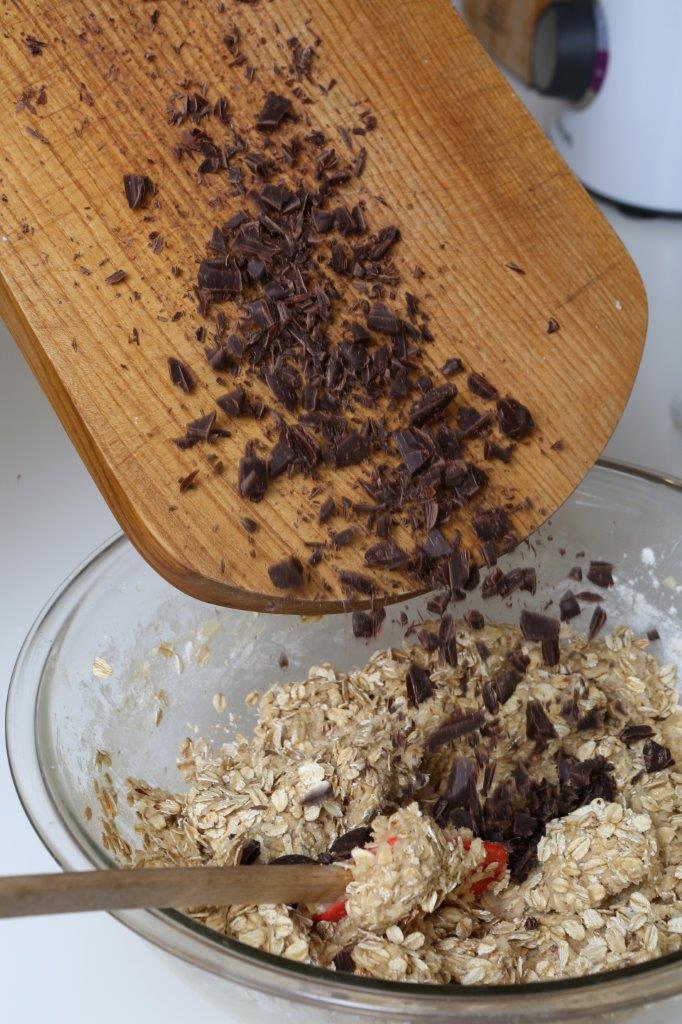
5. Stir in the oats, dried and fresh cranberries if using, nuts and chocolate chips.

6. Using a tablespoon or ice cream scoop, put the dough on baking sheet 9 cookies at a time. Shape the form using wet fingers.

7. Bake in the oven for 12-15 min until golden on the sides, but the middle is still soft.
8. Set aside to cool.
Recipe: Ārija Avota
Foto: Ieva Andersone (IG: photoievaandersone)
Published: Ievas Virtuve, santa.lv
