
Trout soup
This is a quick fish soup, tastes best when made with fresh carrots, new potatoes and dill. It almost feels healing in a way- so eat this slowly to savor every spoonful.
For the broth
A whole fish bone with the head, approx 500-800 g
2 carrots, cut in 2 cm pieces
2 sticks of celery, cut in 2 cm pieces
1 onion, cut in 4 pieces
A handful of parsley
2 bay leaves
For the soup
1 small onion, chopped
300 g trout fillet, no skin, cut in 2 cm pieces
2 medium carrots, peeled, cut in thin slices
4 medium potatoes, peeled, cut in 2-3 cm cubes
A handful of dill
2 tbsp olive oil
Salt and pepper to taste
Optional: 150-200 g melted cheese
1. Make the broth. Thoroughly wash the fish bone and place it in a large pot, add all the veggies, parsley and bay leaves, pour over 1,5-2 l cold water and bring to boil. Remove the foam and let simmer for approximately 30 min.
2. Remove the fish bone and keep any fish meat (if there is any)
3. In a medium pot, cook the chopped onion in the olive oil until transparent.
4. Then lower the heat and cook the carrots a little bit, add the broth and potatoes and bring to boil. After 10 min add the trout fillet pieces, boil for 3-5 min,add the saved pieces from the broth (if you had any).
5. Taste and add salt and pepper, if you choose to- add the melted cheese.
6. Serve with chopped fresh dill.
Recipe: Ārija Avota
Photo: Ārija Avota

BBQ ribs
This is the best bbq rib recipe ever (well at least up until now). Through trial and error I have come to this recipe and absolutely love it.
What should perfect bbq ribs be like? They are packed with flavor and are slightly spicy (thanks to the marinade, cumin, cayenne pepper), they are soft and juicy, they are literally falling off the bone (by being sautéed for such a long time), they have this sweet and yet savory taste of that smokey homemade bbq sauce.
I recommend making a large batch of these, since they are oh so good and can be eaten later on as well 😆😋😇
3 kg pork ribs
For the marinade
4 garlic cloves, pushed through a garlic press
2 tsp paprika powder
1 tsp cumin
1 tsp cayenne pepper
2 tbsp sea salt
2 tbsp brown sugar
3 tbsp olive oil
For the bbq sauce
3 tbsp apple cider vinegar
5 tbsp ketchup
2 tbsp brown sugar
5 tbsp rum
1 tbsp Worcestershire sauce
2 tsp Dijon mustard
3 garlic cloves, pressed through a garlic press
Ginger, the size of your thumb, peeled and finely grated
½ chili with seeds, chopped
1. Wash and pat dry the ribs. Cut in pieces so they fit in a shallow oven baking pan. Turn with the rib side up and use a knife to pull off the membrane. If that is not possible, just puncture it all over so the marinade has a chance to get through. If the top part of the ribs is too fatty, cut most of the fat off, leaving about 0.5 cm of fat for better taste.
2. Make the marinade. Mix together all the ingredients except olive oil and use that to rub in all of the ribs generously. Then drizzle olive oil on top at the end and rub that in too.
3. Preheat the oven to 160 degrees (celsius).
4. Place the ribs in thicker foil and tightly wrap each piece separately. Leave the opening on top (the bone part stays up) so that all the juices don’t leak out.
5. Put in baking pan and place in the oven for 2-2.5 h, depending on the meat.
6. Check on the ribs after 2 h. The foil should be full of juices and the meat should be stewing in it. If the meat seems to be coming off the bone, it is time to remove from the oven. If not- leave for 20-30 min more.
7. When the ribs are cooked, remove from oven and drain the juices, but leave the meat in foil to rest up until the moment you plan to start grilling.
/If you don’t plan on grilling and want to continue to cook in the oven, then brush the bbq sauce on the meat in the foil and put it back in the oven on the grill setting for 5 min, turn them over, cover that side in sauce and cook for 5 min again./
8. You can use the store baught bbq sauce, but you can also try and make it yourself.
9. In a small pot mix all the sauce ingredients and put it on low heat on the stove. Keep stirring every once in a while until the sauce reduces to a creamy, sticky consistency, about 20 min.
10. Put the ribs on a preheated grill on medium heat and grill until golden on both sides. Then brush both sides with the bbq sauce and lower the grill heat to finish the ribs off (the sauce gets sticky and thick).
11. Serve with grilled corn or potatoes and a green salad.
Recipe: Ārija Avota
Photo: Oto Avots
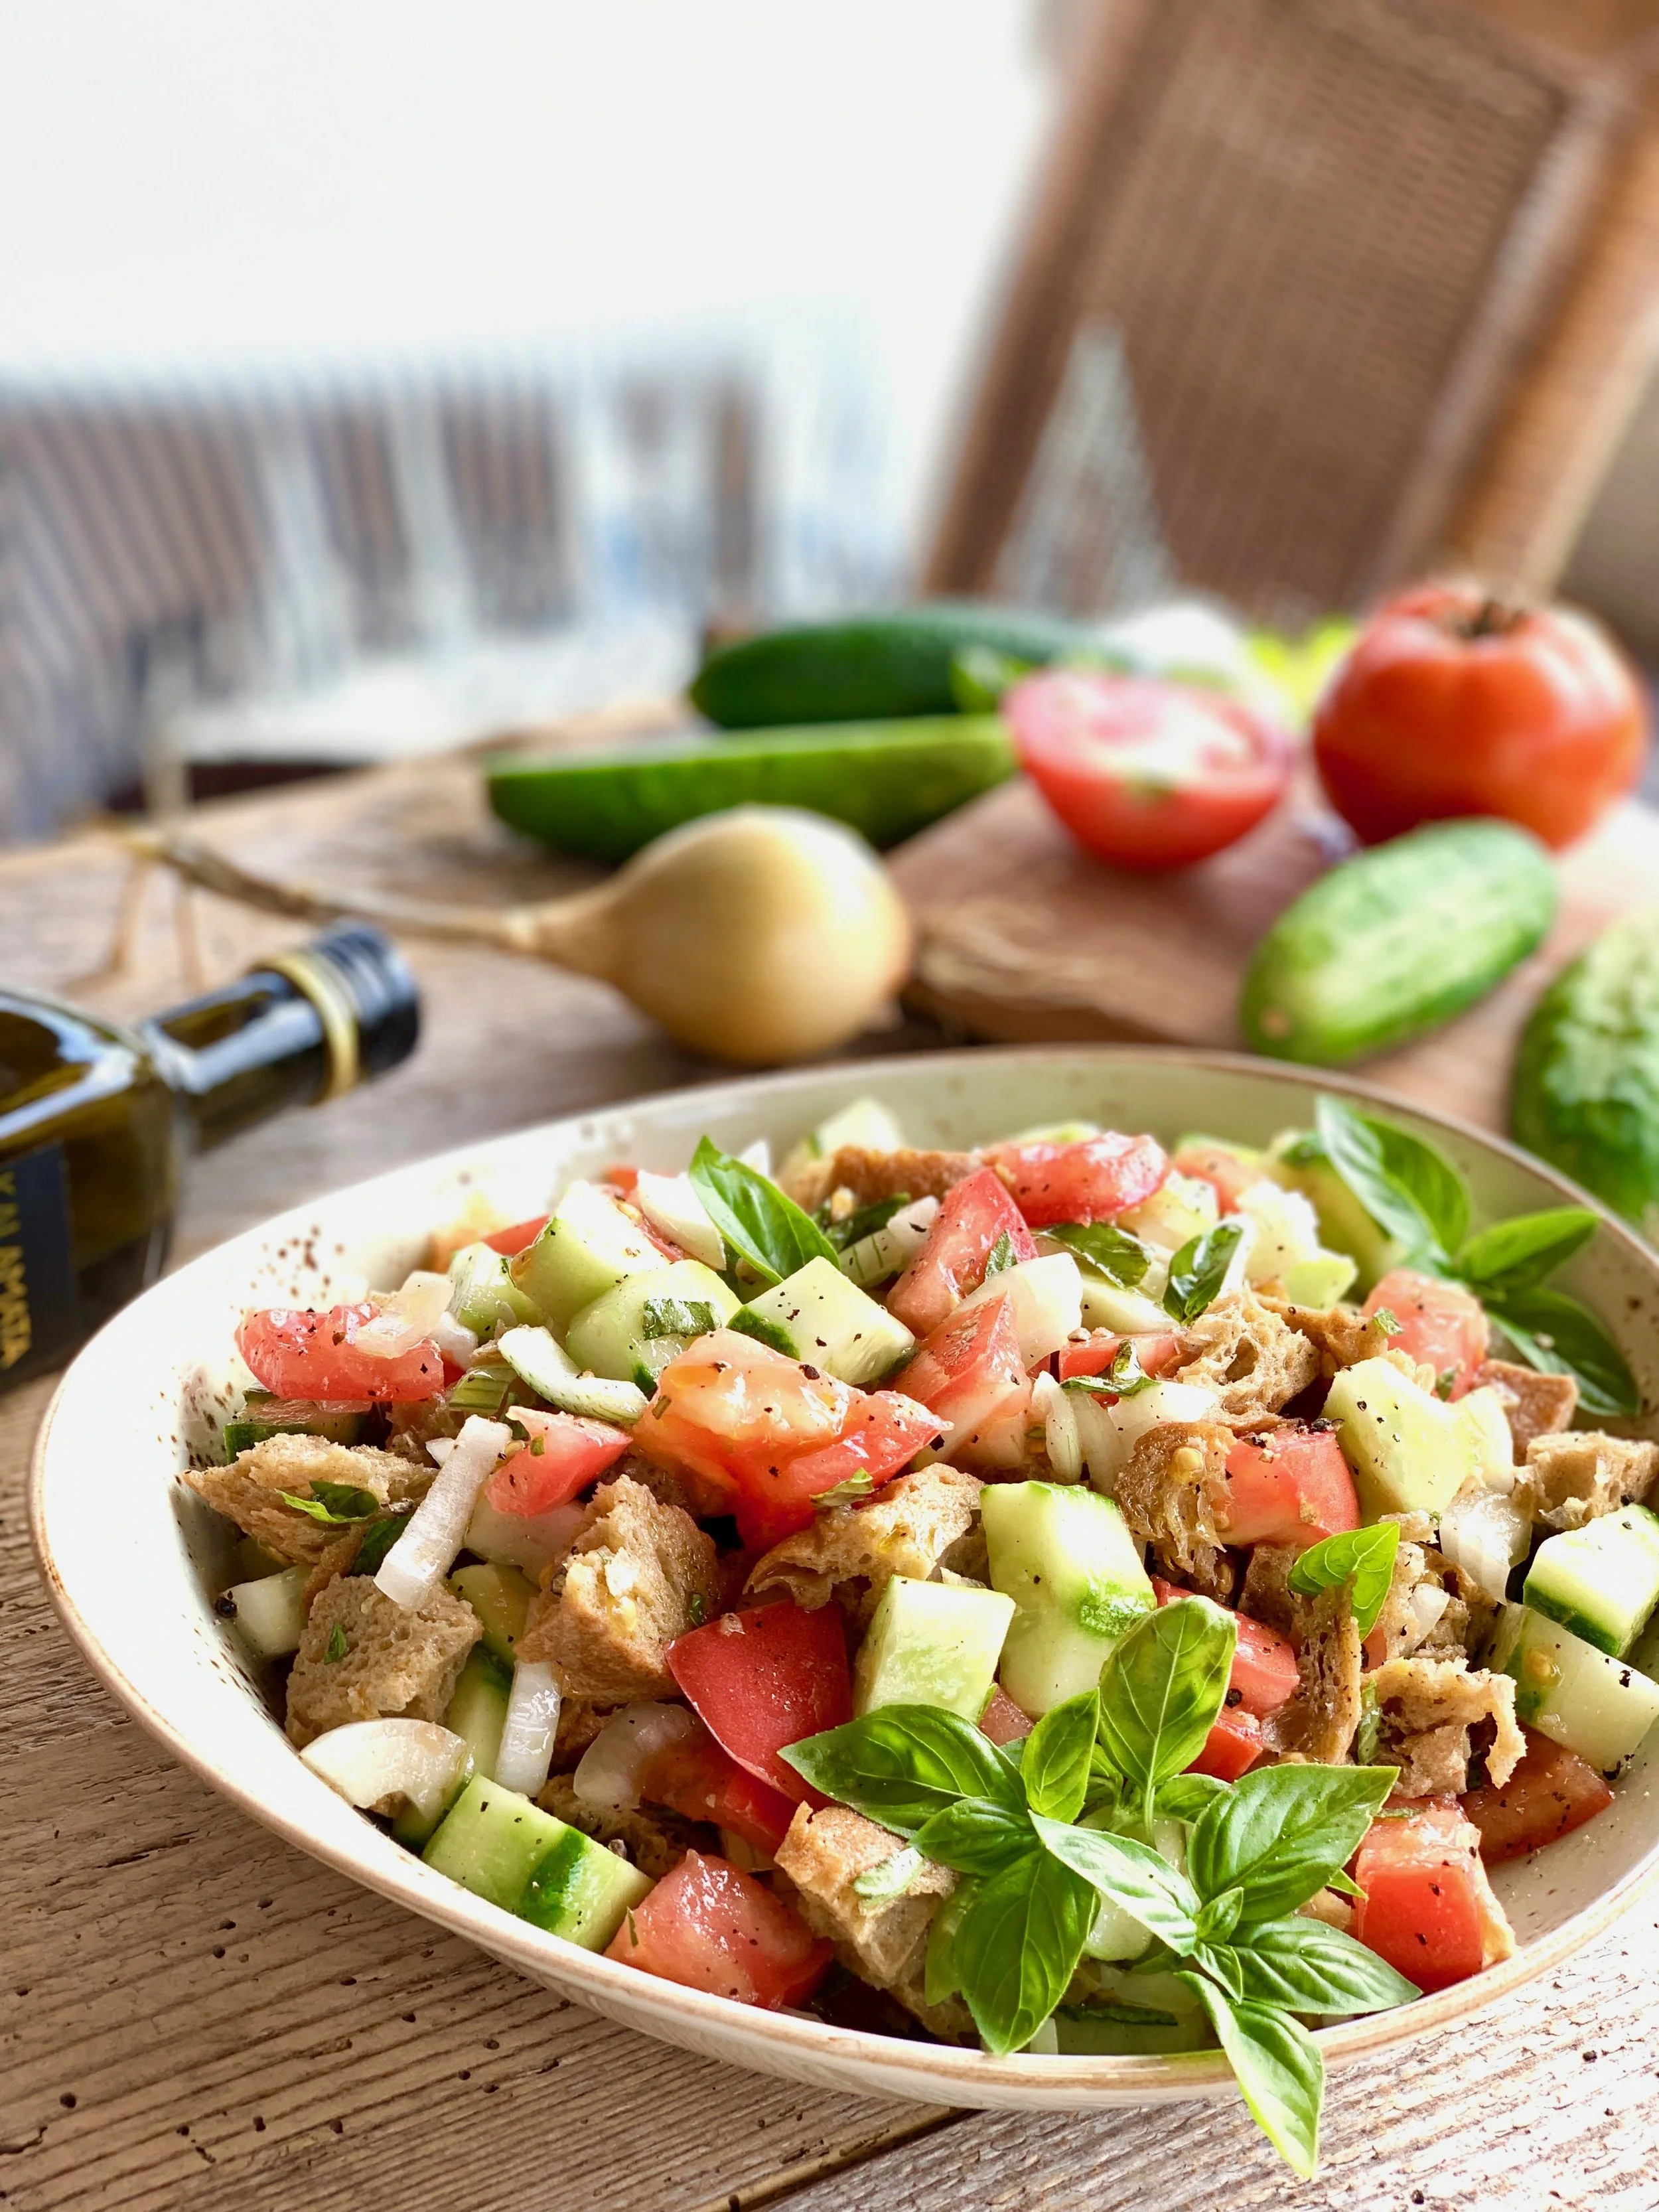
Bread salad
This salad is something to make when there are cucumbers and tomatoes in season. And if you have some stale bread left over (which is exactly what happened to me), then a great salad can be made!
On lazy evenings this could even be a contender to a light dinner recipe. It is very fresh and smells of basil, it can also be a little fancy if necessary (I mean pairing with white whine can make anything more fancy.😄
200 g stale bread, something like ciabatta
2 large tomatoes
4 small cucumbers
1 sweet onion
Handful of basil
2 tbsp white wine vinegar or Balsamic vinegar
4 tbsp Extra Virgin olive oil
Salt, pepper, brown sugar to taste
1. Cut the bread in 3-4 cm pieces, place in a deep bowl you will be serving the salad in.
2. Dice the tomatoes in 2-3 cm pieces. Peel the cucumbers, cut in half and chop in 2 cm pieces. Add everything to the bread in the bowl.
3. Cut the onion in half rings, add to salad.
4. Add torn basil leaves, salt, pepper and half a tsp brown sugar.
5. Drizzle with chosen vinegar and olive oil, mix together. Serve chilled.
Recipe: Ārija Avota
Photo: Oto Avots

Tomato soup
We make this soup very often. When it is tomato season- I use fresh tomatoes, if it is off season, then canned tomatoes. And it tastes great in both versions.
I really enjoy the strong flavor of the tomato soup, so I rarely use the heavy cream. I use the saved calories to eat a chocolate fondant instead :)
When cooking this soup, the most important part is to balance the flavor- using brown sugar for sweetness, salt for saltiness and lime or balsamic vinegar for the sour.
800 g canned tomatoes, peeled
2 medium onions, chopped
2-3 large garlic cloves
½ chili with the seeds, chopped or ¼ tsp chili paste
2 tbsp tomato paste
2 tsp oregano
1 handful fresh basil
500 ml vegetable broth
Salt, pepper, sugar to taste
4 tbsp olive oil
2 limes for serving
Optional: add 100-150 ml heavy cream and bring soup to boil, creating a cream soup
1. In a large double bottom pot heat some olive oil and on low heat sautée the chopped onions. Stir occasionally and check to see if the onion is slowly turning translucent instead of cooking golden brown.
2. After about 10 min add the garlic, pushed through a garlic press, chopped chili (or paste) and oregano, and sautée a bit more. Then stir in tomato paste and cook.
3. In a separate bowl blend the canned tomatoes (or in a blender) with the fresh basil. Then pour in the pot.
4. Add the vegetable broth and bring the soup to a boil. Then lower the heat and slowly let the soup cook for 5-10 min. Add salt, pepper and sugar to taste.
5. If you want the soup to be smoother, use a hand blender to blend the soup right in the pot. This is when to add the heavy cream, if you choose to make a cream soup version.
6. Let the soup rest for 15 min.
7. Serve with a lime wedge and toasted bread or croutons.
! It is possible to drizzle a little olive oil, balsamico or pesto on the soup. You can add roasted seeds, crumbled blue cheese or even pieces of mozzarella.
Recipe: Ārija Avota
Photo: Ārija Avota
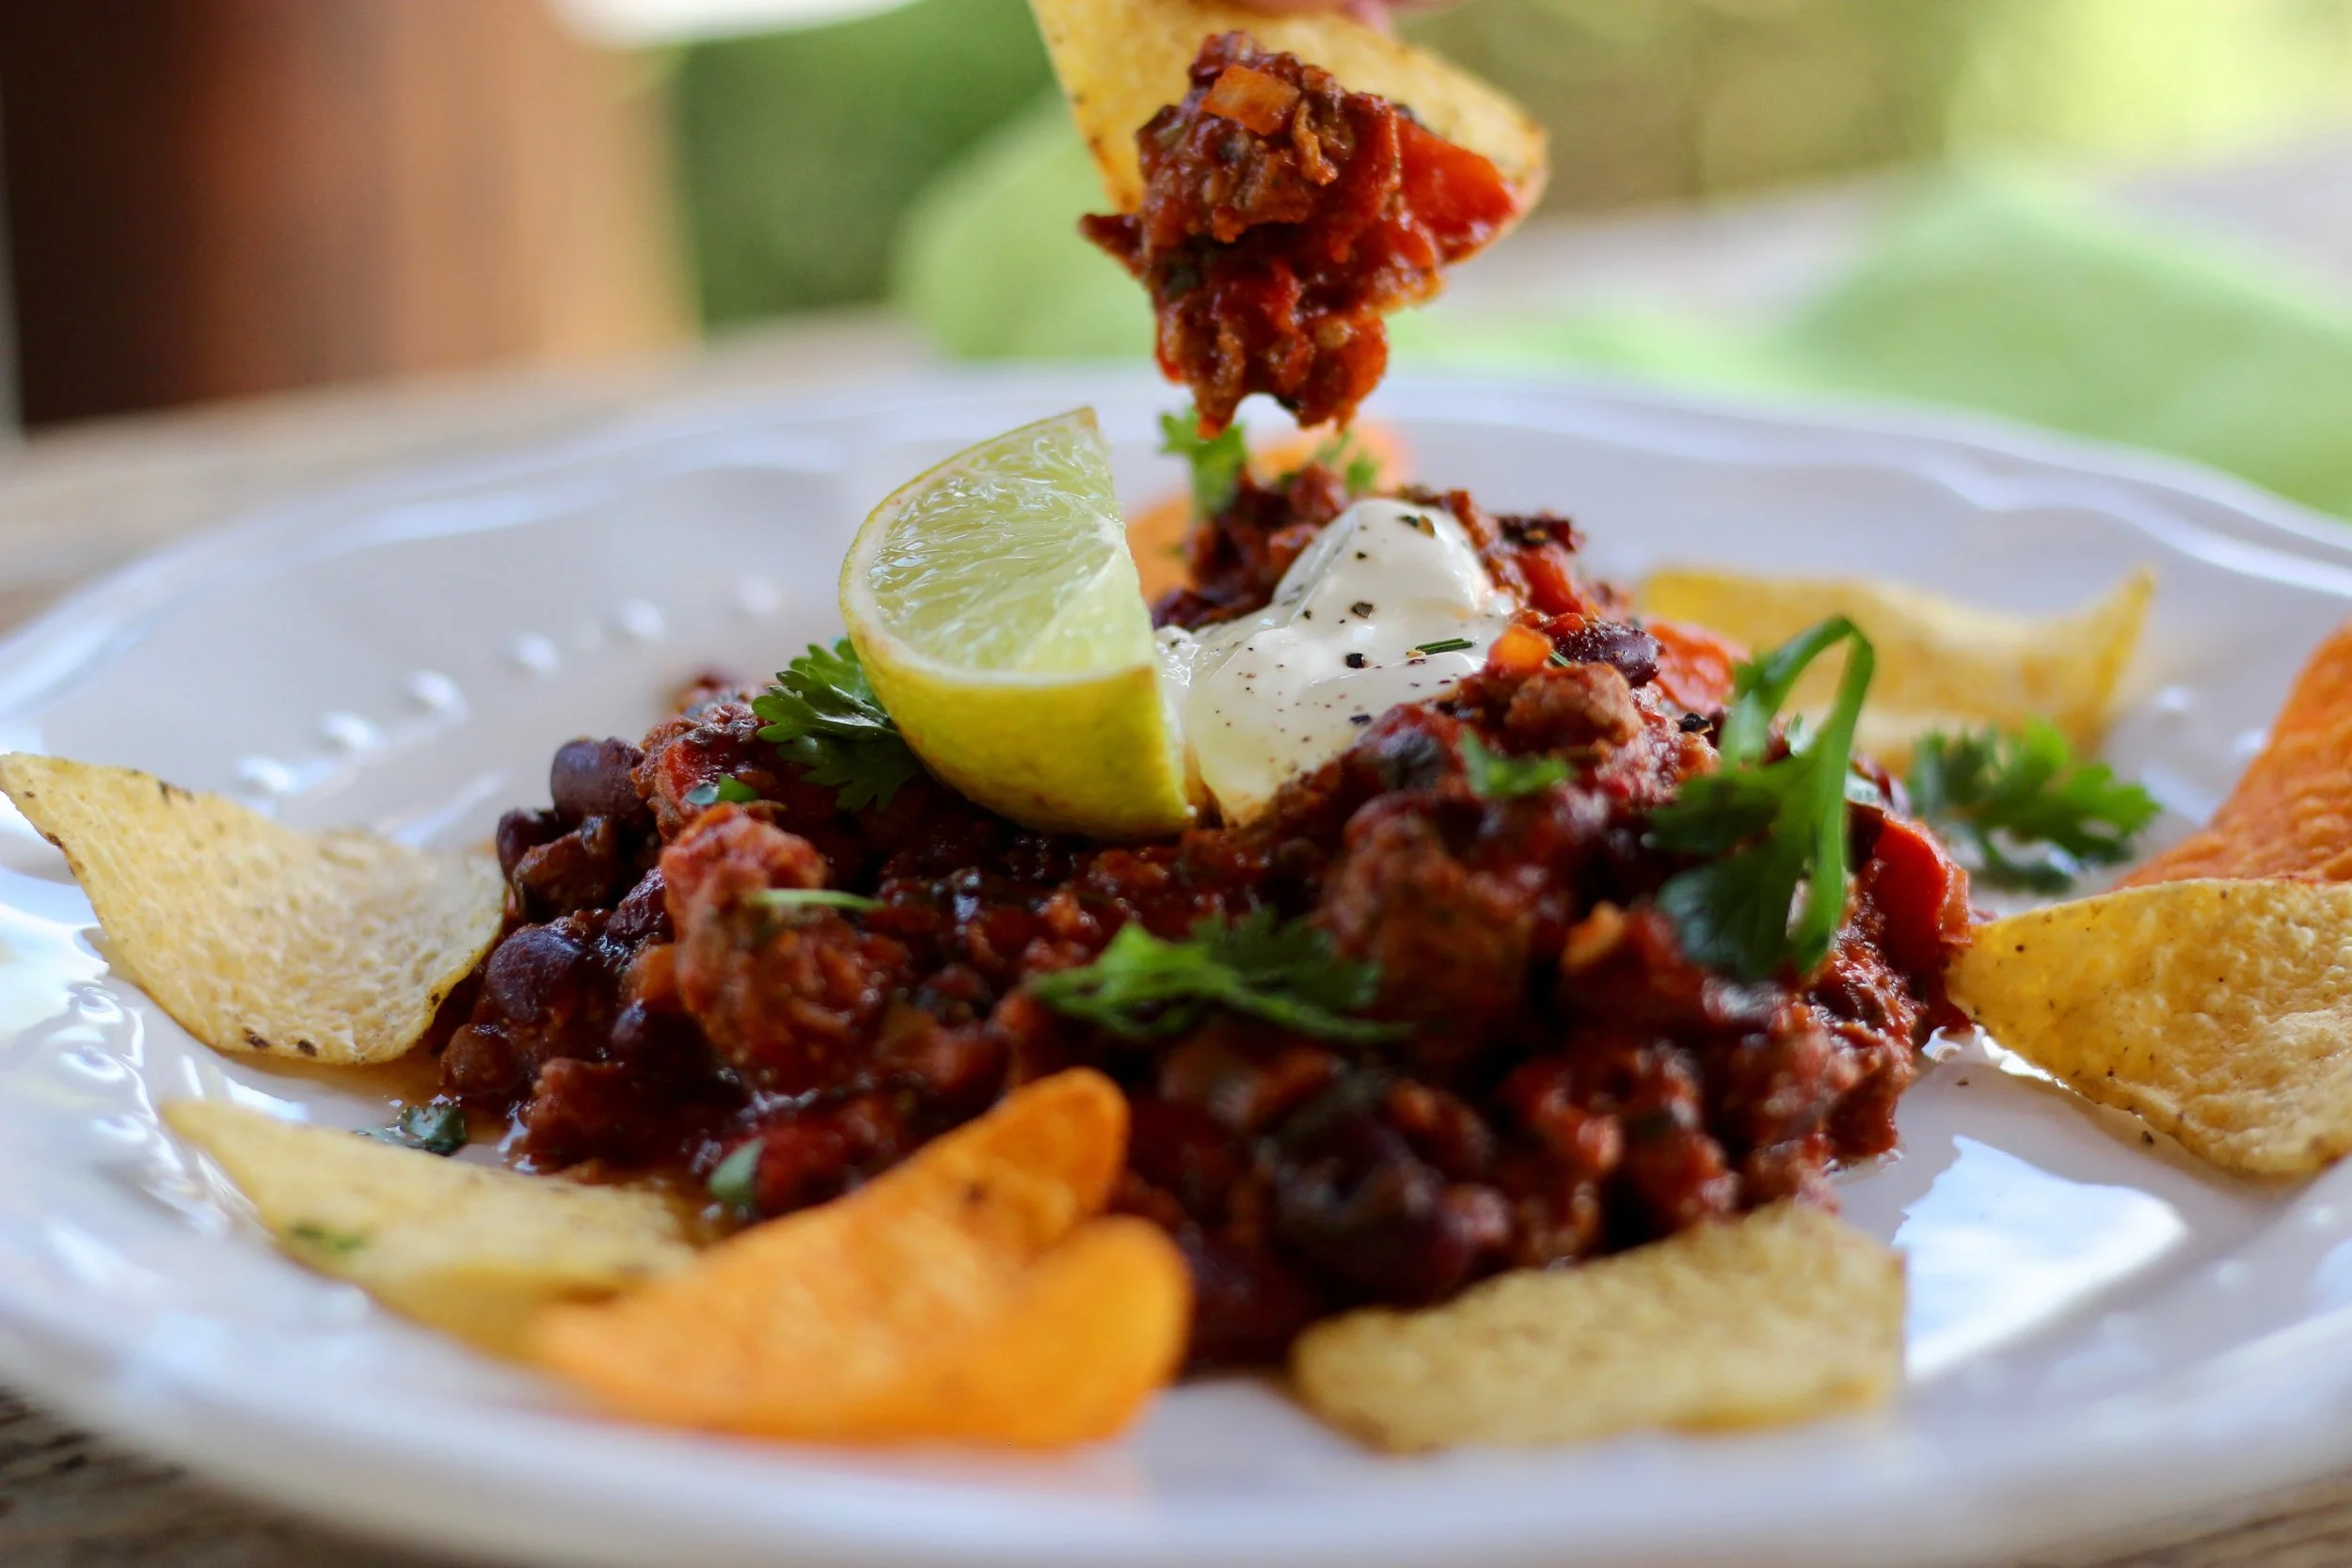
Chili con carne
O, chilli con carne! Our family has really come to love Mexican food, even all the kids enjoy it (when not too spicy). This chilli recipe has been modified and made better over the years and now it is here for you to use!
The distinct taste this chilli has couldn’t be possible without using coriander. And- if you want this chilli to be more like a soup- add more water and serve it in a bowl.
The serving is quite generous which is great because we always come for seconds and also is super delicious when served the next day.
600-700 g ground beef or veal
200-300 g tomato paste
400 g (1 can) canned peeled tomatoes
480 g net (2 cans) canned kidney beans, water drained
2 onions
3 garlic cloves
3 celery sticks
2 carrots
1 green paprika
A handful of coriander or parsley
1 chili or 1 tsp chili paste
1-2 tsp cumin
2-3 tsp paprika powder
1 tsp cinnamon
4 + tbsp olive oil for cooking
Salt, pepper, Balsamic vinegar, sugar to taste
500 ml hot water or vegetable broth, if you want it more of the consistency of a soup
For serving
2 limes
A handful of coriander or parsley
Sour cream
Corn chips or nacho chips
Canned jalapeno, if you want it spicier
1. Finely chop the onions, garlic cloves, carrots, celery sticks, paprika, chilli with the seeds, coriander or parsley. Leave these separately as they will be cooked at different times.
2. In a deep frying pan, pour the olive oil and cook the onions, celery, carrots and paprika for 7-10 min on medium heat. Then add the chilli, coriander, garlic.
3. Add all the spices- cumin, paprika powder, cinnamon and cook a little.
4. Now you can add the ground meat and cook while stirring constantly. Add more olive oil if necessary.
5. When meat is cooked, pour in the tomato paste along with the canned tomatoes (with the juice) and beans (rinsed). Mix well and lower the heat to minimum, put the lid on pan and leave to simmer for about 40 min. Add the hot water or vegetable broth if the mixture gets too dry or starts cooking too fast.
6. Taste the chilli con carne and start looking for your own taste- add salt, pepper, balsamico and sugar as necessary. When you find the perfect balance for your needs, take the pan off heat and let it rest for 15 min. This will allow all of the ingredients to come together better.
7. Serve with the chips, sour cream, slice of lime and sprinkle with fresh coriander or parsley.
Can also be served on a tortilla or rice.
Recipe: Ārija Avota
Photo: Oto Avots

Adding more water- as a soup

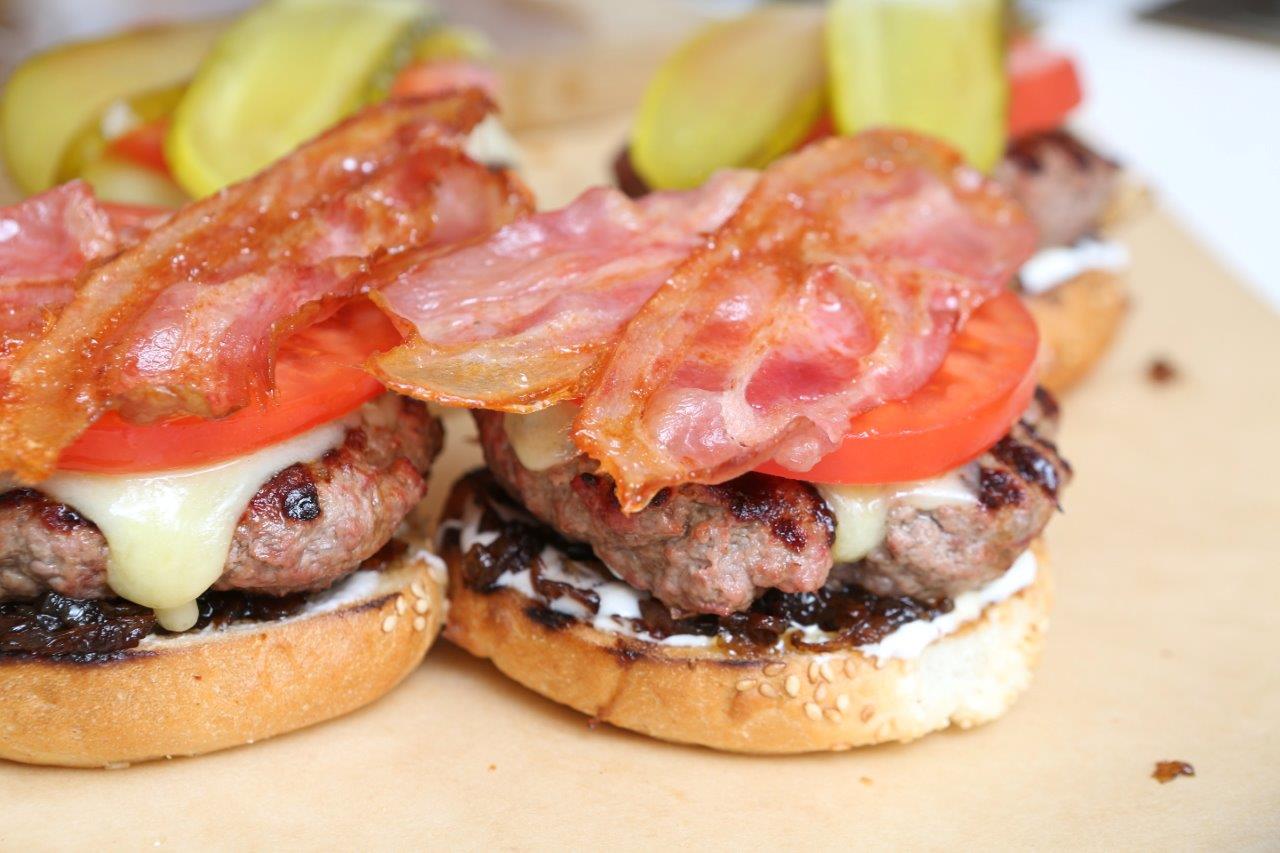
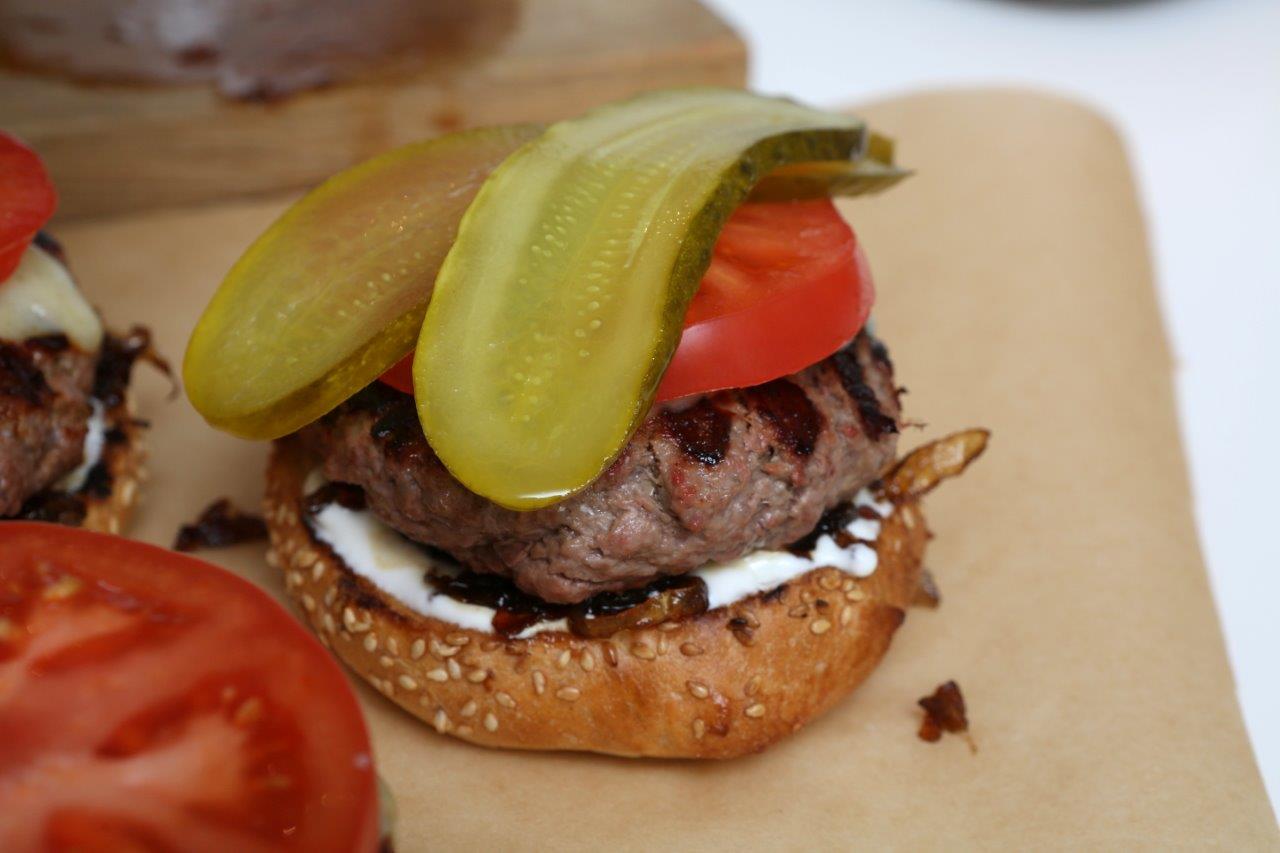
Hamburgers with caramelized onions
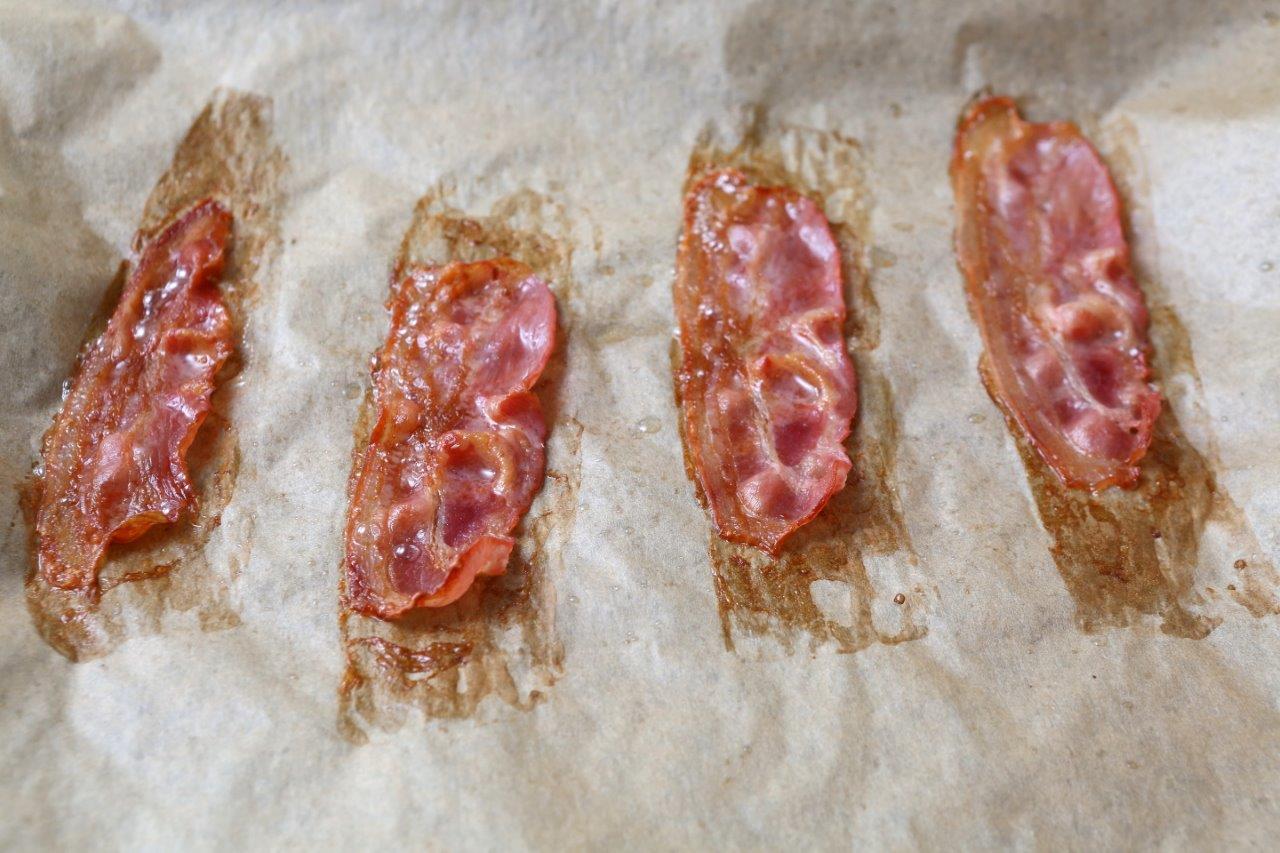
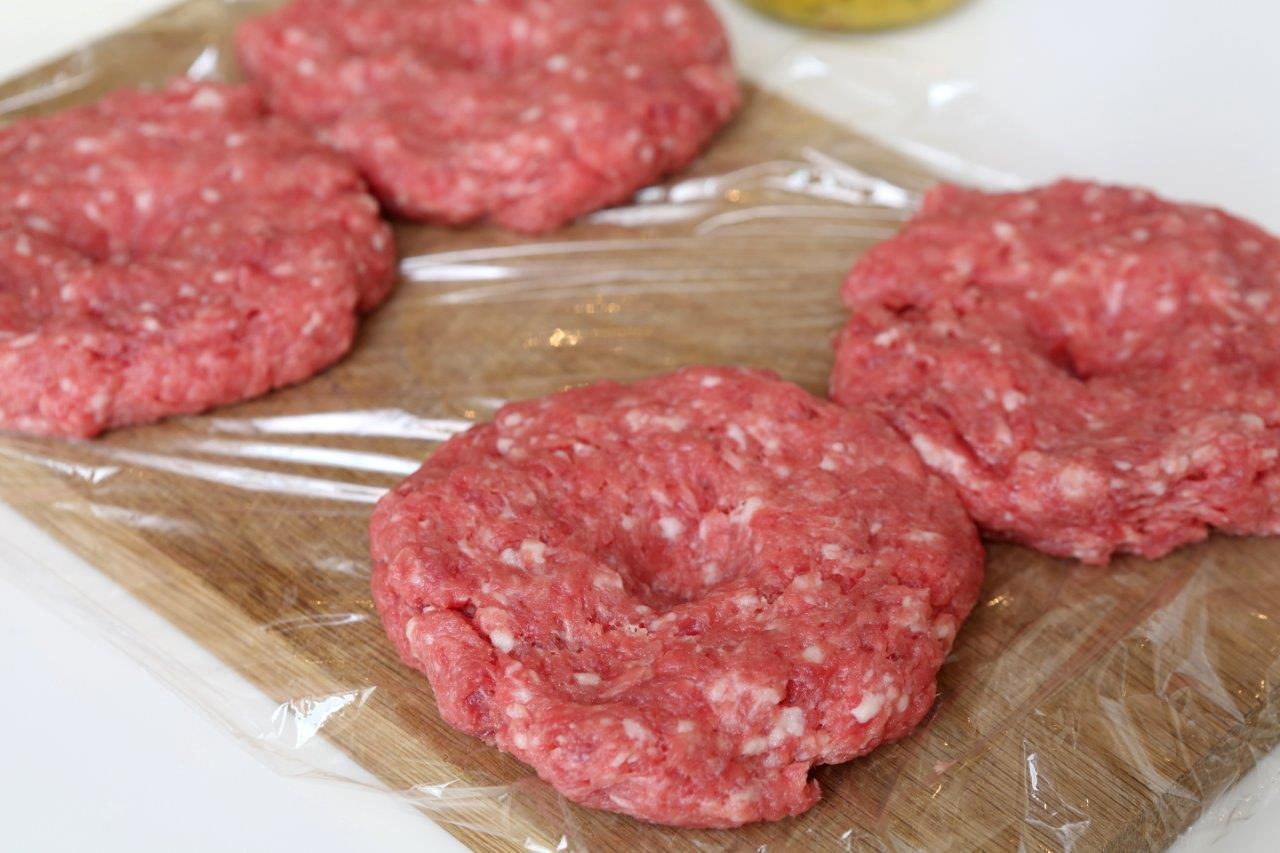
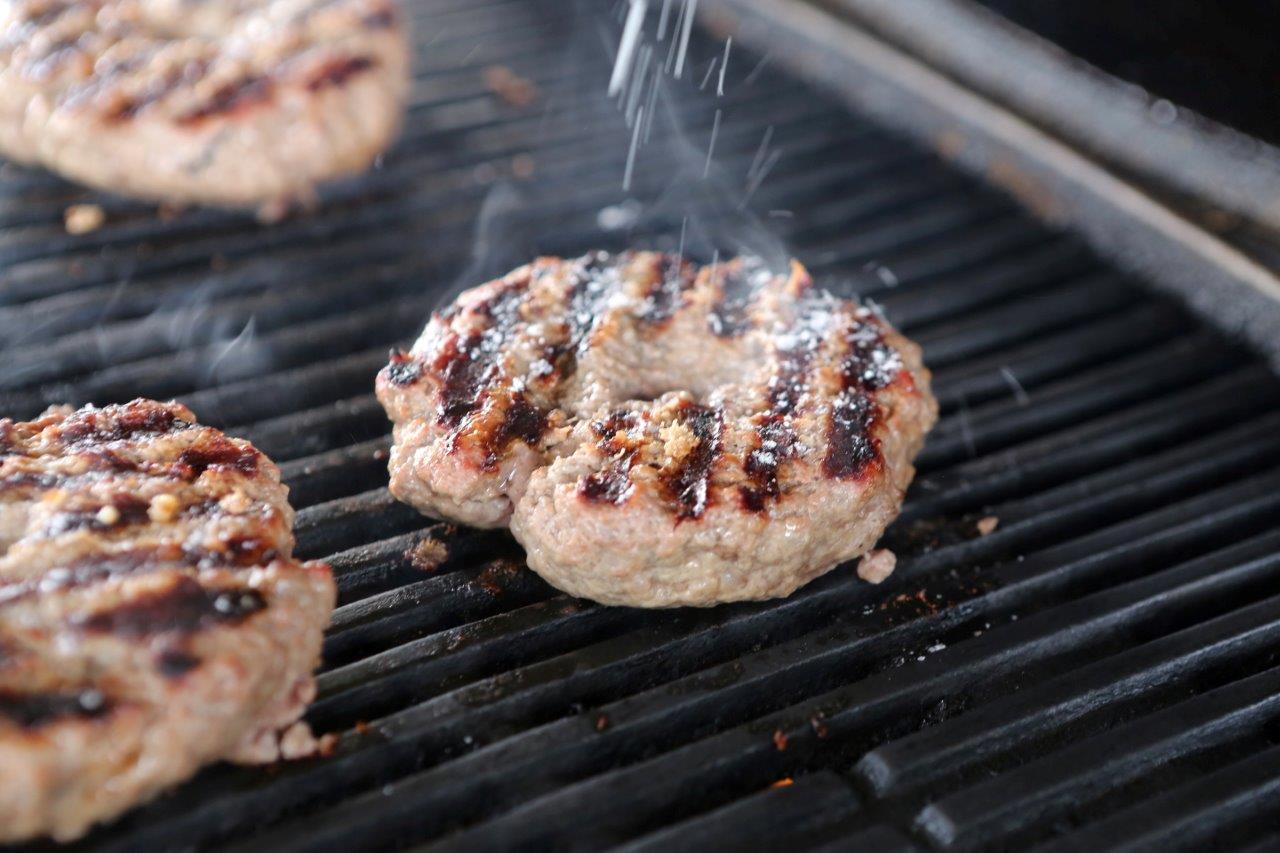
This is a nice classic summer hamburger recipe that has all the good stuff- the caramelized onions, crunchy bacon and melted Cheddar cheese.
It’s best to make these in good company, there are a lot of parts in this recipe and together it just is way more fun. That can make the whole evening turn out great 😇
For the burger meat
500-550 g ground beef, if possible, ask to have 10-15% lard or 30% fattier beef ground into the mass
Salt and pepper
For the caramelized onions
2 tbsp olive oil for cooking
1 tbsp butter for cooking
4 medium onions, cut in half rings
1 tbsp sugar
2 tbsp Balsamic vinegar
For the additives
1 medium tomato, cut in fat slices
8 bacon strips, fried crispy
4 slices of Cheddar cheese, matured is best
The sauces
4 tbsp ketchup
4 tbsp mayo or Greek yogurt mixed with 1 tsp Worchestire sauce
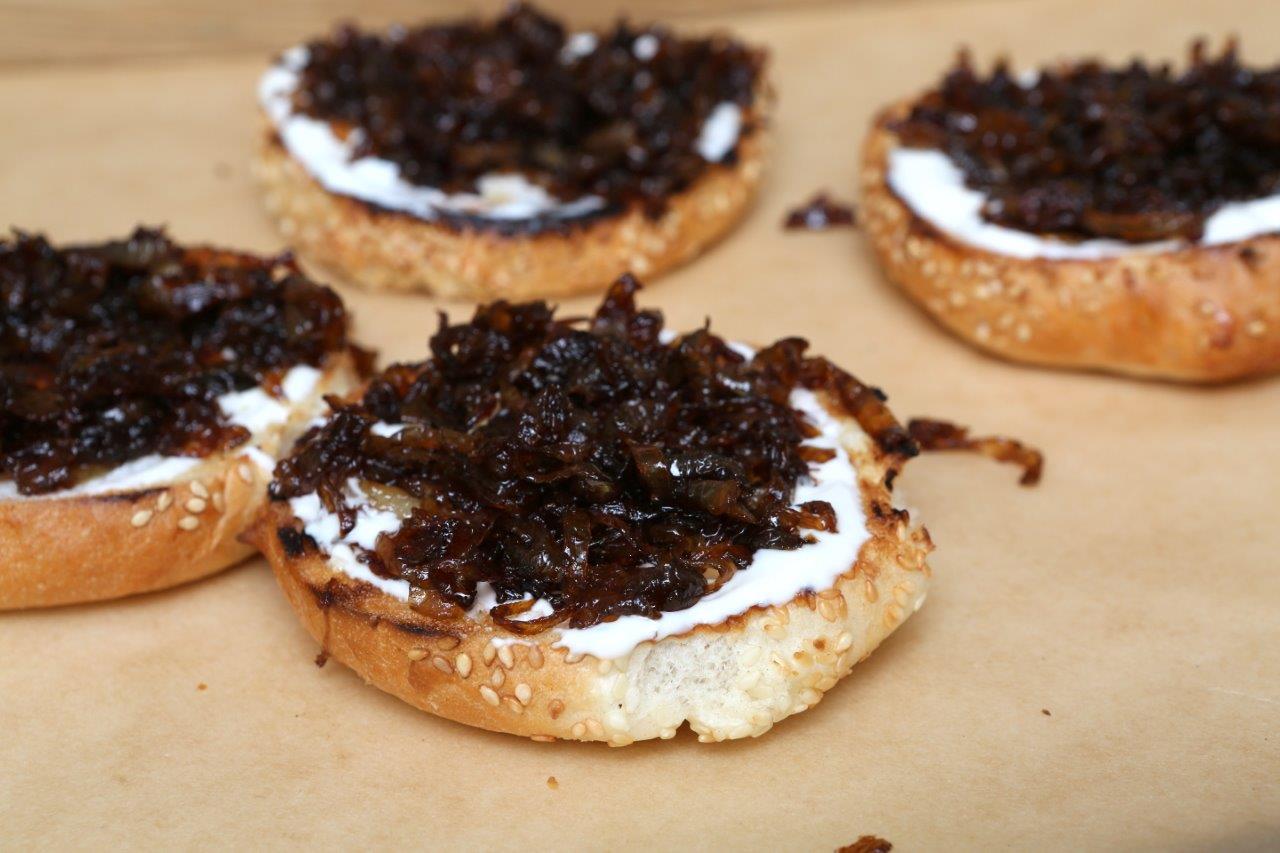
The bread
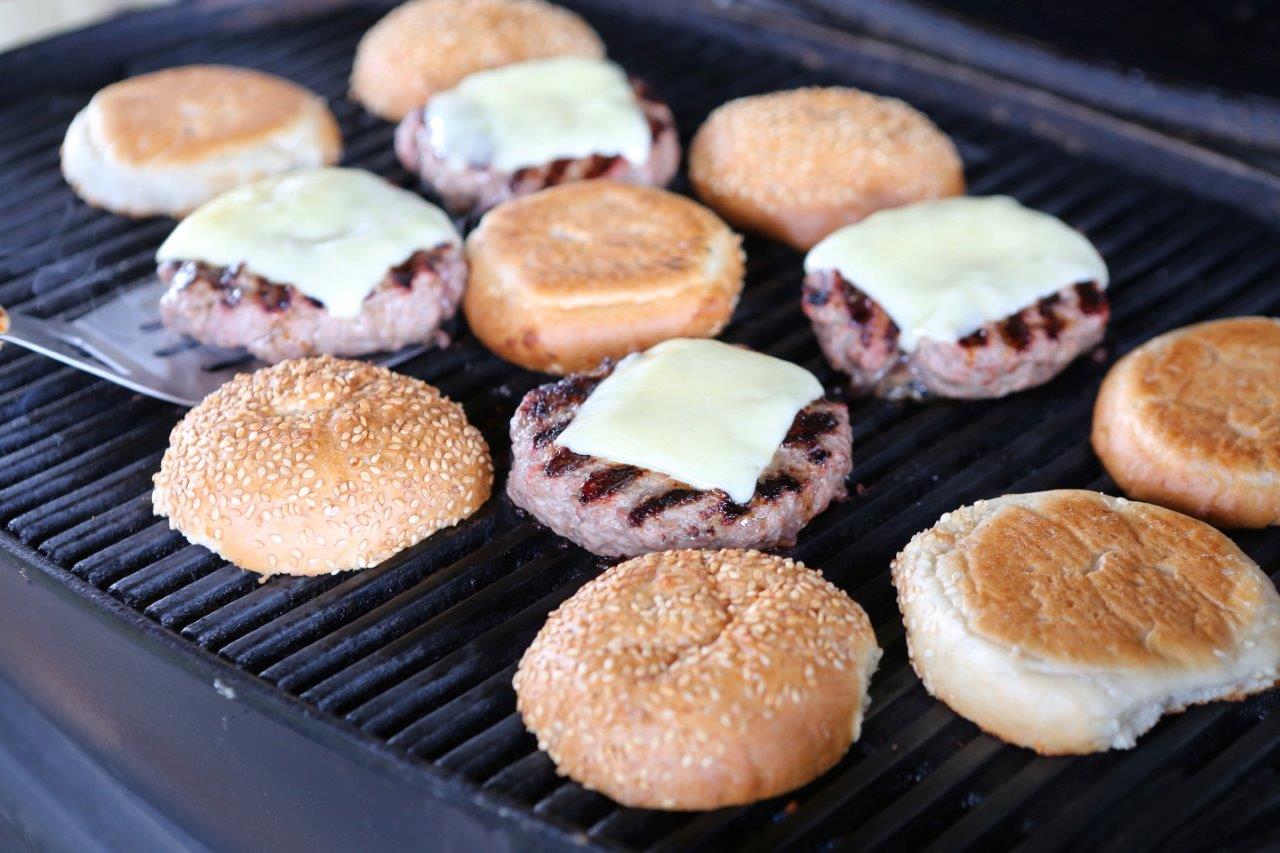
4 burger buns, cut horizontally and toasted
Optional: pickles, mustard salad
Makes 4 burgers
1. Peel the onions and cut in half rings. On a frying pan, heat the oil and butter and cook the onions on medium heat until they turn golden. Then add a tbsp of sugar and let it caramelize. Then add 2 tbsp Balsamic vinegar, stir everything and on low heat sautée for about 20 min.
2. In the mean time- prepare the meat. Mold 4 equal sized patties and create a little pit in the center. Each burger should have at least 125 g of meat.
3. When the patties are prepared, generously sprinkle both sides with salt and pepper.
4. Slice the tomato starting at the bottom (instead of the side) in large slices.
5. Mix the Worchestire sauce with the Greek yogurt, or you can use a delicious high quality mayo.
6. Preheat the oven to 200 degrees (celsius) and place the bacon strips on a baking sheet. Bake in the oven until crunchy and golden.
7. Heat the grill you will be using and place the meat patties with the pit down first. To get the meat to a medium,leave it to cook on each side for 3-4 min.Once the patty is turned over, place the cheese slice on top to melt. Close the lid of the grill so the cheese can melt better.
8. 2 min before the meat is done, place the burger buns on the grill to toast slightly.
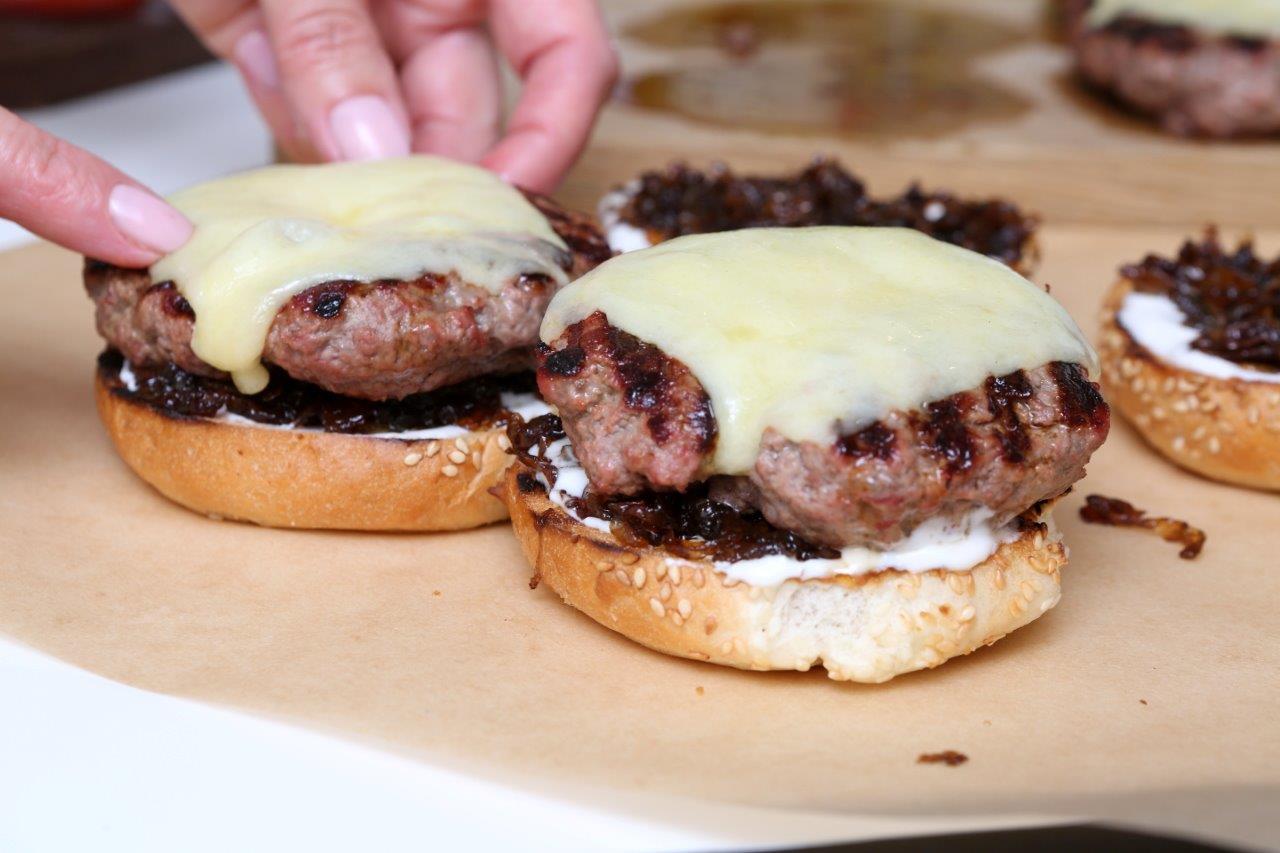
9. Time to assemble the hamburgers! Put sauce on the bottom bun, then caramelized onions, then meat, tomato, bacon and pickles if desired. Ketchup goes on the top bun and place that on the stacked burger, press down firmly so it holds together better.
Recipe: Ārija Avota
Photo: Ieva Andersone (IG: @photoievaandersone)

Lasagna
This is the classic lasagna- based on Bolognese type sauce, very mild but yet full of aroma. This is personally my absolute favorite recipe for lasagna- I got it years ago from USA and was the first time I had ever tried lasagna in my life.
The cooking part itself is easy, but takes time. It is best to cook this on a weekend when you have plenty of time, you don’t have to rush and can actually enjoy the cooking process.
In this recipe the classic Beshamel sauce is replaced with a similar sauce that requires cottage cheese- you need to try this version since it is truly the best. The lasagna can be served with crunchy ciabatta bread with butter and a glass of red wine.
For the Bolognese sauce
500 g ground beef or veal
400-500 g classic tomato sauce
250-300 g tomato paste
400 g canned peeled tomatoes
1 large onion, chopped
4 garlic cloves
½ chilli or ½ tsp chilli paste
Salt, pepper and sugar to taste
1 tsp Italian spices (basil and/or oregano, thyme)
4 tbsp olive oil
For the white sauce
400 g cottage cheese (2-9% fat)
8 tbsp sour cream
3 eggs
100 g cheese, grated (parmesan or cheddar)
2 tsp Italian spices (basil and/or oregano)
8 lasagna noodles
300 g cheese, grated (parmesan or cheddar)
1. Start by cooking the Bolognese sauce. Heat a large frying pan and cook the chopped onions until they turn translucent. Then turn the heat on low and cook for a bit longer. Add the garlic (pushed through a garlic press), chilli, Italian spices and sautée for a while. Bring the heat back up a little to medium and add the ground beef- it needs to be constantly stirred to cook evenly. Add salt and pepper to taste and drain any oil or liquid if that has showed up at this point. Now you can slowly star adding the tomato paste, then tomato sauce and finally the canned peeled tomatoes. When the sauce starts to bubble, turn the heat down, put the lid on the pan and leave it to stew for another 30 min. Then you can add more salt and pepper as necessary and the sugar too (to remove acidity).
2. Prepare the white sauce. In a medium bowl beat the eggs and then stir in the cottage cheese along with sour cream, grated cheese (100 g), Italian spices. Set aside.
3. Boil water in a medium sized pot and add salt. When the water is boiling, add the noodles one by one and boil them as directed on the packaging. Stir the noodles once in a while to prevent them from sticking. When done- rinse the noodles in cold water and pour over some olive oil- again so they do not stick together.
4. Heat the oven to 180 degrees (celsius). Grease the baking pan 30x20x5 cm.
5. Now it’s time to start layering:
Noodles, Bolognese sauce, white sauce, grated cheese. Repeat once more and sprinkle the most cheese on top. Cover the baking pan with tin foil and place in the center of the oven to bake for 30 min.
6. When it is done, leave the lasagna to rest and cool for about 15-20 min. This way it will also hold together better when cutting.
7. You can make the lasagna on the previous day and keep it in the fridge for serving the next day. Remember to keep it in room temp for at least an hour before cooking.
Recipe: Ārija Avota
Photo: Ieva Andersone
Published: Ievas Receptes, santa.lv


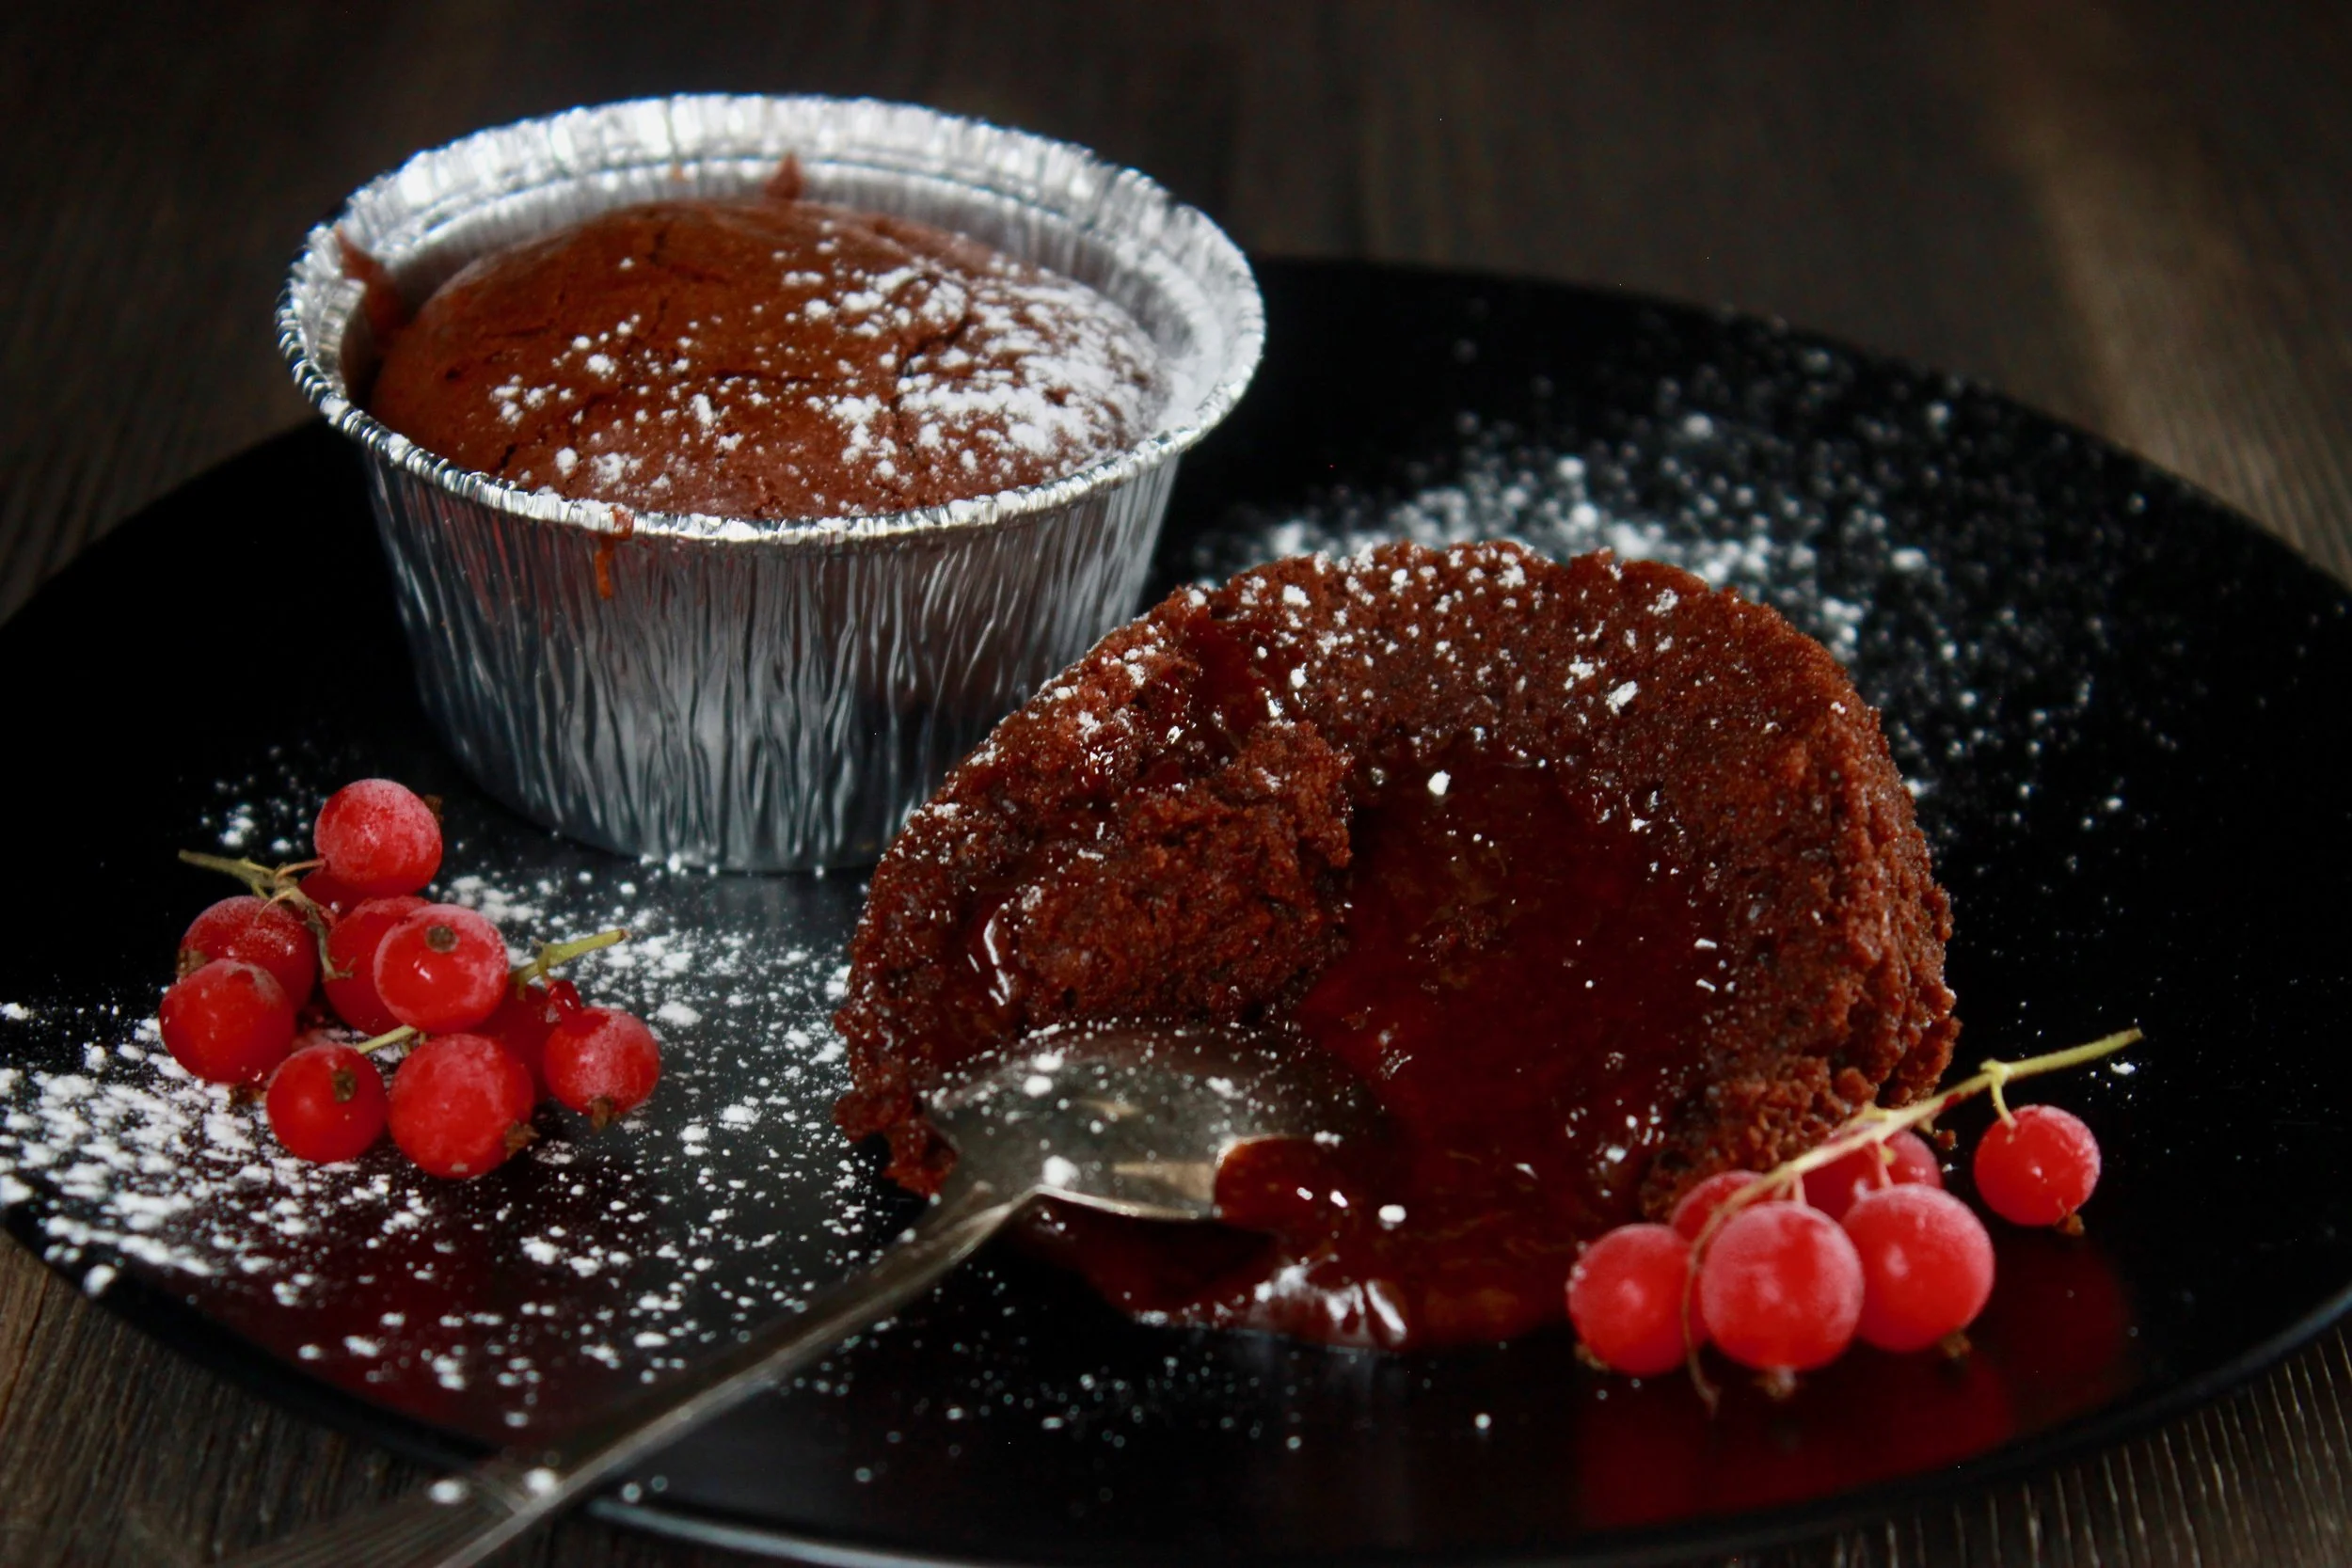
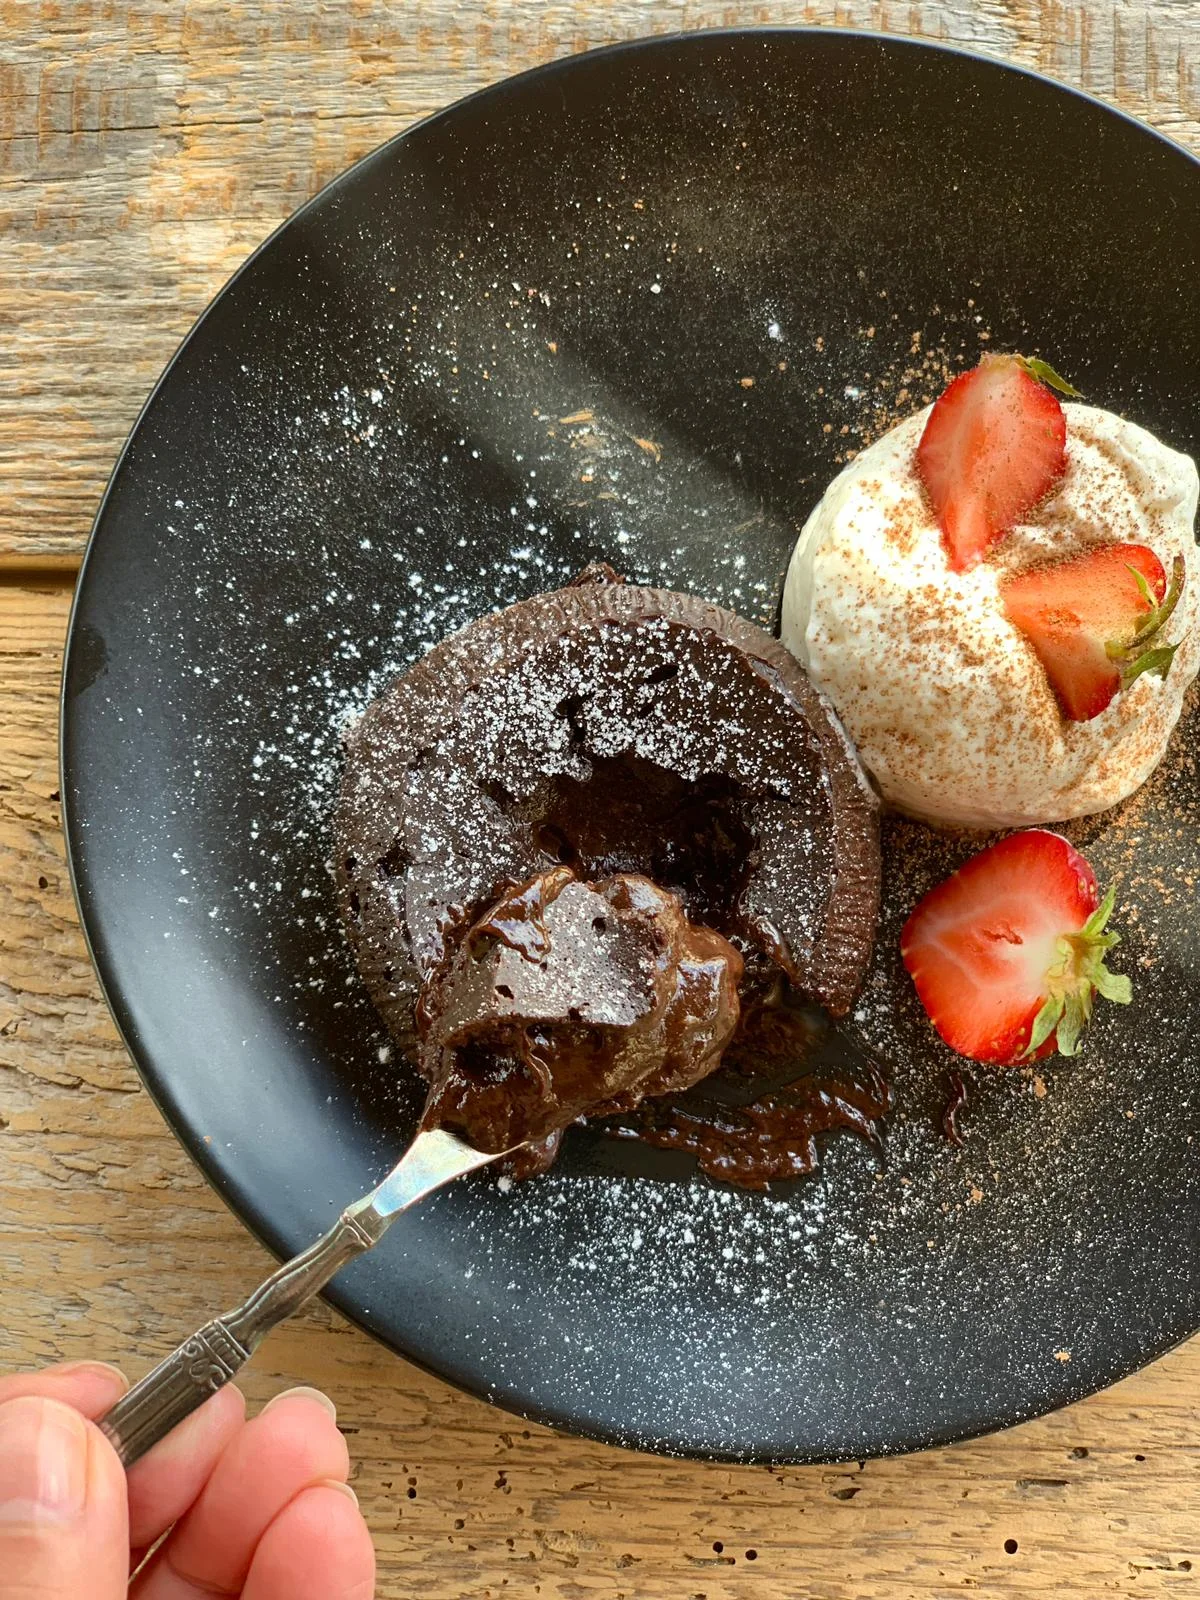
Chocolate fondant
This is the real deal- easy to make with that gooey melted chocolate center, just how it was meant to be. I feel that this is my favorite, especially when you consider the investment vs the gain. It is super easy to make and it just melts in your mouth, has a perfect balance of butter, chocolate and sugar. Yummmm :)
250 g dark chocolate (cocoa content at least 50%)
250 g unsalted butter
5 eggs, room temp
200 g sugar
130 g all purpose flour
1 tsp vanilla paste or vanilla sugar
Makes 10 servings
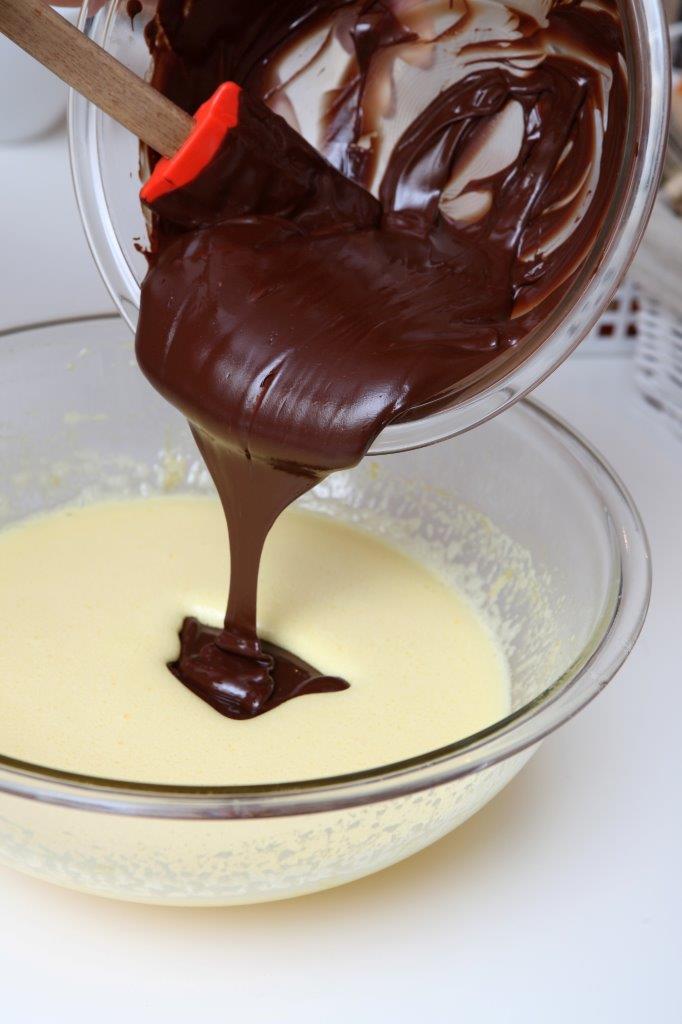
1. Melt the chocolate with butter in a saucepan on very low heat- be careful not to burn it. Set aside to cool a little.

2. In a medium bowl, beat the eggs with sugar and vanilla with a mixer until the sugar has dissolved.
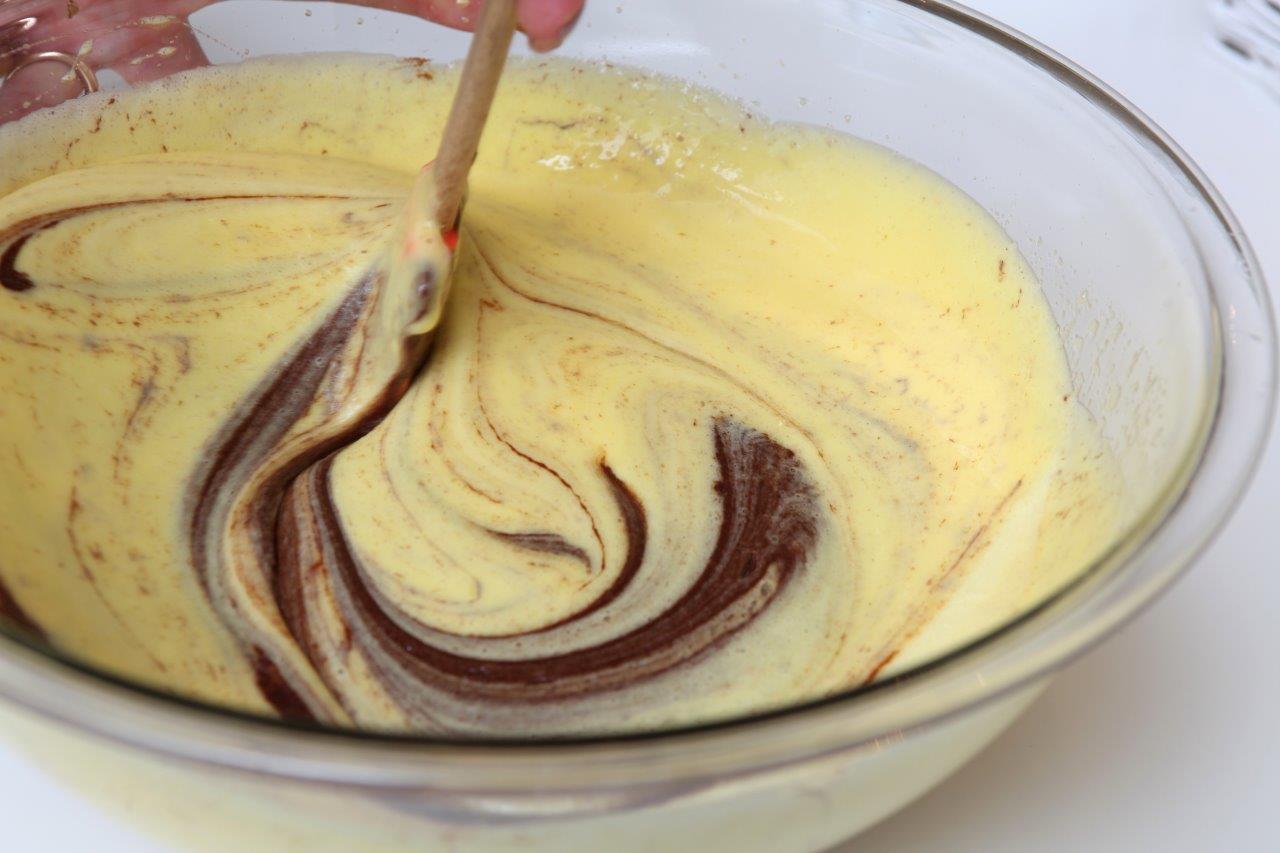
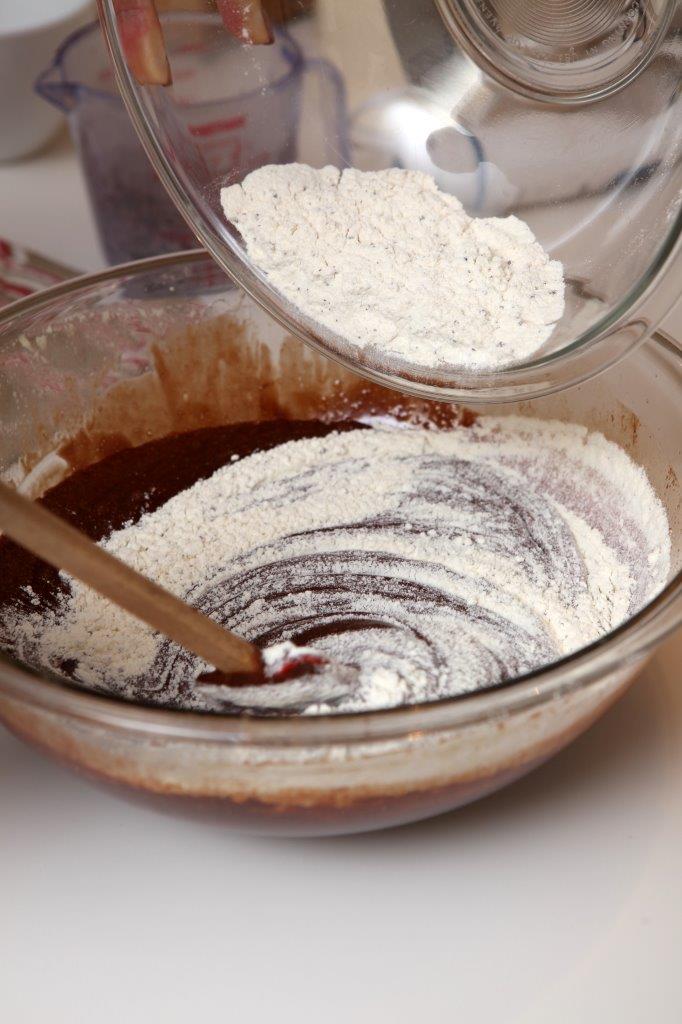
3. Add the melted chocolate with butter to the egg mixture and mix until incorporated.
4. Add the flour, but best to sift it in. Slowly stir the dough, but do not overmix.
5. Fill the baking molds slightly over half way. We use tin foil ones, that can be discarded afterwards- this makes storage easier. Ceramic molds can be used just as well.
6. Put the fondants in the fridge for at least 30 min or overnight.
7. Meanwhile heat the oven to 200 degrees (celsius). Bake the fondants in that heat 17 min precisely.
8. Let the fondants set for 5 min before serving- then turn the molds over and transfer the fondants to a plate. Serve while still warm with fresh berries or vanilla ice cream.
Recipe: Anna Inne-Smilga
Photo: Oto Avots
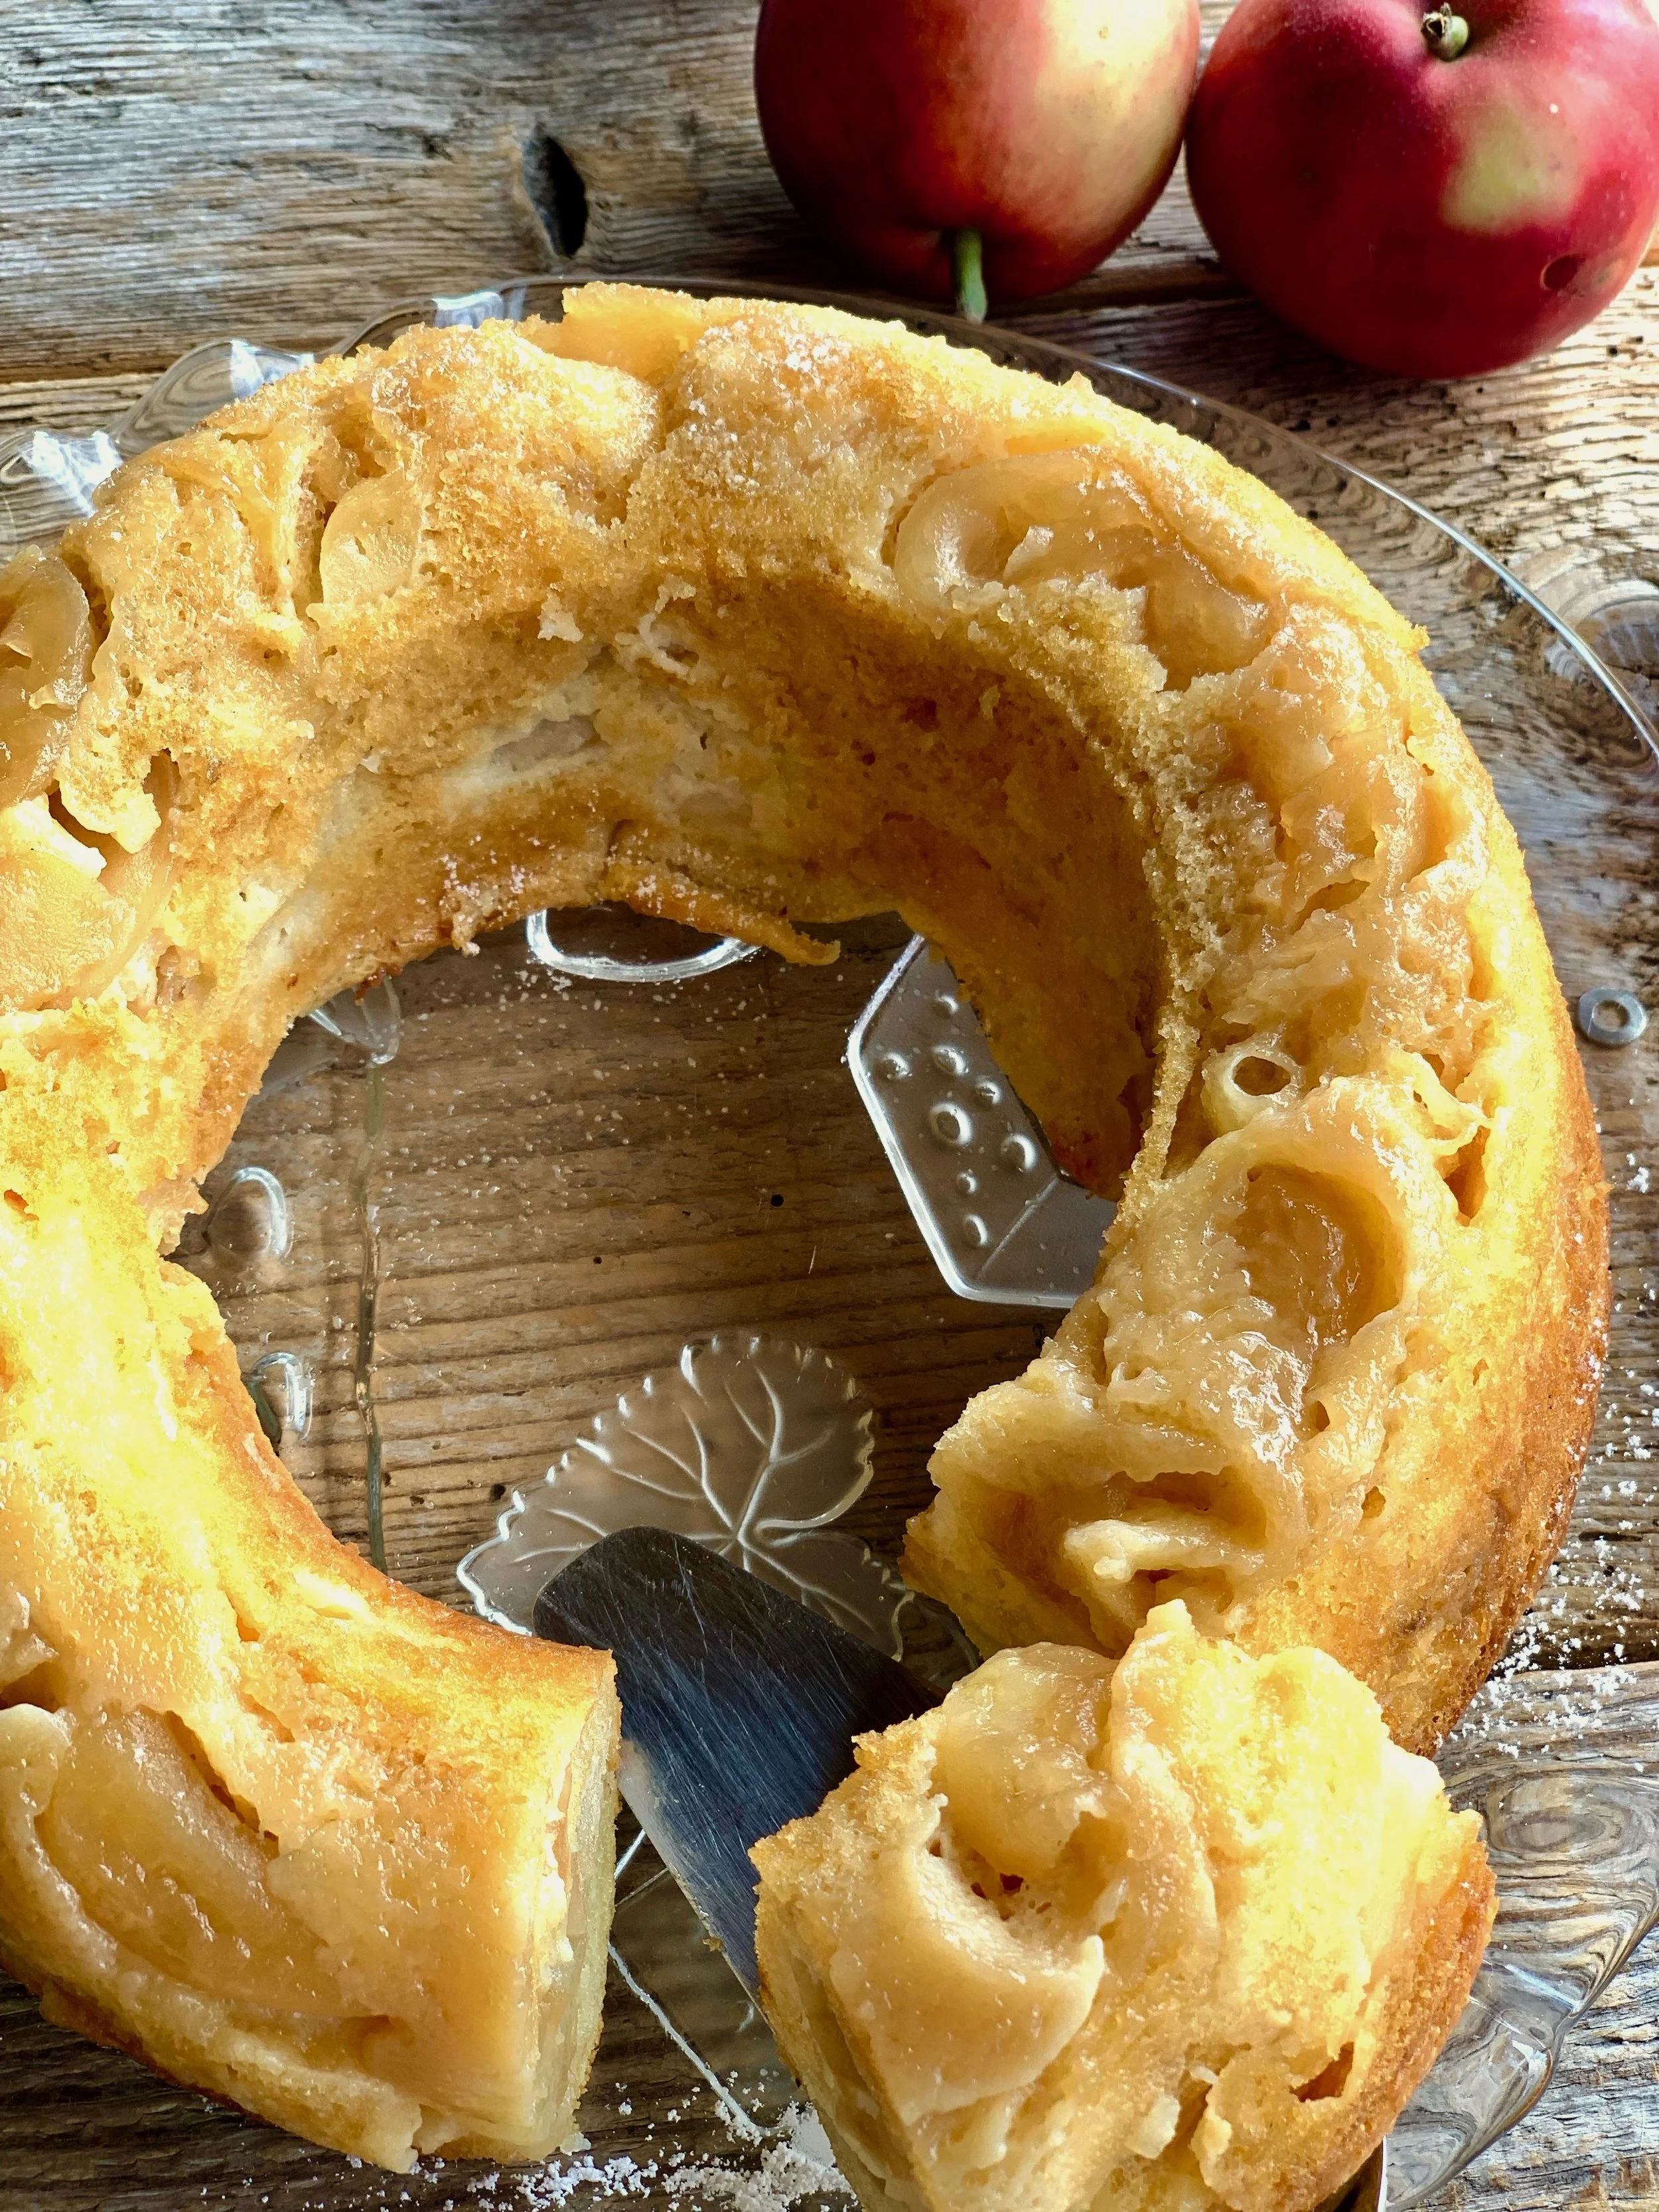
Apple pound cake
The best quick apple cake recipe! All the other recipes really have nothing on this one- it is an absolute winner!
Originally the recipe calls for baking it in the classic round cake pan, and that can easily be done if that is the look and shape you prefer. But I wanted to make it as a pound cake as pictured, which seemed easier to cut and just overall looked better (just my opinion). This called for slight alterations to the recipe- I used 280 ml of condensed milk, 80 g of flour and 60 g of butter- everything then came out perfect!
5-6 medium apples best for baking, peeled, cut in 0.5-1 cm segments
2 tbsp light brown sugar
80 g (60 g) unsalted butter
For the dough
2 eggs, room temp
320 ml (280 ml) sweetened condensed milk
110 g (80 g) all purpose flour, 1/3 can be substituted with wholegrain flour
1 tsp baking soda
1. Preheat the oven to 180 degrees (celsius).
2. Place a baking sheet on the bottom of a round baking pan (or butter a pound cake tin if using).
3. Peel the apples, cut out the core, cut in segments. Put the cut pieces in the chosen pan and evenly sprinkle with 2 tbsp of sugar and the butter separated into small pieces.
4. Place in the center of the oven to bake for 10 min.
5. Make the dough. Beat 2 eggs until fluffy, add the condensed milk and then mix in the flour with baking soda.
6. When the apples have baked for 10 min, remove from oven and pour the dough over the apples. Place back in the oven to bake for 22-25 more min.
7. Test the readiness with a toothpick- if nothing sticks to it, the cake is ready.
8. Leave to cool on a wire rack for at least 20 min.
9. Trace the edges of the pan with a sharp knife and then remove the cake from the pan.
Recipe: Ārija Avota
Photo: Ārija Avota

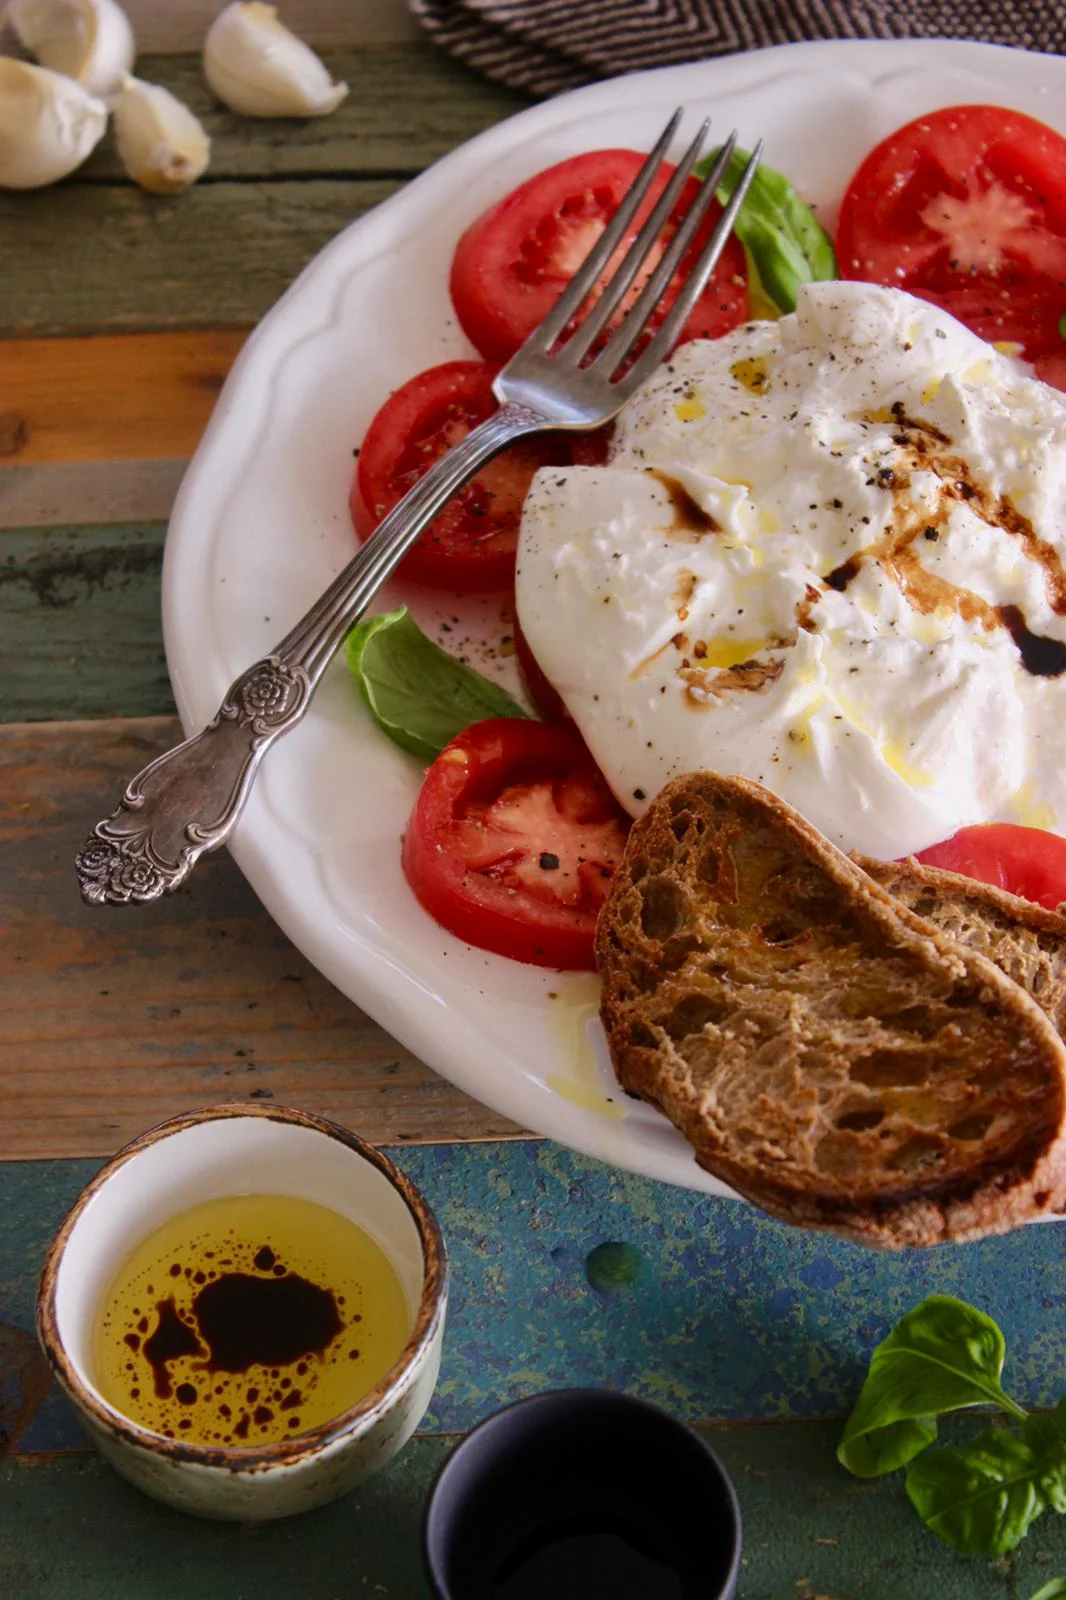
Burrata with tomatoes
1 package burrata cheese, drained
2 large, juicy tomatoes, cut into thick slices
1 tbsp extra virgin olive oil
1 tbsp balsamic vinegar cream
Handful of basil leaves, torn
Salt and pepper
1. On a large plate arrange the tomatoes around the sides. .
2. Put the burrata in the middle and tear it apart with a fork.
3. Sprinkle with the torn basil leaves.
4. Drizzle with olive oil and Balsamic vinegar cream.
5. Add salt and pepper to taste.
6. Serve with toasted bread.
Recipe: Ārija Avota
Photo: Ārija Avota

Bruschetta with porcini mushrooms
A Friday snack for two? Don’t feel like cooking? This recipe is more like meditation instead of intense cooking :)
In Latvia we have many forests full of different mushrooms every fall- most of us love going out to pick some wild mushrooms. But if you have the option to buy some fresh from the market- it is just as good. This recipe is very easy and also a nice snack to have along with the chilled Sauvignon Blanc left from the cooking process.
4 large slices of Italian bread
4 garlic cloves
Thyme, a few branches
4 small porcini mushrooms
50 ml dry white wine, like Sauvignon Blanc
2 tbsp olive oil for cooking
1 tsp butter for cooking
Parsley or sage, chopped
Salt and pepper to taste
A tbsp of Balsamic vinegar cream
1. Preheat the oven to 210 degrees (celsius).
2. Place a baking sheet on the ovens baking tray and arrange the bread slices on it. Add crushed garlic cloves and the thyme branches, drizzle olive oil on top and then just use your hands to mix it all together (so the bread is soaked in oil and all the seasoning).
3. Place the baking tray in the oven and bake until the bread turns slightly golden, do not burn.
4. Clean and wash the porcini mushrooms, pat them dry in a paper towel. Cut into thin slices 3-5 mm and chop the greens and spices.
5. Heat a frying pan on medium heat and add both the oil and butter- cook the mushrooms to quickly become golden, around 2 min, add salt, pepper and wine.
6. Lower the heat and sautée for a bit until the sauce starts to reduce about 5 min, then add the greens and spices.
7. Put the mushrooms on the toasted bread, add the baked garlic cloves on top too. Drizzle the Balsamic vinegar cream over everything.
8. Serve with cooled Sauvignon Blanc.
Recipe: Ārija Avota
Photo: Oto Avots
Chocolate fondant from the movie Chef
I just couldn’t help myself, I really wanted to try another recipe from the movie Chef. I already have a very good fondant recipe in my collection, but I wanted to try if it can get any better? The answer: yes, it can!
The magic in this recipe is that you get the molten lava filling by placing a ball of Ganache in the center (usually it would be the cake not being baked completely). If you want the taste to be a bit more mild, you can use chocolate with a 50% cocoa content, but for a stronger taste- 70%.
For the fondant
400 g chocolate, cocoa content at least 50%
170 g unsalted butter
6 eggs, room temp
100 g brown sugar
60 g all purpose flour
1 tsp vanilla paste or sugar
2 tsp liqueur, like Grand Marnier
For the Ganache
100 g dark chocolate, cocoa content 70%
100 g heavy cream
For serving
100 ml heavy cream
½ tsp sugar
Vanilla paste or sugar
Berries
Makes 10 fondants
Make the Ganache
1. Place 100 g of chopped chocolate in a bowl, meanwhile heat the heavy cream just to the point of boiling (but do not let it boil). Pour the hot heavy cream over the chopped chocolate immediately and leave for 5 min for the chocolate to melt. Then use a whisk to stir everything in a smooth consistent cream and place in the freezer to harden (but not freeze).
Make the fondant
2. Melt the chocolate on low heat or using the method over water. Once evenly melted, set aside (keep a close eye on it not to burn).
3. Beat the eggs until light and fluffy, then add the sugar and vanilla paste and beat some more. Finally add the liqueur.
4. Add the melted chocolate to the egg mixture, slowly mixing together with a spatula.
5. Add the flour, best sifted and stir in gently.
Assemble the fondants
6. Check on the Ganache in the freezer- it should be solid, but not frozen.
7. Preheat the oven to 200 degrees (celsius). Butter the molds and sprinkle with sugar.
8. Fill the molds half way with the dough, then put a ball of Ganache in the center and fill the rest of the mold up with dough (almost to the top, but leave some room to raise). Use a small spoon or scoop to create the Ganache balls, ti doesn’t have to be perfect.
9. Bake the fondants for 10-13 min depending on how soft of a filling you prefer (maybe bake the first one alone as a test).
10. Serve while still warm with fresh berries and maybe whipped cream or vanilla ice cream.
Recipe: Ārija Avota
Photo: Ārija Avota
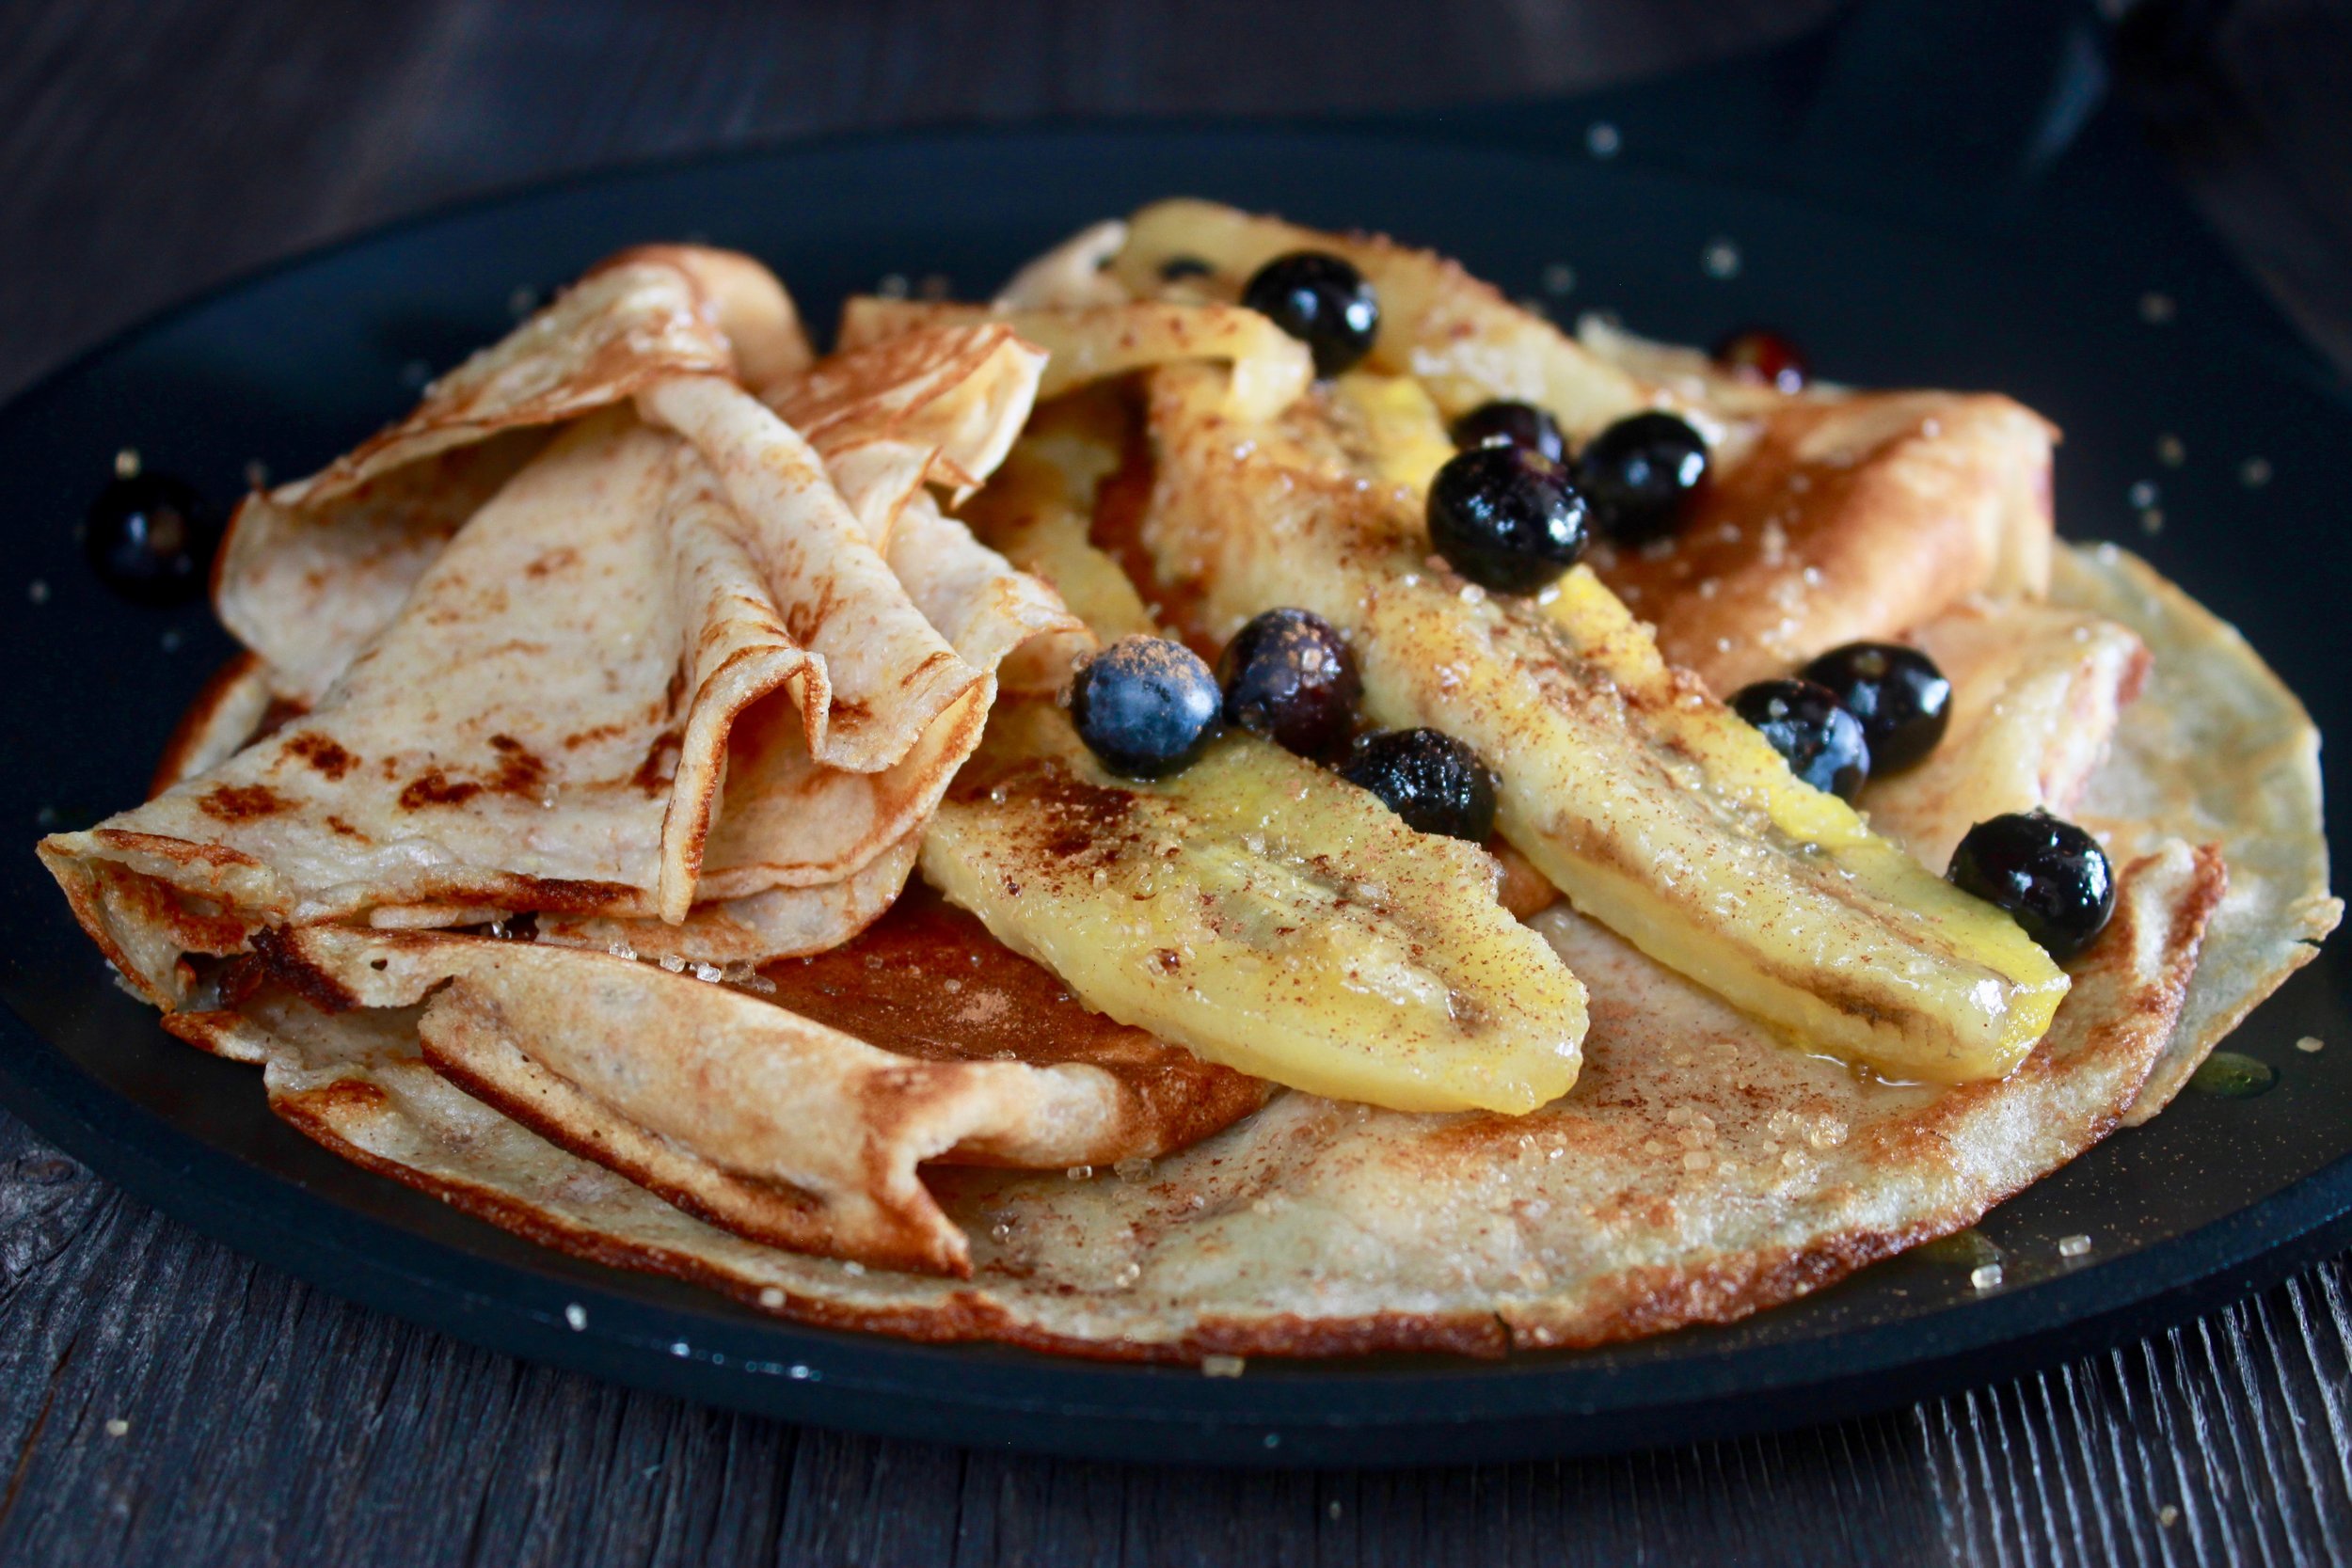
Crêpes
In Latvia, it seems that crêpes are one of the first things we learn to cook. And now the options of ingredients are so broad, we can adjust those basic recipes to our current flavor preferences.
One of my classic favorite variations is this: I replace part of the flour with wholegrain flour and add just a little melted butter.
The pancake dough can be prepared the day before and kept in the fridge overnight in an airtight container. In the morning you just add a bit more milk and stir everything before use.
For the dough
4 eggs
500 ml milk
250 g all purpose flour (1/3 can be replaced with healthier options- wholegrain, buckwheat, oat flours)
60 g butter, melted
1-2 tbsp sugar
Pinch of salt
Olive oil for cooking
For serving
Maple syrup or honey
Favorite jam
Cream cheese or greek yoghurt
Fresh seasonal berries or fruit
Tuna or caviar
1. Beat the eggs along with the sugar. Mix in 100 ml of milk.
2. Stir in sifted flour and salt. Be careful to not create lumps, keep a smooth consistency. Add the melted butter.
3. Pour in rest of the milk and mix well.
4. Leave it to set for at least an hour.
5. When ready to cook, heat the frying pan to medium heat and pour some olive oil to grease.
6. Using a ladle, pour the dough evenly on the heated pan as thin as possible. Cook one side until golden and flip with a spatula. Grease the pan after every crêpe.
Serve with favorite condiments
Recipe: Ārija Avota
Photo: Ārija Avota


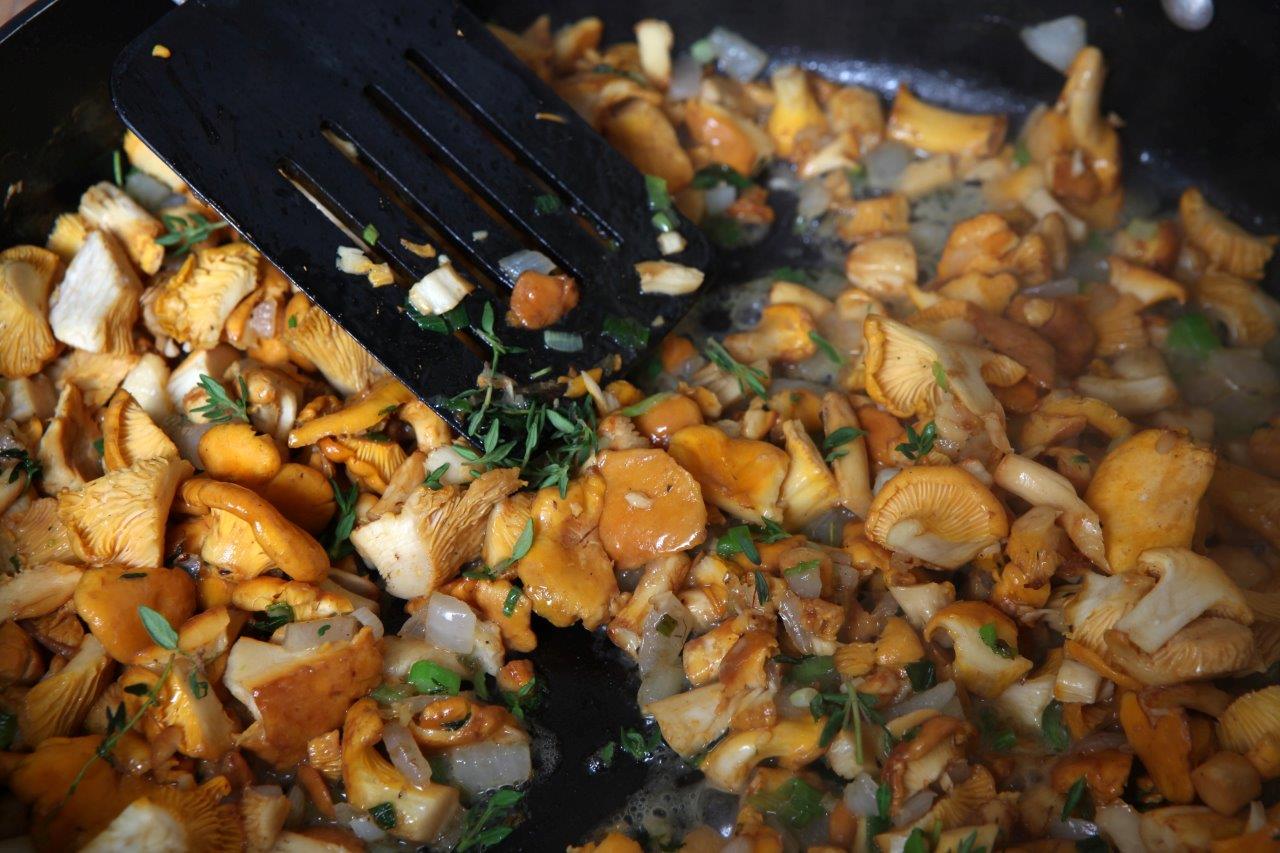
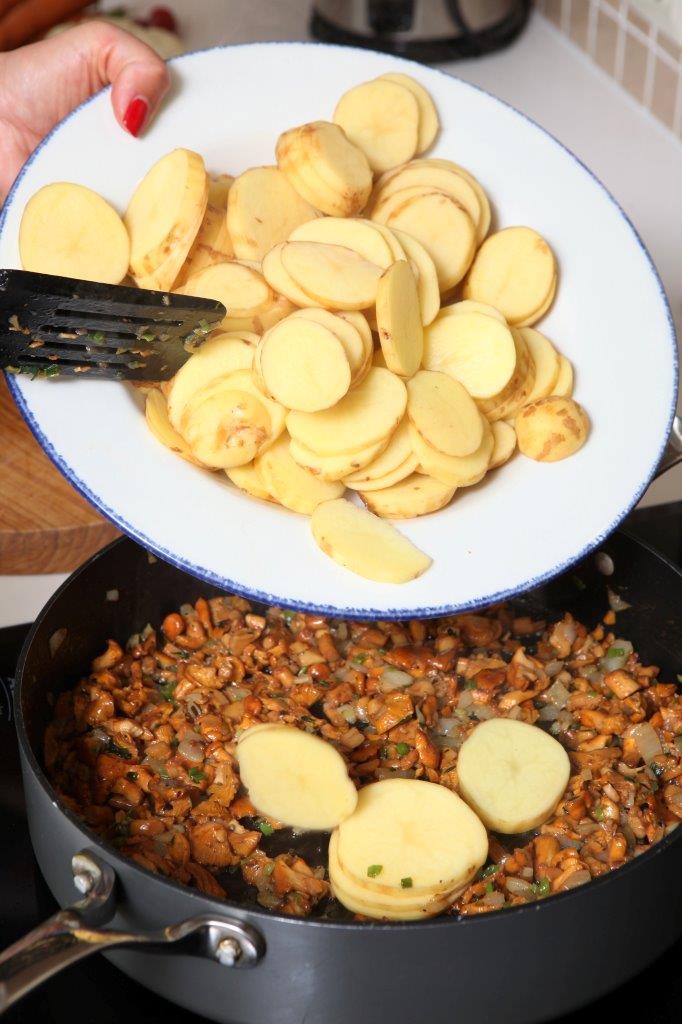
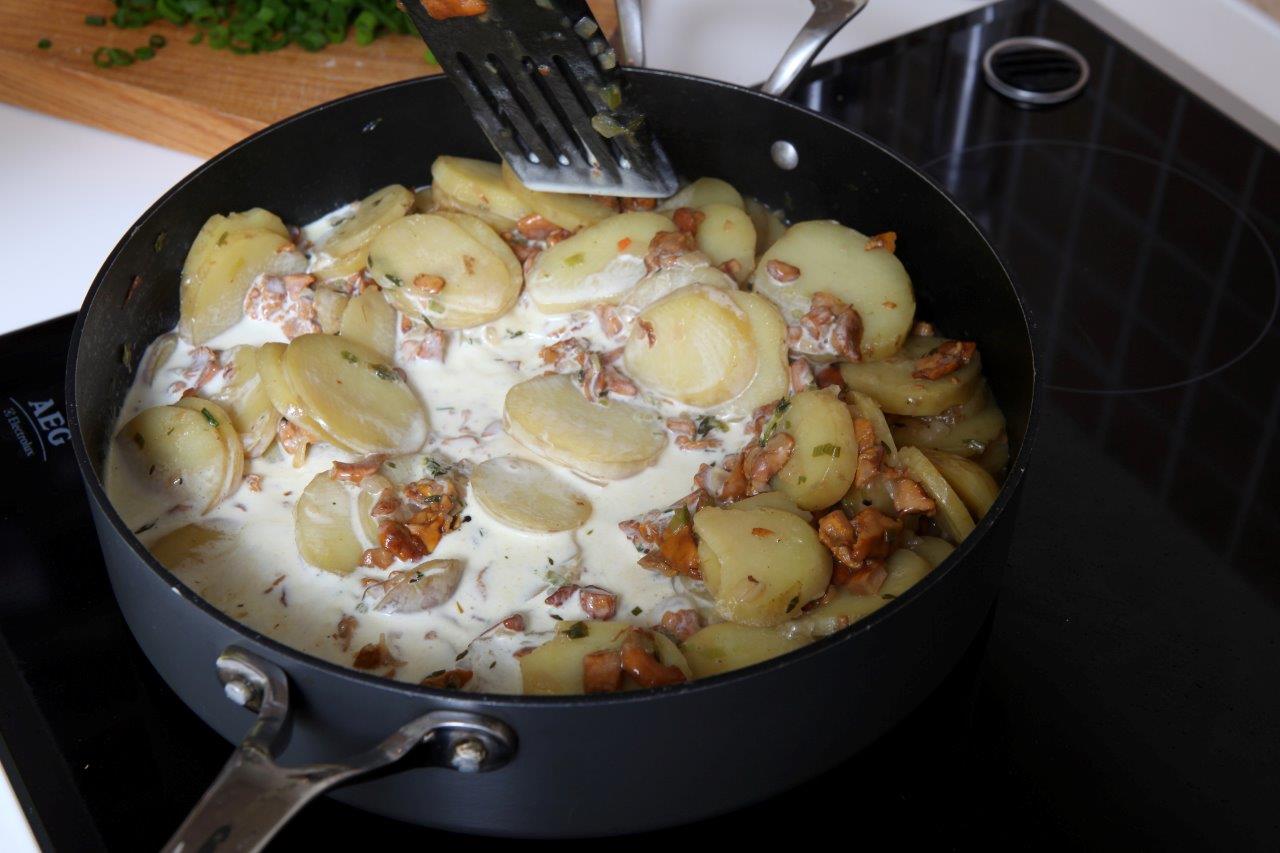
Chanterelles with new potatoes in aromatic sauce
The mushrooms still have a little crunch to them, the potatoes have soaked up all the flavors of the greens and sauce and that amazing fragrance this dish leaves in the house!
Even if you don’t get a hold of a lot of chanterelles to use, you can still make a great dish with this recipe. This is my moms recipe- she created it for times when mushrooms weren’t that easily available, but you needed to feed the whole family.
The technique used is actually very similar to that of making a risotto (my mom definitely didn’t know about risotto back then), but instead of rice this uses new potatoes, genius!
400-500 g chanterelles
6 medium new potatoes
1 large onion
250 g heavy cream
300-500 ml vegetable broth
2-3 tbsp butter for cooking
2 tbsp olive oil for cooking
Greens- scallions, dill, thyme
Salt and pepper to taste
1. Clean and wash the chanterelles, pat them dry with a paper towel and cut into medium pieces.
2. Wash the new potatoes and scrub them with a brush to clean off the skin. Cut in thin slices 1-2 mm.
3. Chop the onions and greens, make the broth (if using cubes).
4. Heat a deep frying pan with a lid on medium heat and cook the onions in both the butter and olive oil, add the thyme too.
5. Then cook the chanterelles until golden brown, add salt.
6. Add the new potato slices and fry for a few minutes.
7. Now pour in half of the broth and stir everything, put the lid on and lower the heat. Keep cooking while stirring every once in a while, adding more broth when necessary until the potatoes are almost ready (and not yet mushy).
8. Now add the heavy cream, stir again, taste and add salt and pepper if necessary and let it simmer for a few minutes until potatoes are completely done.
9. Sprinkle with greens and serve.
Recipe: Ārija Avota
Photo: Ieva Andersone (IG @photoievaandersone)


Chocolate fondant without flour
This is one recipe from the fondant collection that is here to stay- no flour added! Yay!
I usually make these and store some in the freezer so I can pop them out whenever the craving for something sweet comes up. You can bake just one if you want, guilt free!
120 g unsalted butter
180 g dark chocolate (cocoa content at least 50%)
3 large eggs, room temp
60 g sugar
1 tsp vanilla paste or vanilla sugar
1 tbsp butter to grease the molds
1 tbs sugar to sprinkle the molds
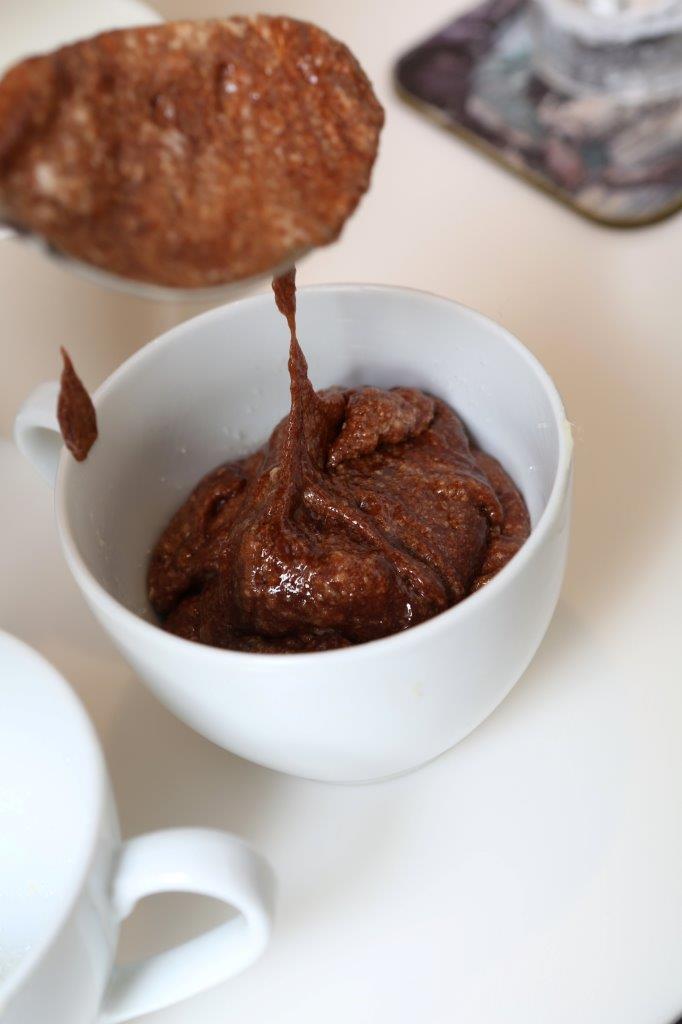
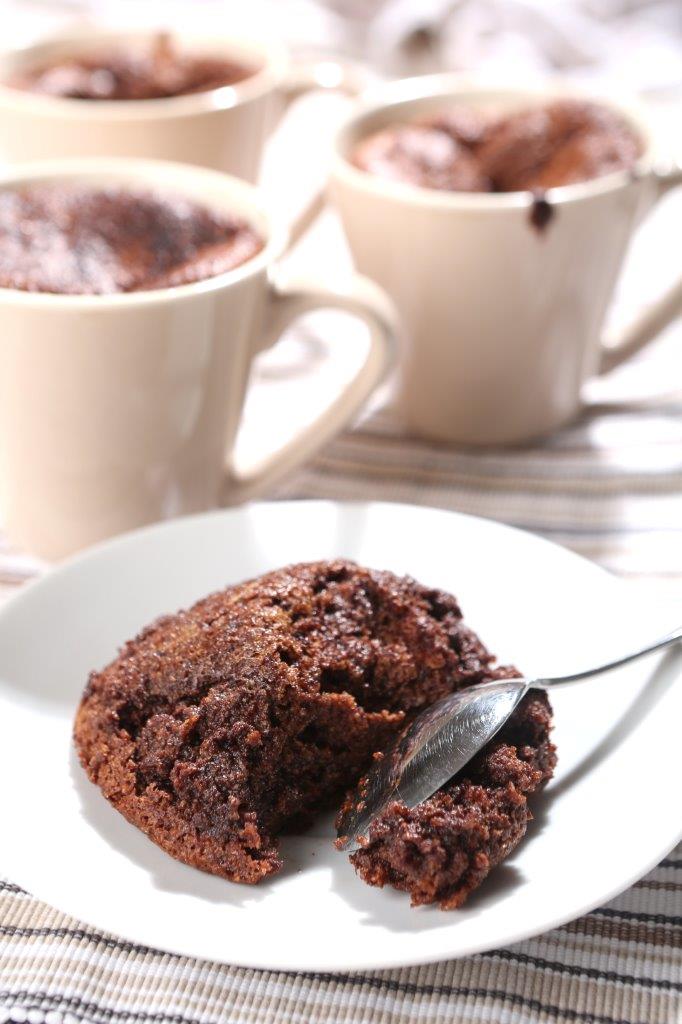
Makes 6 small coffee cups (200-240 ml) or ceramic molds
1. Preheat the oven to 200 degrees (celsius). Prepare the molds by greasing them with butter and then sprinkling the inside with sugar.
2. In a small pot on low heat melt the butter with the chocolate. Stir constantly not to let it burn as it will become thick and grainy. Or you can use the over water melting method. Set aside to cool.
3. In a medium bowl beat the egg yolks with the sugar until light and fluffy, add the vanilla. Then mix in the melted chocolate.
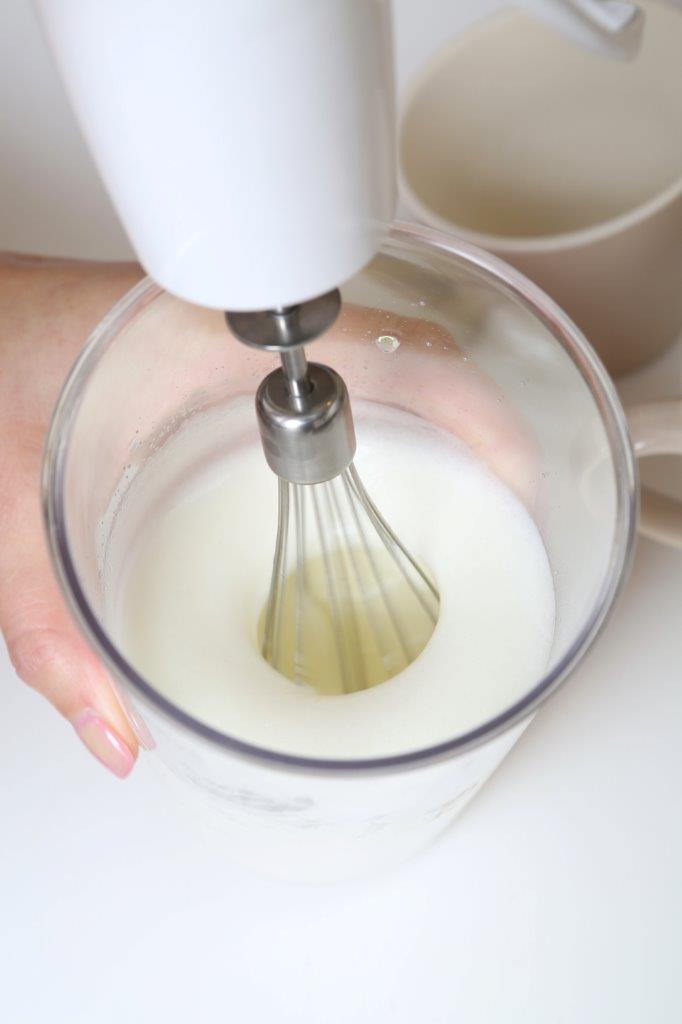
4. In another clean, dry bowl, beat the egg whites until they become foamy. Then add a tablespoon of sugar and beat until stiff peaks form. When the bowl is turned over, the whites should hold in the bowl.


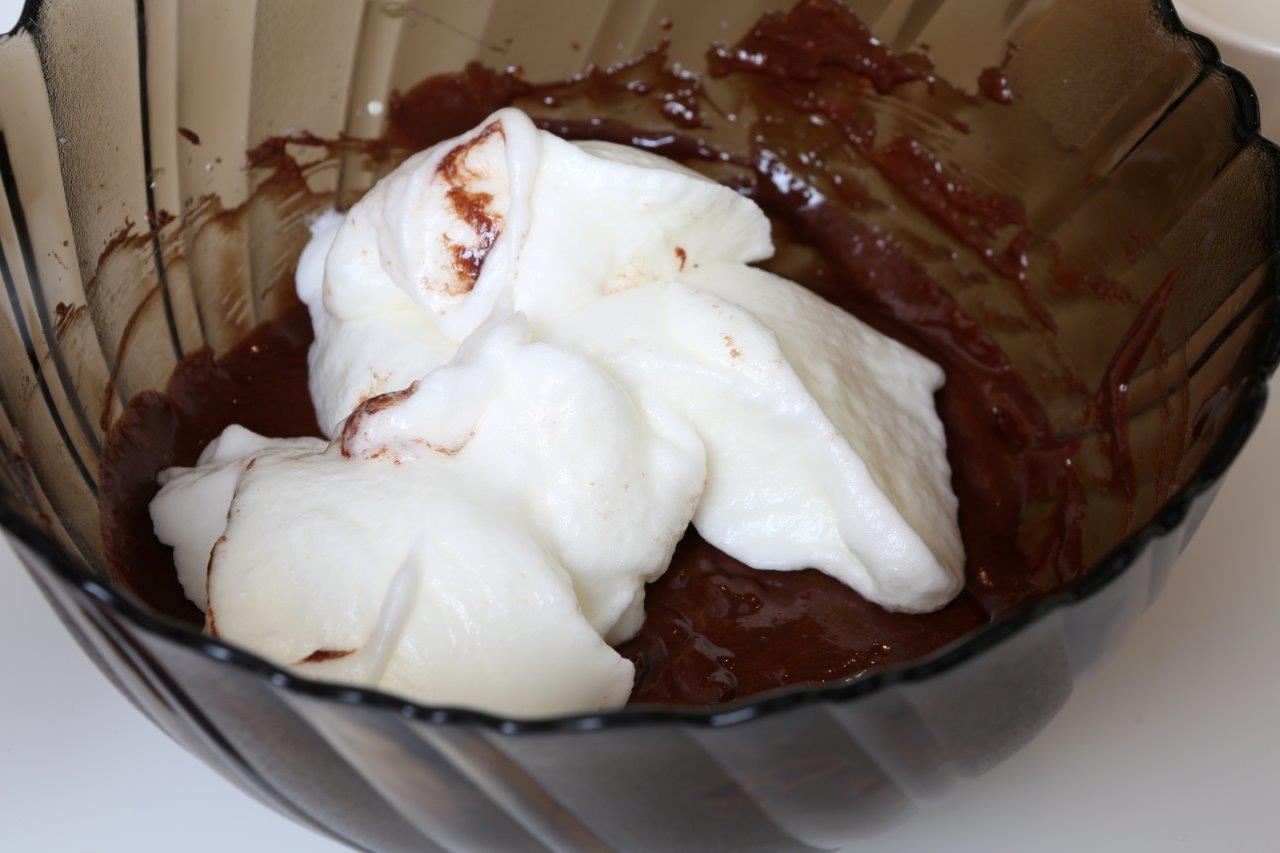
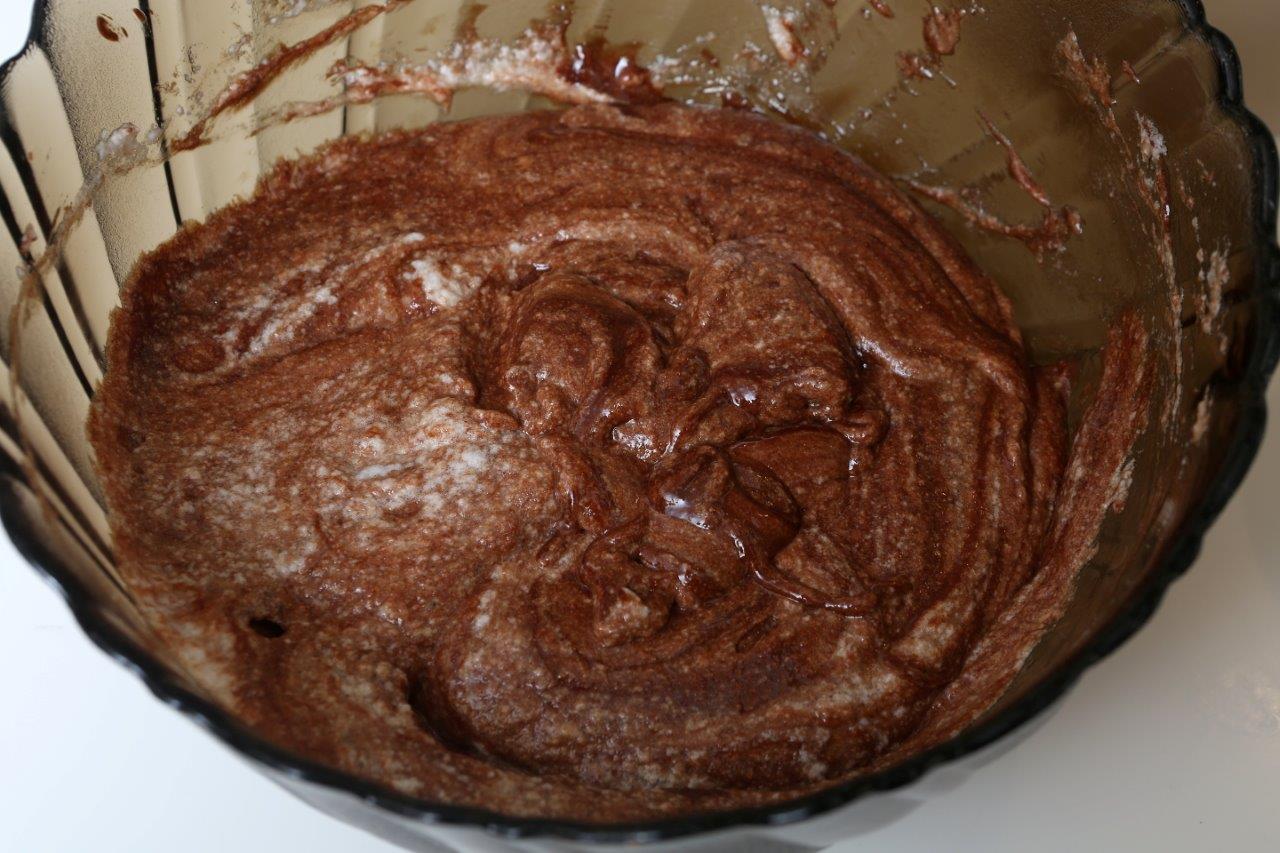
5. Carefully fold in the egg whites in the chocolate mixture. Do not over mix as this way you can lose the aeration.
6. Using a spoon or ice cream scoop divide the dough between the molds. Place in the middle rack of the oven for 13-15 min. The center should still look wet, but the top will crack.
7. Remove from the oven and let cool for a few minutes. Can be served hot or cooled later. Can be eaten straight from the mold or cup. If you want to present it on a plate- run a sharp knife along the edges of the molds and flip over on the plate. Sprinkle with powdered sugar and serve with vanilla ice cream.
Recipe: Ārija Avota
Photo: Ieva Andersone


Summer pavlova
Light meringue that’s crunchy on the outside but is marshmallow soft in the center, covered with cold whipped cream and topped with sour seasonal berries. That is what a real summer pavlova is!
I have published this recipe years ago in the magazine “Ievas Virtuve” and it hasn’t changed one bit since then. That means it is perfect.
Many recipes tend to use powdered sugar for the meringue, but I like to use plain sugar since I feel it makes the taste better and more real. Also, this recipe has gotten many compliments over the years from my friends I have shared it with. That it is easy and turns out perfectly every time you try it. So don’t be afraid to try it for yourself, good luck!
For the meringue
4 large egg whites, room temp
200 g fine granulated sugar
1 tsp vanilla paste or sugar
1 tsp vinegar (9%)
1 tsp corn starch
For the cream
300-350 ml heavy cream
2-3 tsp sugar
1 tsp vanilla paste or sugar
For decorating
Seasonal berries- strawberries, raspberries, currants, black berries etc.
1. Preheat the oven to 130 degrees (celsius).
Prepare the meringue
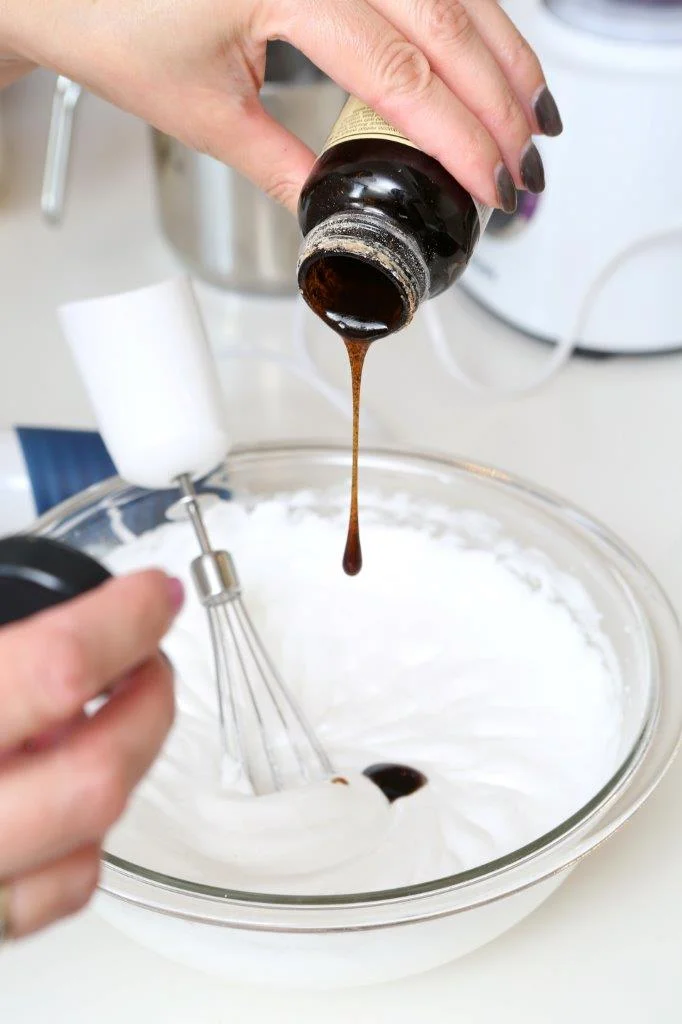
2. Beat the egg whites until light and fluffy, then gradually add the sugar and keep whisking. Finally add the vinegar and whisk until the sugar dissolves (feel between the fingers) and the whites are very stiff. When you turn the bowl around, the meringue holds in the bowl and nothing drips.
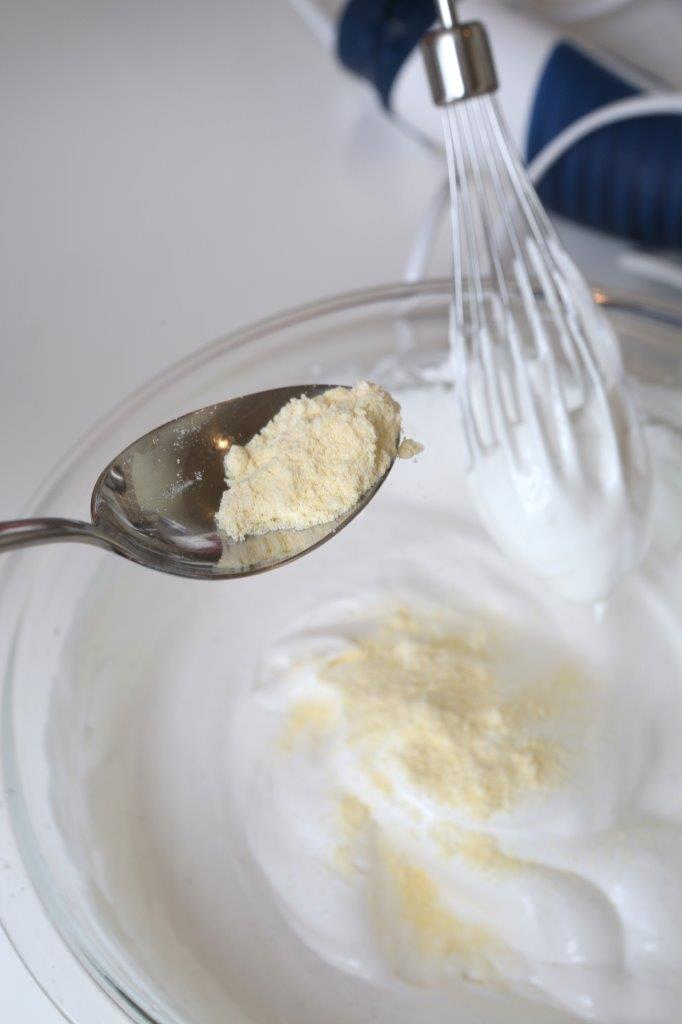
3. Stir in the vanilla paste and corn starch very slowly.
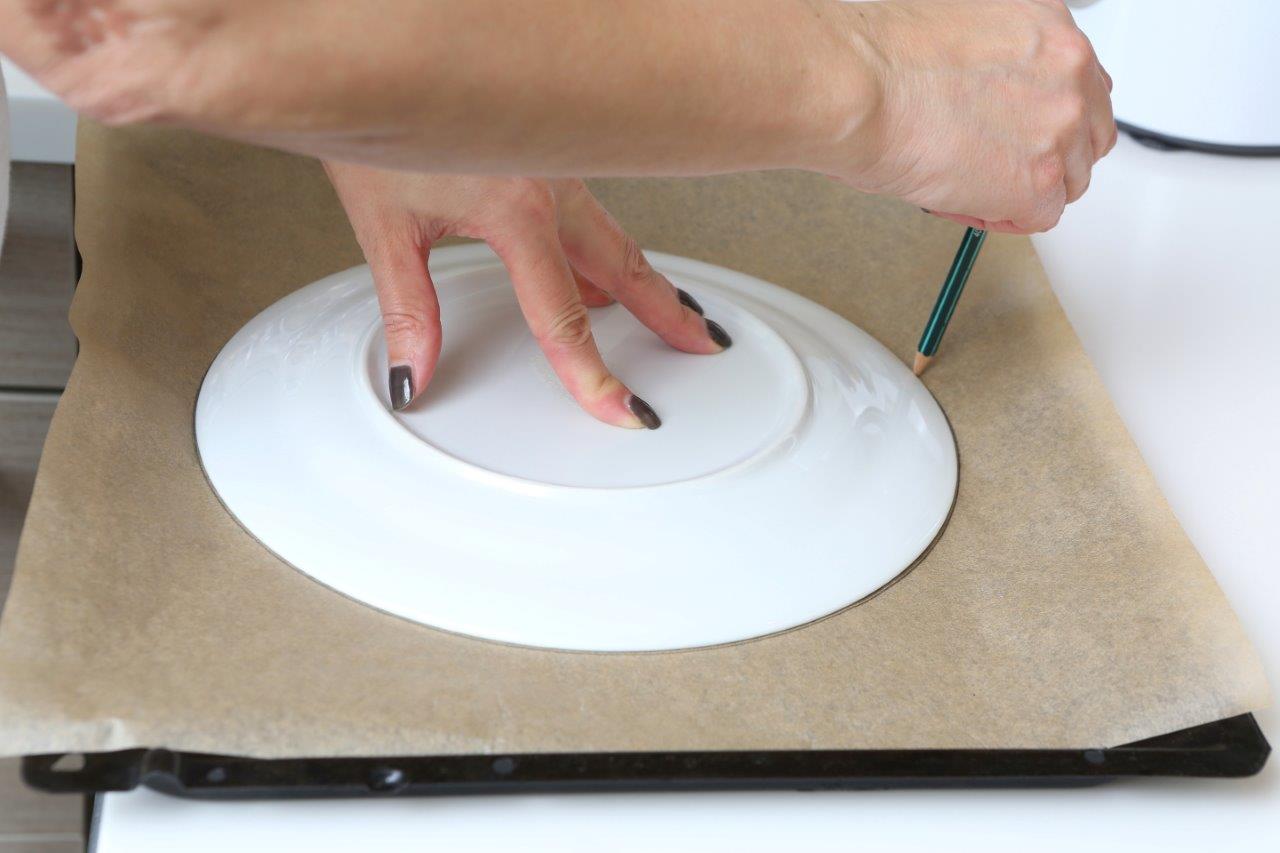
4. Draw a 20-22 cm circle on a baking sheet. Turn the sheet over so you can use the circle as a baking form.
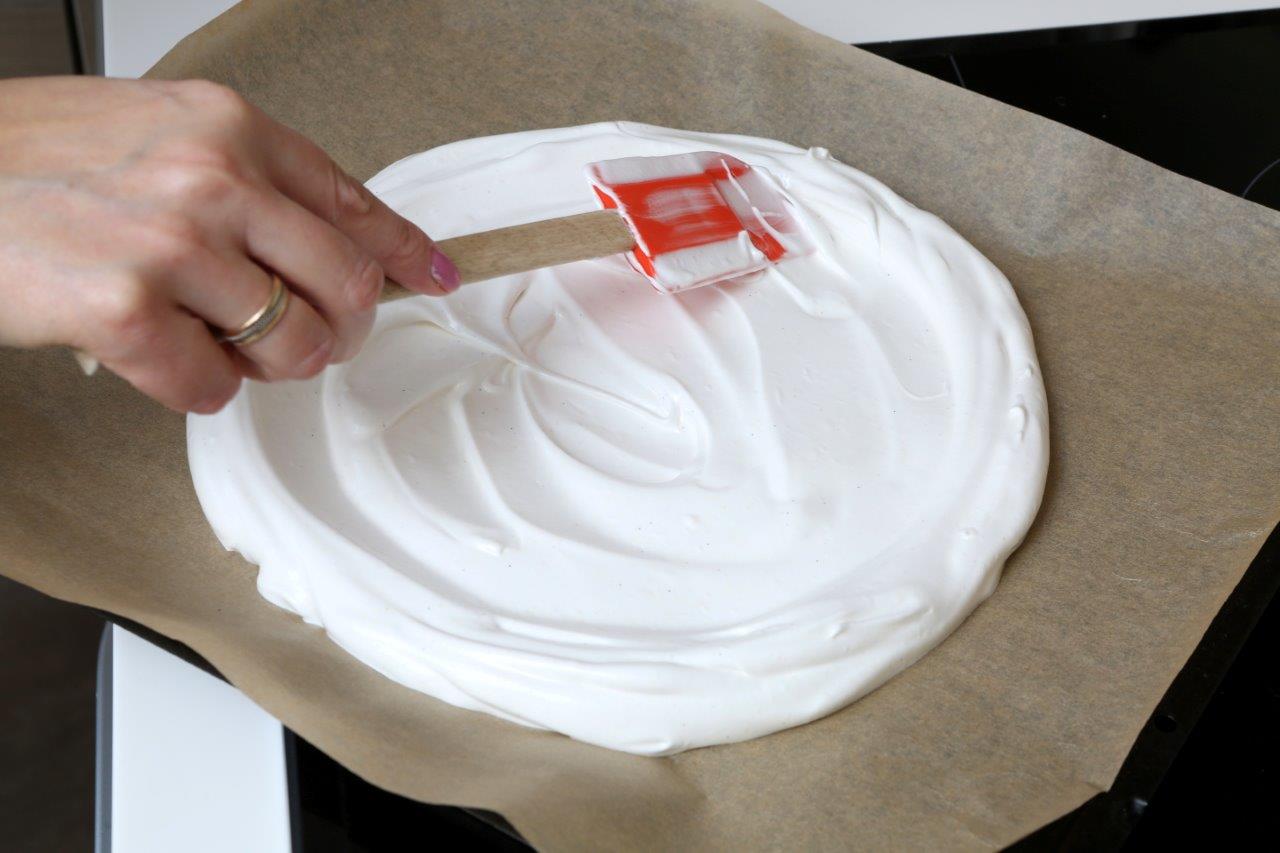
5. Place the meringue in the center of the circle and spread it evenly around the circle. Create a bit higher edges so that it is easier to hold the cream when baked.
6. Bake in the middle rack of the oven for about 70 min. The meringue will turn a slightly cream color. Once done baking, turn off the oven and leave a small crack open (put a spoon in the door, just so the hot air can escape). Leave the meringue to cool completely, about 2h. This can be done the day before as well.
Make the cream
7. When the meringue has cooled, and shortly before serving the pavlova, start preparing the cream.
8. Using an electric mixer beat whip the heavy cream until it starts doubling in size. Then gradually add the sugar and keep beating until nice and gentle peaks form. Add the vanilla. Be careful not to over mix.
Assemble the cake
9. Gently remove the meringue from the baking sheet and transfer to the plate or stand you will be serving it on.
10. Spread the cream on top of the meringue evenly.
11. Decorate generously with seasonal berries.
Recipe: Ārija Avota
Photo: Ieva Andersone
Published: Ievas Virtuve, santa.lv


Peach galette
This is a great dessert for the summer season! When gardens and the woods are full of berries and fruit, it is time to make this galette.
A galette is basically the very origin of a classic pie- just without the use of that perfectly round pie tin.
The peach galette isn’t very sweet, you can definitely add more sugar to the recipe if you are feeling up to it. It is very juicy and with nice pieces of fruit that dance in the mouth. The dough is light and a slightly crumbly- and it pairs perfectly together with any other seasonal fruit, like plums, blueberries or apples. If you decide to try this recipe with nectarines, you can skip the part of blanching and peeling the skins off.
For the filling
700 g peaches, approximately 5
40 g sugar
40 g light brown sugar
1 tsp vanilla paste or sugar
½ tsp ground cinnamon
Pinch of salt
the peel of 1 lime, grated
2 tbsp corn starch
1 tsp butter
For the dough
200 g all purpose flour, 1/3 can be replaced with whole grain flour if desired
160 g unsalted butter, cold
80 ml ice cold water
Pinch of salt
1 tbsp sugar
Optional: a handful of berries like currants, blueberries, raspberries etc.
Make the dough
1. In a large bowl or on a clean counter surface stir together the flour, sugar and salt.
2. Cut the cold butter into 2-3 cm large cubes and put it in the flour mixture. Start by flattening the butter cubes and then slowly kneading the dough, add the ice cold water and knead until the dough holds together but is still flaky. No need to over mix.
3. Wrap the dough in plastic wrap and refrigerate for at least 30 min.
Make the filling
4. Blanch the peaches. Boil water and pour it immediately over peaches placed in a deep bowl or pot. Drain the water a minute later and rinse peaches in cold water.
5. Peel the skin off the peaches and cut them into 1 cm segments, place them in a bowl and cover with sugar, salt, cinnamon, vanilla and corn starch. Mix together.
Assemble the galette
6. Preheat the oven to 200 degrees (celsius).
7. Sprinkle a baking sheet with flour and flatten the refrigerated dough on it. Use a rolling pin to roll out the dough in a round shape about 5 mm thick.
8. Place the peaches in the middle of the dough circle and spread out evenly, leaving 5-6 cm free from the edges.
9. Fold the edges of the dough to the center and press together the folds so they hold together better and don’t open when baking.
10. Put small clumps of butter on top of the peaches and the sides of the galette and then sprinkle brown sugar over everything.
11. Place the galette in the middle of the oven and bake for 40-45 min. The bottom must be golden brown too, not only the top, so be sure to check before removing from oven.
12. Remove from the oven and top off with fresh berries, let it all rest for 15 min.
Recipe: Ārija Avota
Photo: Ārija Avota

Grilled cheese sandwich
Ah, the grilled cheese sandwich. So simple but if prepared correctly can really blow your mind!
If you have seen the movie Chef with Jon Favreau, you will understand what I am talking about…
The bread, soaked in the butter all golden and crunchy, the cheese, melted and creamy, running like hot lava once the sandwich is cut in half. Just heaven :)
4 slices of bread made for toasting
80 g Cheddar cheese, cut in thin slices (can be mixed with Gruyere and Parmesan)
2 tbsp soft butter
Serves 2 people
1. Cover all the slices of bread evenly with butter, be generous.
2. Using a cast iron pan (or a griddle, if you have one) toast all the slices of bread (buttered side down) keeping an eye on them the whole time.
3. Place the slices of cheese on two of the four pieces of bread, while still cooking. Place the other two pieces of bread on top of the cheese and press down lightly, keep cooking. If the bread starts to brown too fast, turn down the heat. Patience is needed here- the bread needs to cook slowly so the cheese can melt and the toast not burn.
4. Turn the sandwiches over and keep cooking slowly, let the bread soak in the butter on the pan.
5. Keep turning the sandwiches over watching for them not to burn, but waiting for the cheese to melt completely.
6. Once golden brown and ready to be removed from pan, let the sandwiches rest for a few minutes. Cut in half with a sharp knife and serve with a few slices of fresh tomato sprinkled with basil or dill.
Recipe: Ārija Avota
Photo: Oto Avots

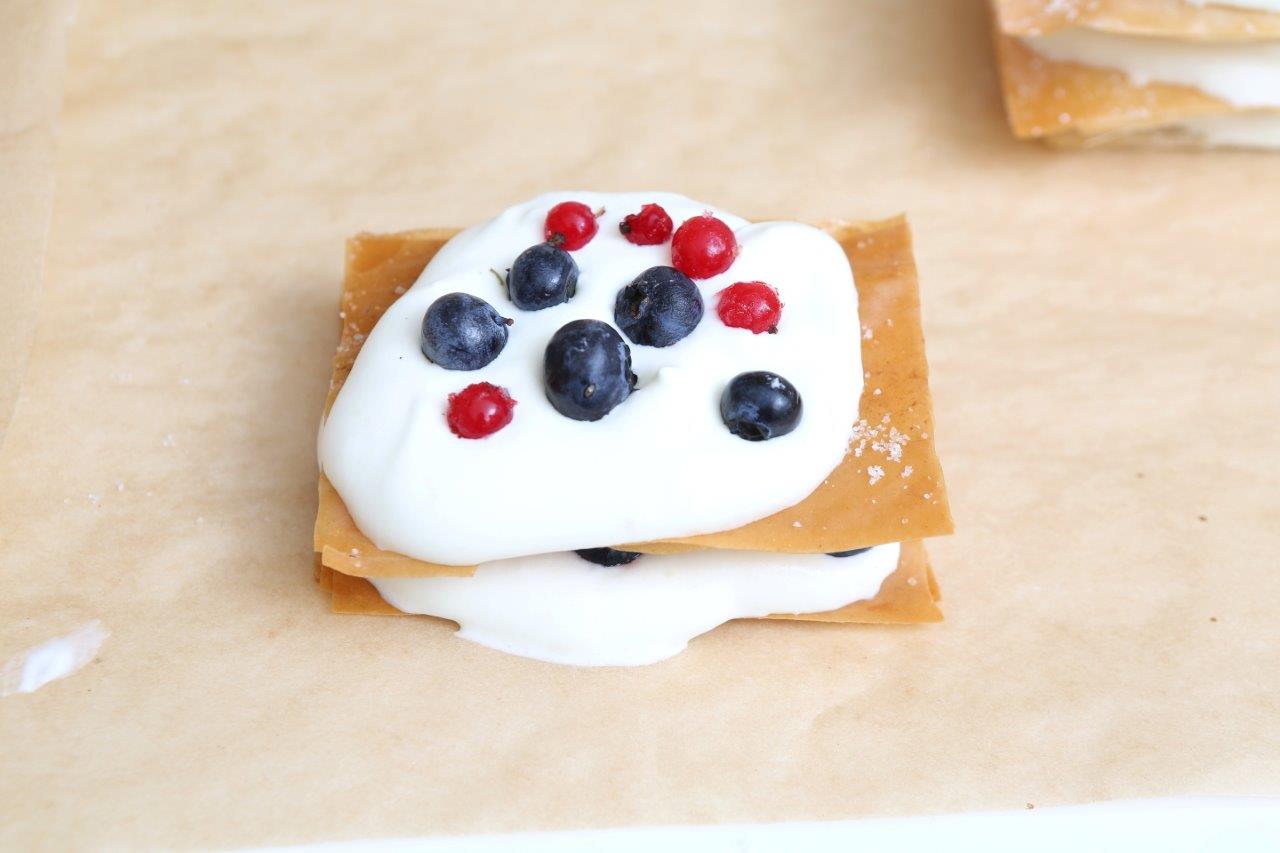
Quick Napoleon cakes with berries
This is a quicker and easier alternative to the well known classic- Napoleon cake. If you are feeling creative and want to make something just beautiful and delicate, definitely try to make this dessert, it is like edible art.
6 sheets of filo dough 20x30 cm (frozen)
6 tsp sugar for sprinkling
2 tbsp unsalted butter, melted
For the cream
400-500 ml heavy cream
6 tsp sugar
Vanilla paste or sugar
2 tsp orange liqueur (or 1 tsp brandy or cognac)
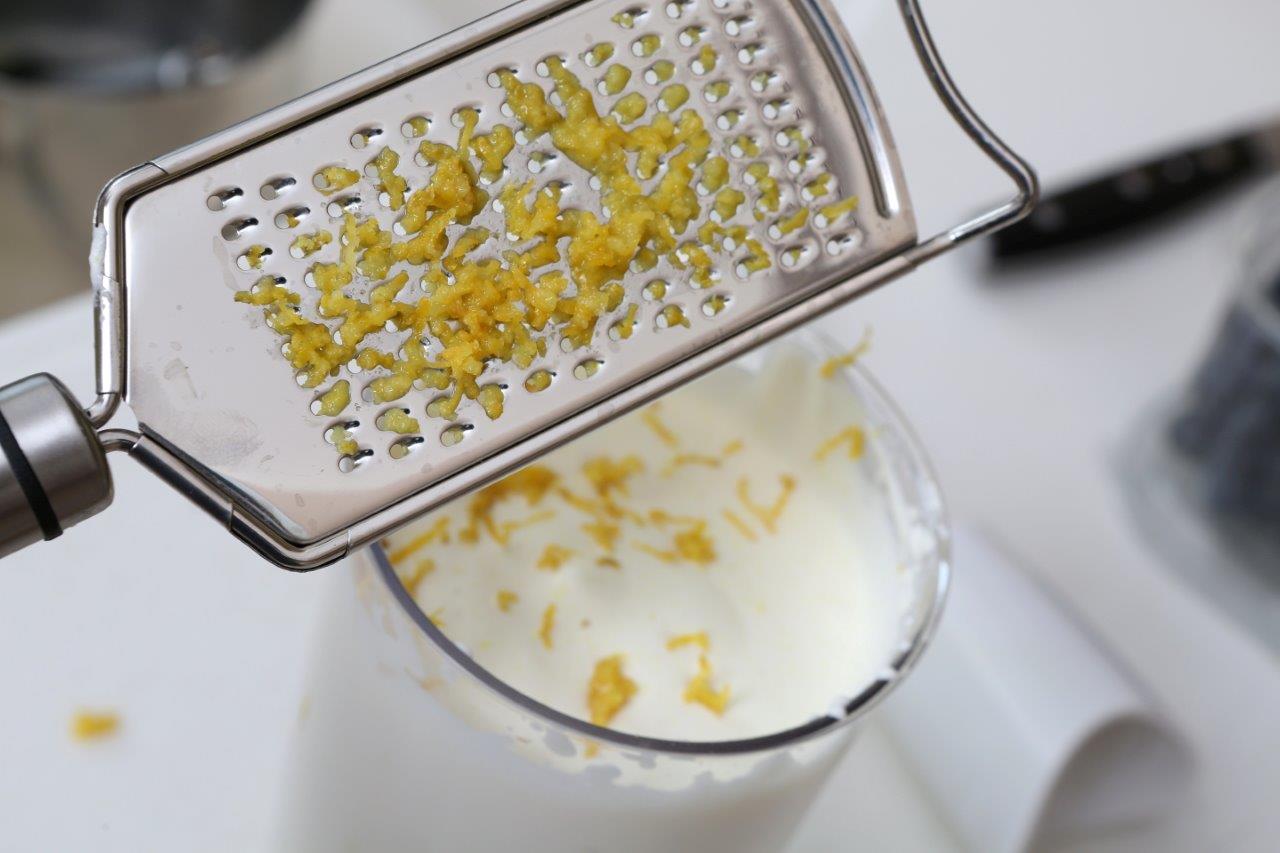
the peel of 1 lemon, grated
300 g seasonal berries- raspberries, blueberries, currants etc.
Makes 6 cakes
1. Defrost the filo dough as instructed on packaging.
2. Preheat the oven to 185 degrees (celsius) and melt the butter.
3. Place baking sheets on two shallow oven pans and set aside.
4. Take 6 filo dough sheets and stack them on top of each other and cover them with plastic wrap and a moist towel.
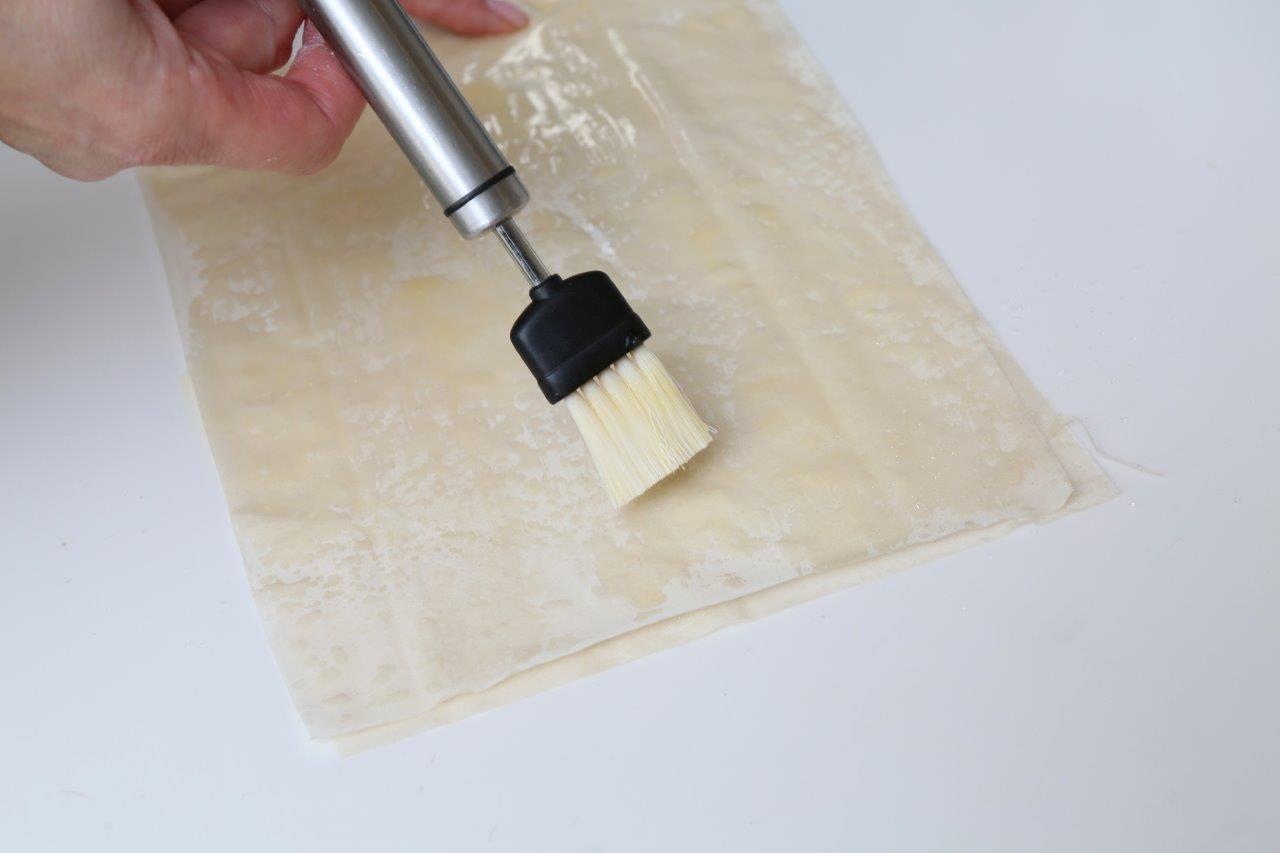
5. Take the first sheet of dough and evenly sprinkle with 1 tsp of sugar. Lightly press the sugar crystals in the dough.
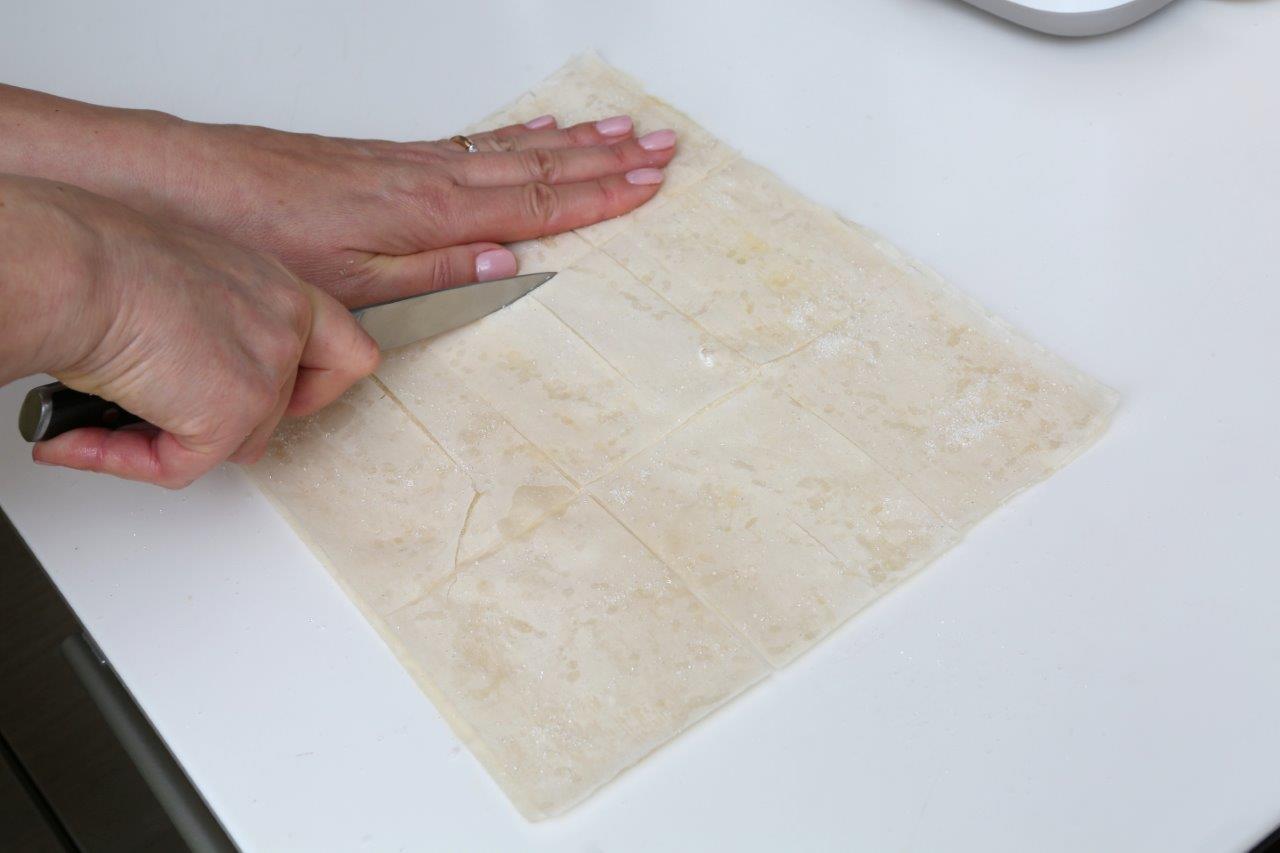
6. Stack the next sheet on top of the first one and use a brush to cover it with the melted butter. Then sprinkle with 1 tsp of sugar like the first one. Stack the third sheet on top and sprinkle the sugar on it, press down lightly so all sheets hold together properly. Then cut the sheets in 9 even pieces. They won’t hold together too well, but that’s ok.
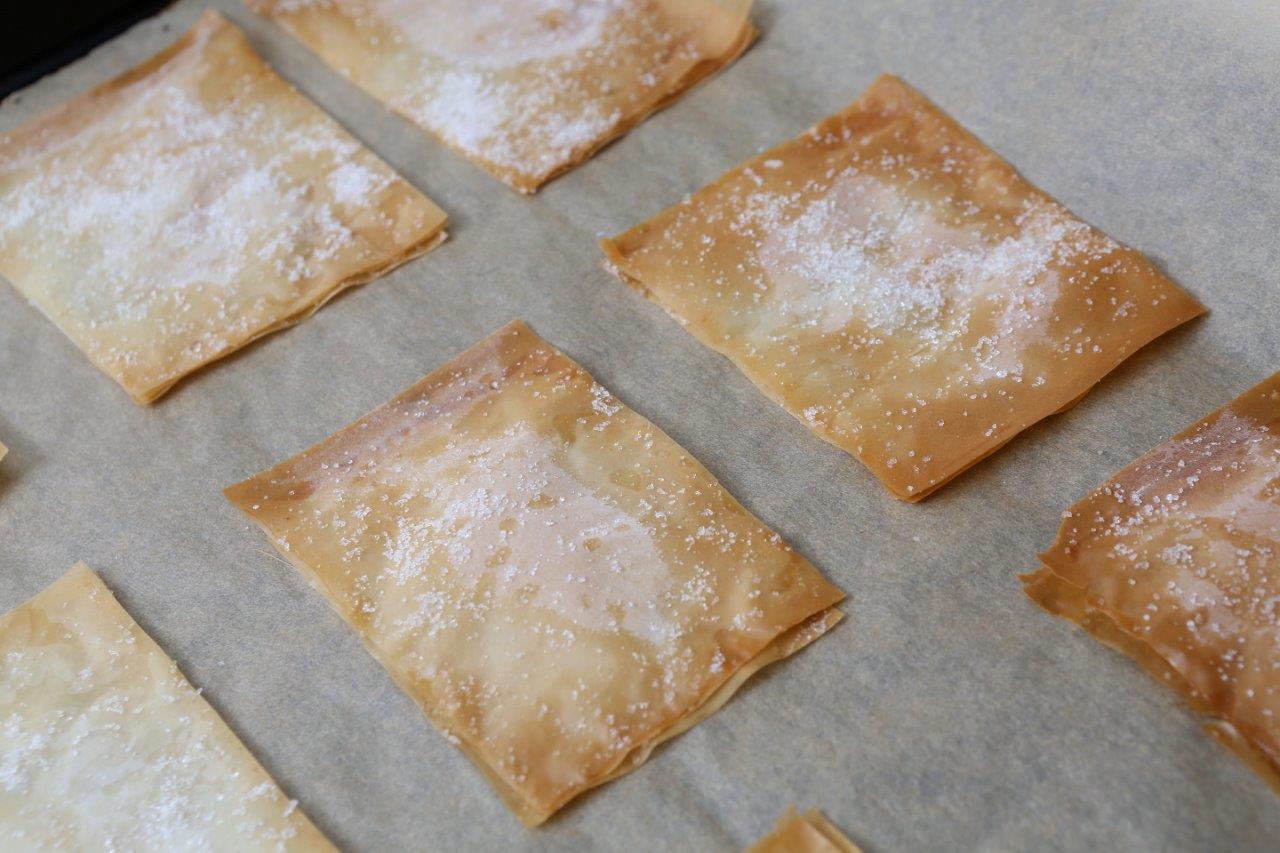
7. Place all the pieces on the prepared pans and put them in the oven to bake for 5-7 min until golden brown. Ovens can be different so keep an eye on the pastry so it doesn’t burn.
8. Repeat steps 6 and 7 to the rest of the 3 pastry sheets.
9. When all sheets are baked (should make 18) set aside to cool.
10. Once the pastry has cooled, start whipping up the cream. Use an electric mixer and clean bowl to beat the heavy cream, only when it is starting to double in size, add the sugar, liqueur, vanilla and lemon peel to whisk until everything is soft and fluffy, not stiff. Do not over mix.
Assemble the cakes
11. Each cake will need 3 of the baked filo squares.
12. Spread a tbsp of cream on the first square and place some berries on top. Then stack the second square on that and do the same. Sandwich the third filo square on top and spread half a tbsp of cream and decorate with more berries.
The cakes can be made freely as desired, there are no rules. If you want them to still be a little crunchy, serve immediately as they will become softer later.
Recipe: Ārija Avota
Photo: Ieva Andersone (IG: photoievaandersone)


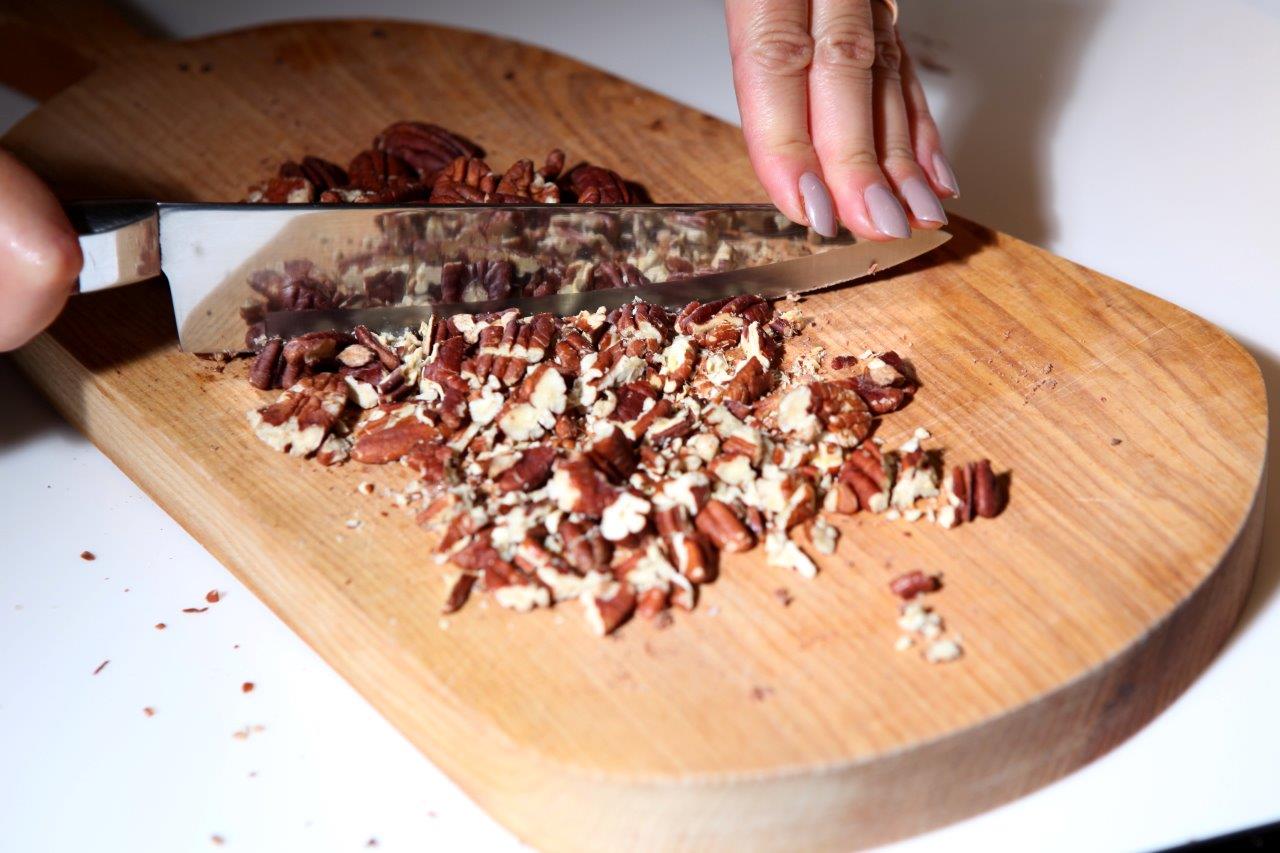
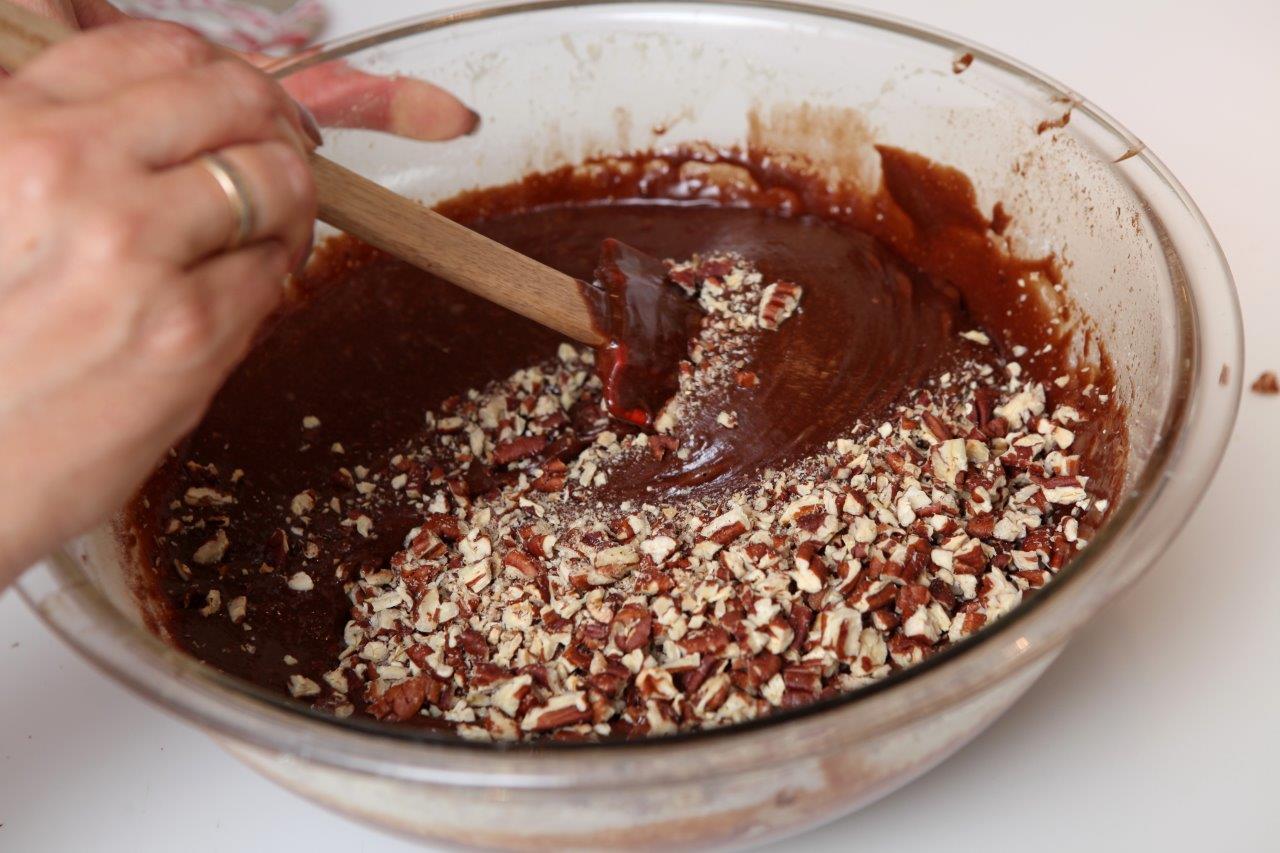
Triple chocolate fudge cookies with pecan nuts
This is like a miniature cake in the form of a cookie!
These cookies differ from the kind we are used to- they are very soft and chewy in the middle. This is because the dough is made similarly to that of a cake instead of a classic cookie. And these really are super chocolatey. Even the biggest chocolate lover will be satisfied with this.
120 g pecan nuts (or walnuts)
60 g all purpose flour
1 tsp baking powder
¼ tsp salt
1 tsp instant coffee powder (this is optional, but it gives a deeper flavor)
450 g dark chocolate, melted (cocoa content must be at least 50%)
60 g unsalted butter
250 g sugar
4 large eggs
1 tsp vanilla paste or vanilla sugar
100 g dark chocolate, chopped (or chips)
100 g milk chocolate, chopped (or chips)
Makes 24 large cookies
1. Preheat the oven to 180 degrees (celsius)
2. Bake the pecan nuts in the oven for about 8 min until fragrant, set aside to cool. Turn the oven off for now.
3. Melt the 450 g of dark chocolate and the butter (be careful not to burn). When melted, set aside to cool a little.

4. In a small bowl, mix together the dry ingredients- flour, baking powder, salt and instant coffee powder.
5. In a large bowl mix the eggs with sugar for 5 min using a mixer. Add the vanilla and melted chocolate with butter, stir until all is combined well.
6. Add the dry ingredients and stir until incorporated. Don’t over mix.
7. Chop the remaining chocolate into chunks, then do the same with pecan nuts. Add these to the cookie mixture.
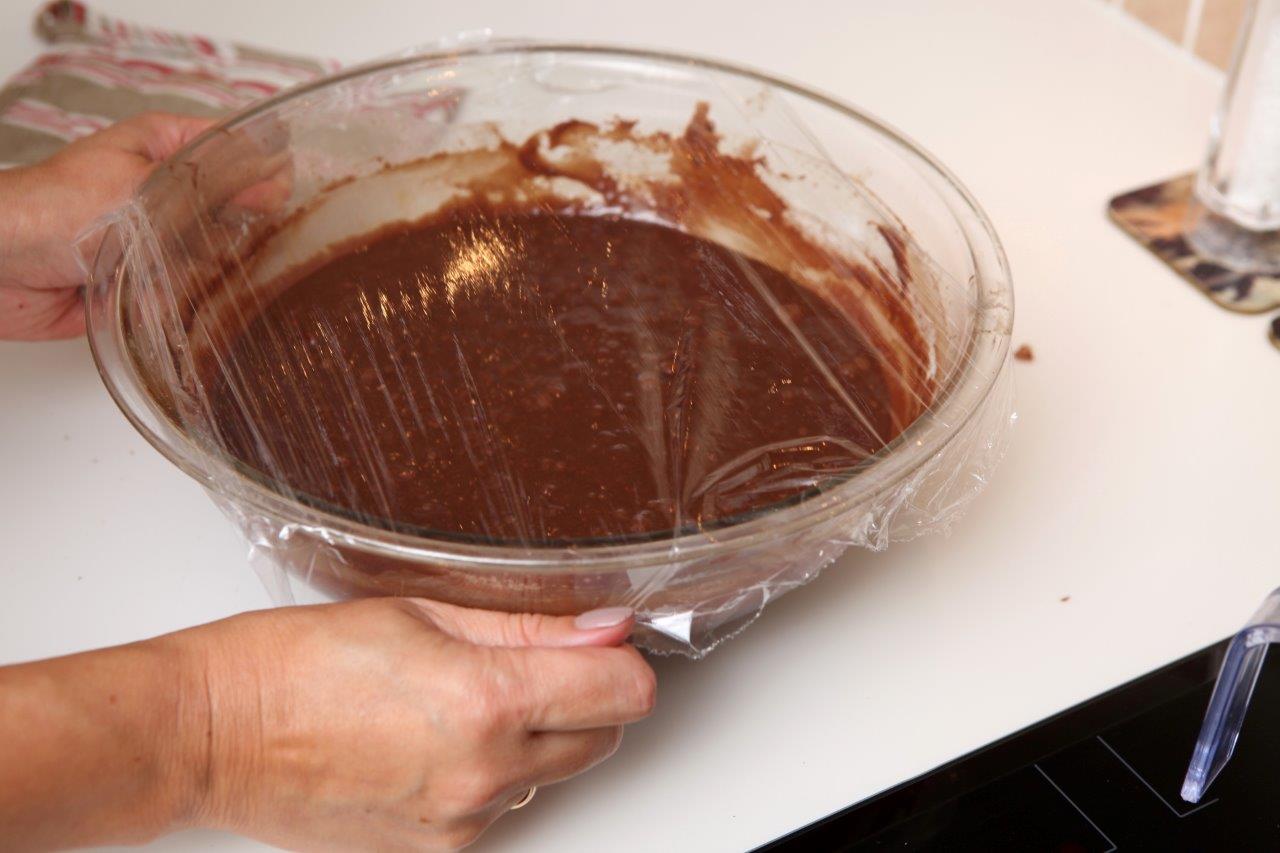
8. Cover the bowl and place it in the fridge to cool and set a little for 30 min (the dough could be slightly runny).
9. Meanwhile heat the oven again to 180 degrees (celsius). Cover the baking tray with paper.

10. Using a table spoon or ice cream scoop, place the dough on the baking sheet 8 cookies at a time (they might melt together if not enough room is left). Shape the form of the cookie with wet fingers.
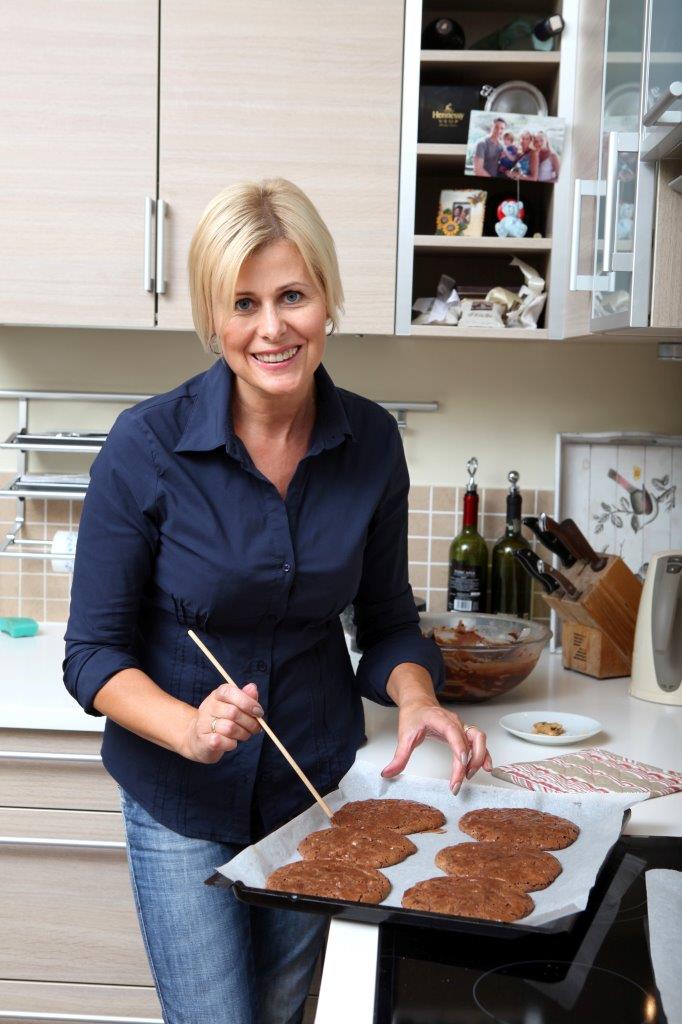
11. Bake for approximately 11-13 min (depending on your oven and the size of the cookies) in the middle of the oven. The cookies are ready when they still look very soft, but have cracked on the surface. They will set when cooled- only then should you take them off the baking sheet to avoid any breaking.
Recipe: Ārija Avota
Photo: Ieva Andersone (IG: photoievaandersone)
Published: Ievas Virtuve, santa.lv